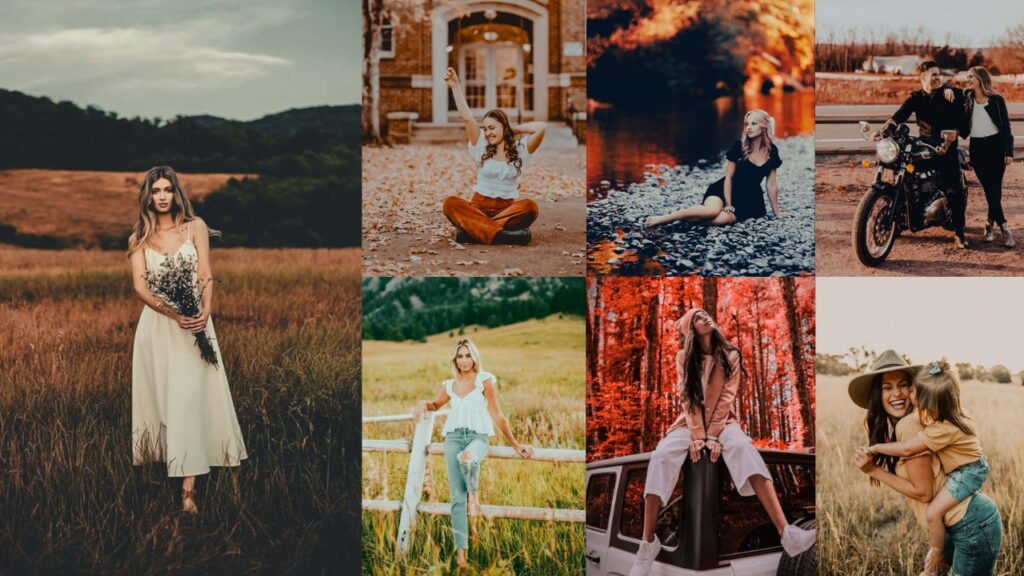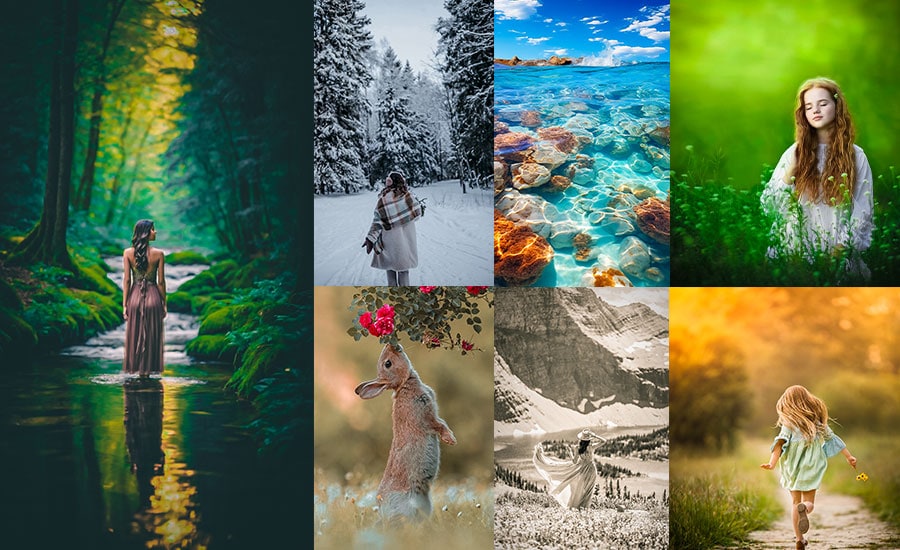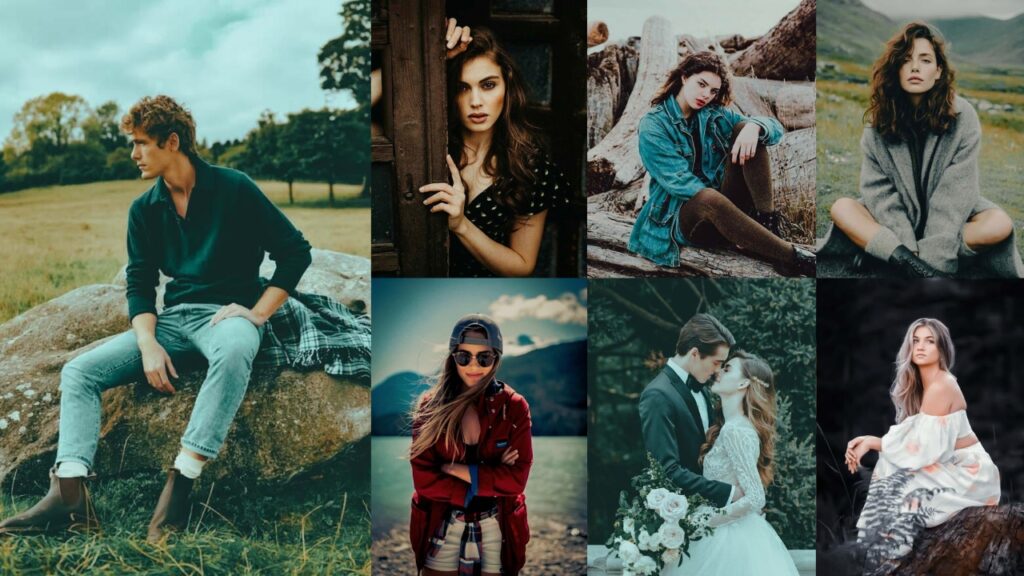
Every great photo has a feeling behind it: a mood that pulls the viewer in before they’ve read a single caption. That’s exactly what cinematic presets do: they transform a technically correct photo into a visually compelling story. Whether you shoot portraits, street scenes, landscapes, or travel moments, a well-chosen cinematic preset can elevate your work from good to unforgettable.
In this collection, we’ve curated 150 of the best free cinematic Lightroom presets, organized by style so you can find the exact look you need fast. Each preset comes with a practical breakdown of what it does, which types of photography it suits best, and how to fine-tune it for your shots. Below the collection, you’ll also find a step-by-step installation guide and answers to the most common questions we get.

Pauline Jackson
I design Lightroom presets that help you get polished results without spending hours editing.
150 Cinematic Lightroom Presets Free Download
Below you’ll find all 150 presets organized into 20 style categories. Each section includes a breakdown of the preset settings and a pro tip you won’t find anywhere else.
- Pauline Jackson
- 1. Classic Cinematic Preset
- 2. Moody Cinematic Preset
- 3. Teal and Orange Cinematic Preset
- 4. Desaturated Cinematic Preset
- 5. Matte Cinematic Preset
- 6. Black & White Cinematic Preset
- 7. Epic Cinematic Preset
- 8. Vintage Cinematic Preset
- 9. Cinematic Street Presets
- 10. Cinematic Light Preset
- 11. Serum Cinematic Presets
- 12. Dark Cinematic Presets
- 13. VSCO Film Presets
- 14. 35mm Film Preset
- 15. Disposable Film Preset
- 16. Fuji Film Simulation Presets
- 17. Kodak Film Presets
- 18. Cinematic Green Presets
- 19. Dramatic Presets
- 20. Brighten Cinematic Presets
- 21. Creamy Cinematic Presets
- 22. Warm Brown Cinematic Presets
- 23. Cinematic Red & Sepia Preset
- 24. Cinematic Wedding Preset
- 25. Cinematic Night Preset
- Desktop Lightroom Classic
- Lightroom Mobile (iOS & Android)
1. Classic Cinematic Preset
The Classic Cinematic is built on a foundation of deep shadows, rich midtones, and subtle film grain, delivering that timeless, old-Hollywood aesthetic. Unlike modern over-saturated edits, this look is restrained and intentional. It works on almost any subject because it enhances mood without distorting reality.
Light Panel: Exposure −10% | Contrast +20% | Highlights −10%.
Color Panel: Temp +10% | Vibrance +15% | Saturation −5%.
Effects Panel: Vignette +15% | Grain +20%.
Detail Panel: Sharpening +15%.
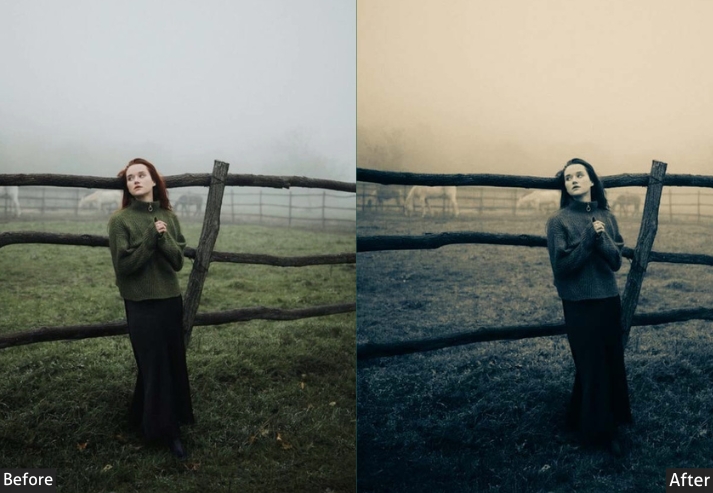
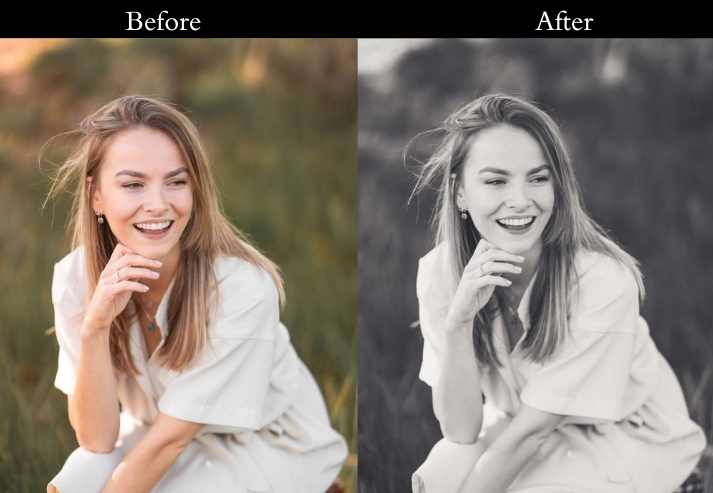
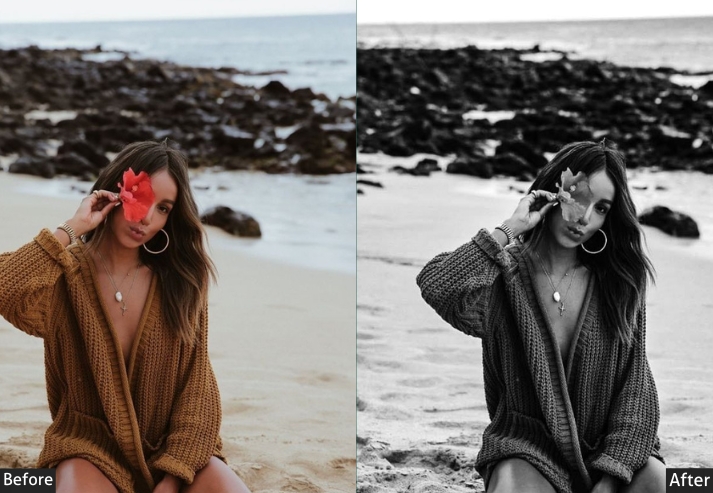
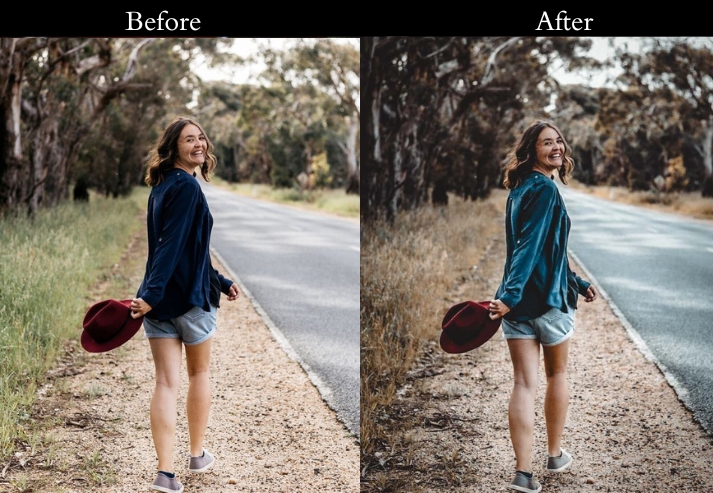
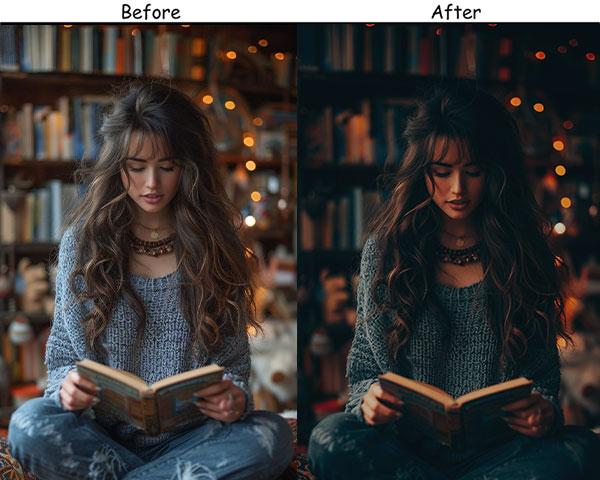
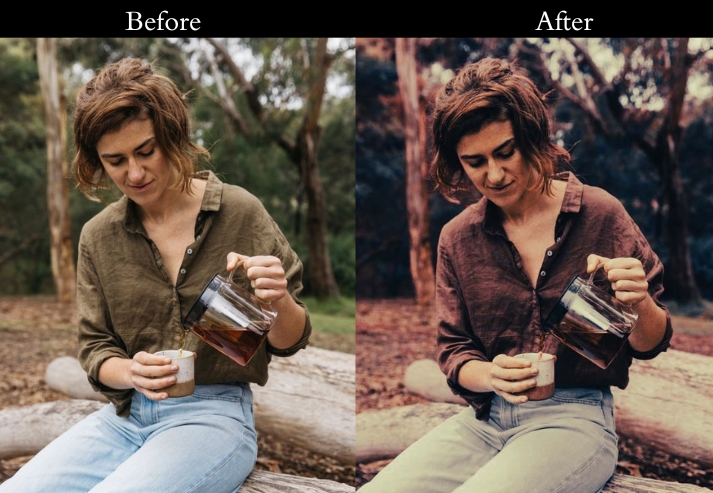
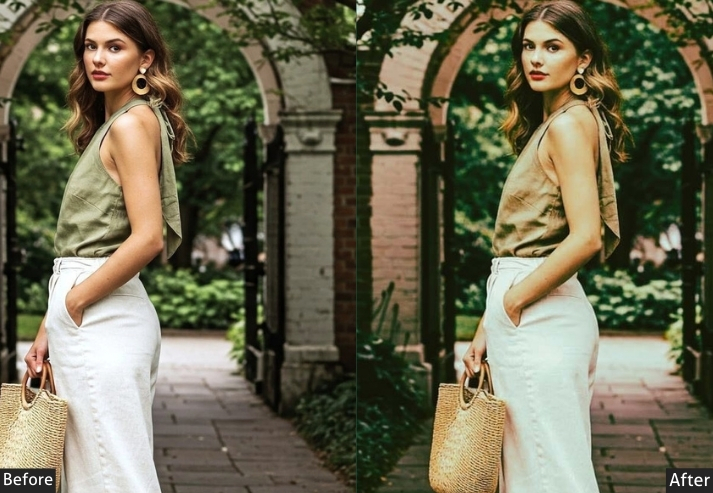
Purpose: timeless, movie-like look.
Best For: Portraits, street photography, and urban landscapes.
Usage: classic film vibe to your photos.
Style: Timeless, rich, and dramatic.
2. Moody Cinematic Preset
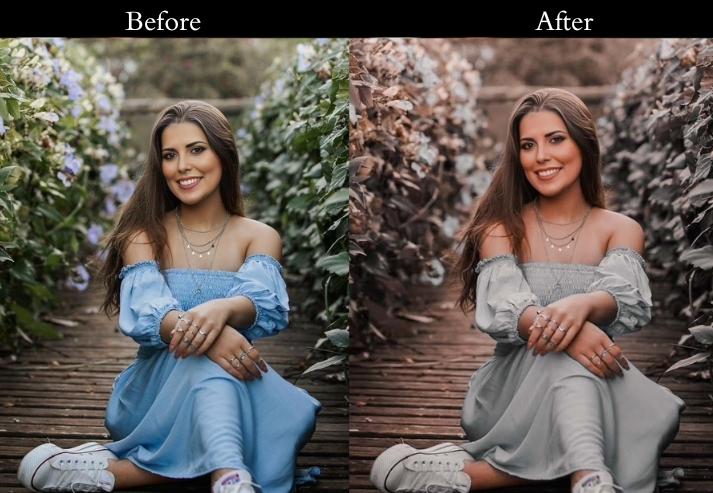
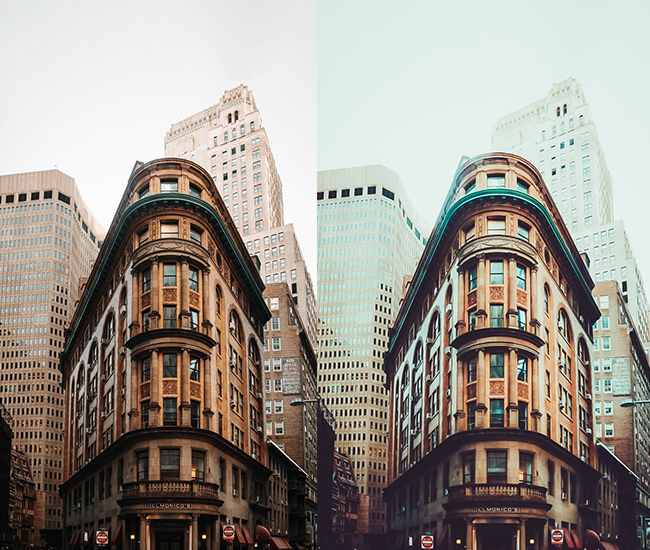
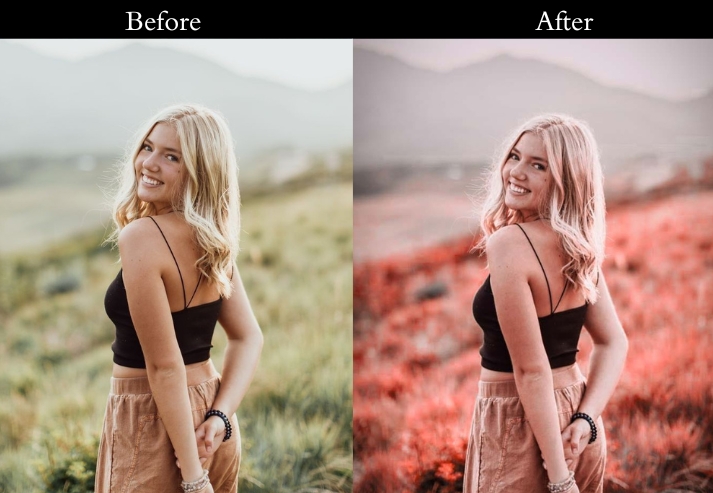
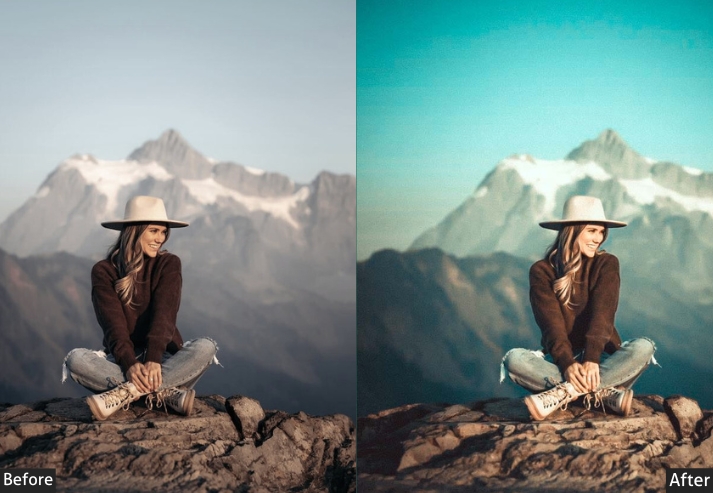
Moody Cinematic goes darker and more atmospheric than Classic. It suppresses highlights aggressively and lifts blacks just enough to prevent pure crushing, giving that signature ‘lifted shadows’ look you see in prestige TV dramas. The blue-leaning temperature enhances the melancholy without going full cold-tone.
Light Panel: Exposure −15% | Highlights −20% | Shadows −25%.
Color Panel: Temp −10% (cool) | Saturation −10% | Vibrance +10%.
Effects Panel: Vignette +25%.
Detail Panel: Sharpening +20%.
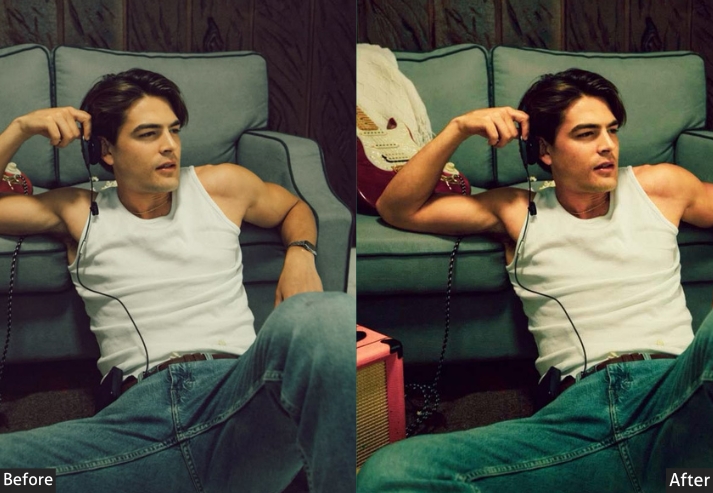
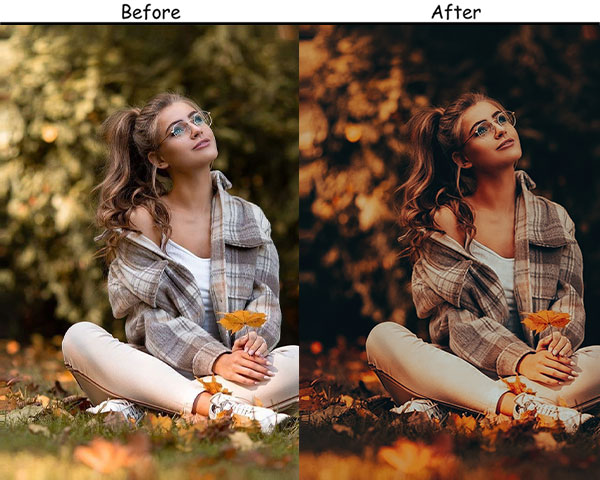
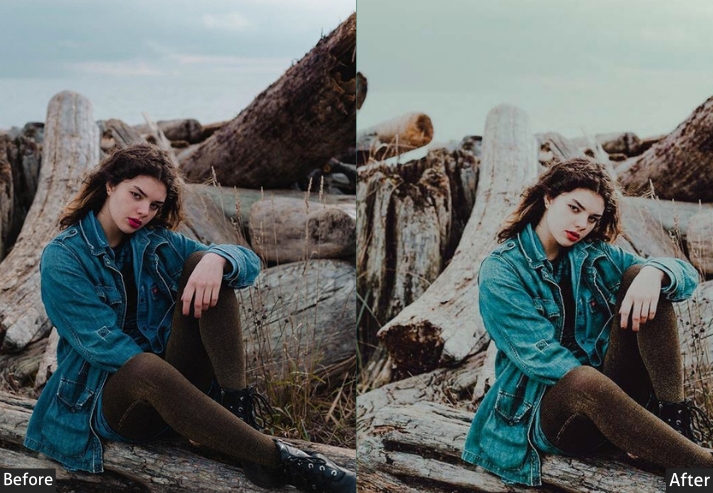
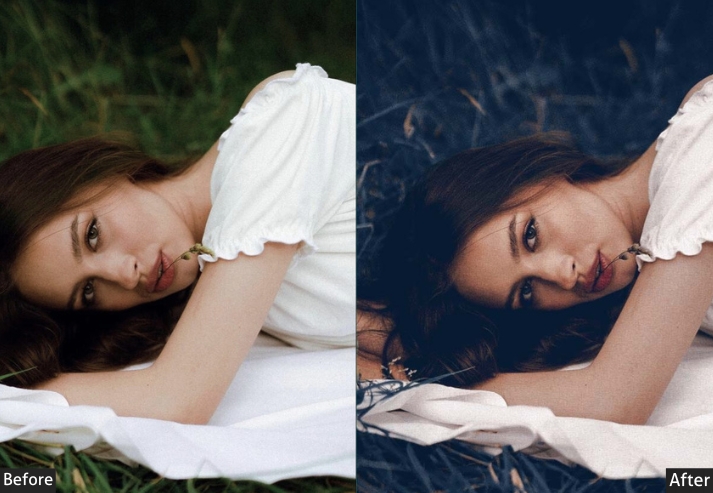
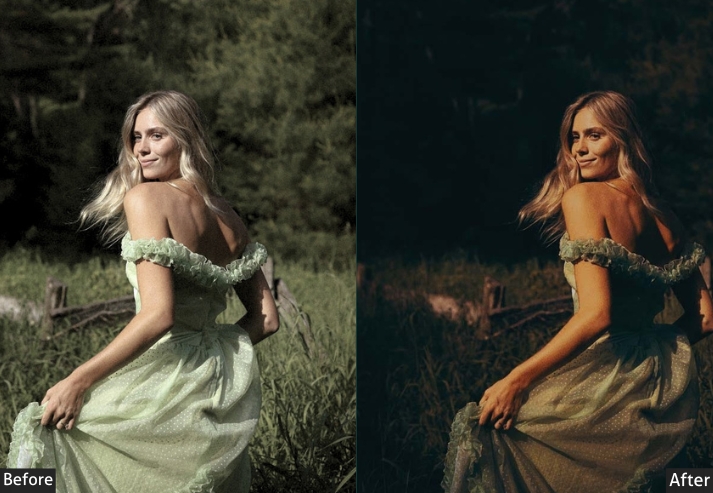
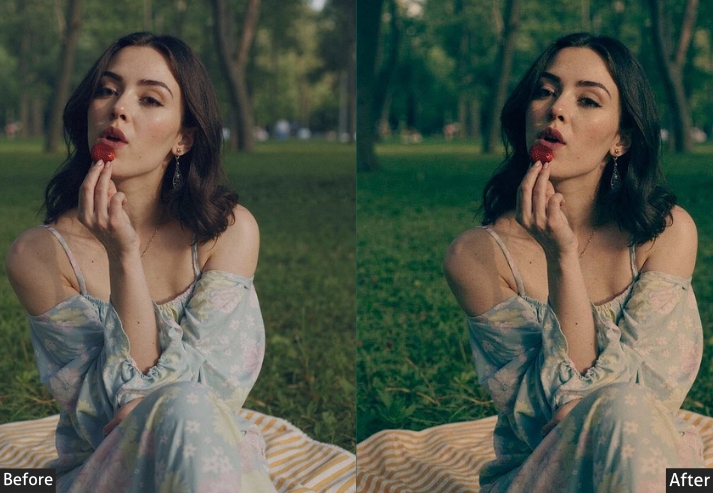
Purpose: drama and intensity.
Best For: Dark portraits, urban scenes, and night photography.
Usage: mysterious, moody atmosphere.
Style: Dark, intense, and mysterious.
3. Teal and Orange Cinematic Preset
The Teal and Orange grade is arguably the most recognizable Hollywood color treatment used in blockbusters from The Dark Knight to Mad Max. The principle is simple: push shadows toward teal and midtones/highlights toward warm orange. This creates a natural skin-tone contrast against cool backgrounds that’s extremely flattering for people photography.
Light Panel: Contrast +25% | Exposure (adjust as needed) | Highlights −10%.
Color Panel: Blue → Teal +25% | Orange +20% (warm) | Vibrance +30% | Saturation −10%.
Effects Panel: Vignette +10%.
Detail Panel: Sharpening +20%.
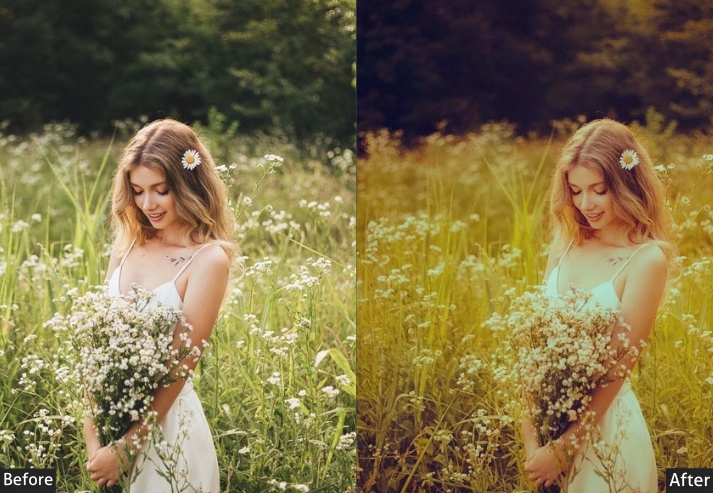
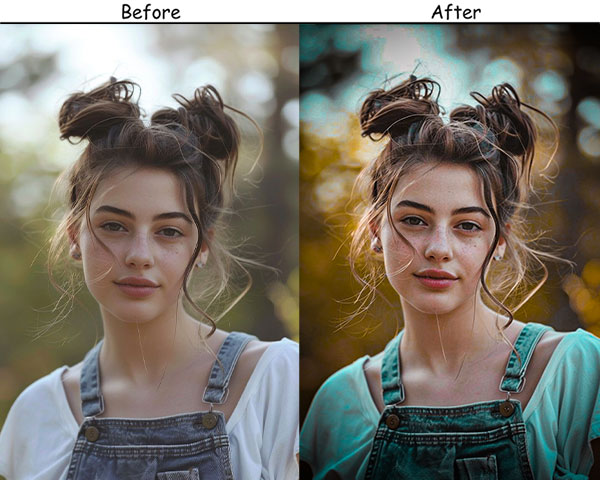
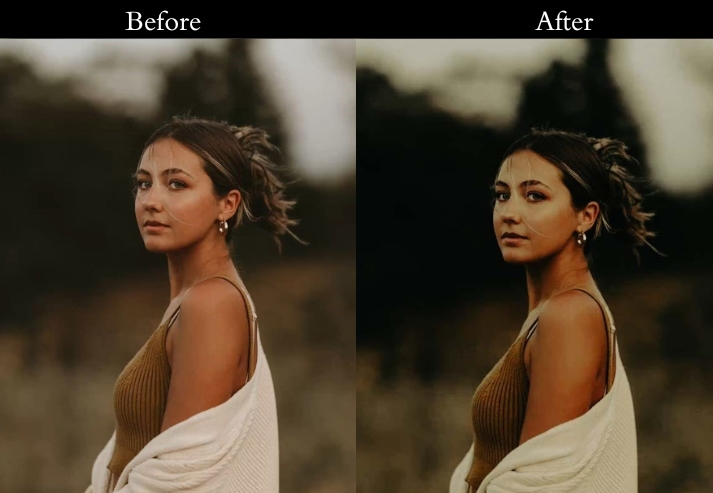
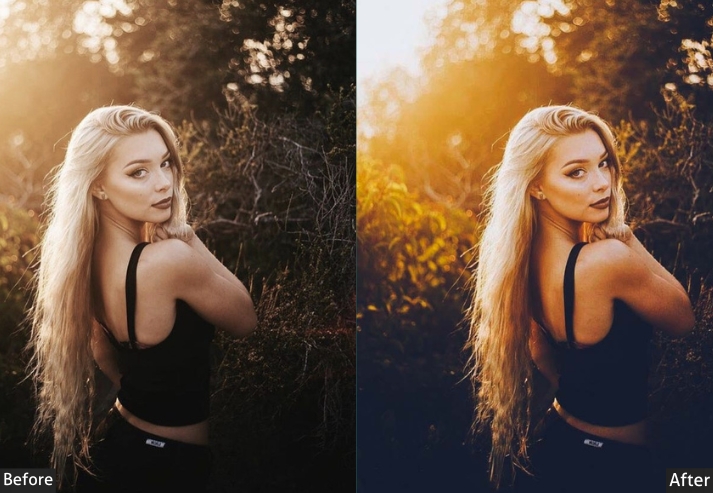
Purpose: a bold, vibrant look with strong color contrasts.
Best For: Outdoor shots, cityscapes, and fashion photography.
Usage: striking, cinematic look.
Style: Bold, vibrant, and dynamic.
4. Desaturated Cinematic Preset
The Desaturated Cinematic look draws inspiration from Nordic and Scandinavian cinema: cold, quiet, and precise. By muting colors to near-grey while keeping detail and texture razor-sharp, this preset lets composition and light do all the heavy lifting. The result is sophisticated and editorial.
Light Panel: Exposure −5% | Contrast +15% | Highlights −10%.
Color Panel: Saturation −30% | Vibrance +5% | Temp −5% (cool).
Effects Panel: Vignette +10%.
Detail Panel: Sharpening +15%.
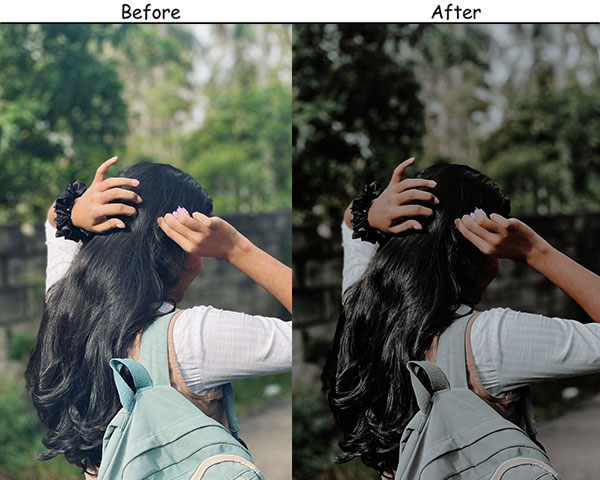
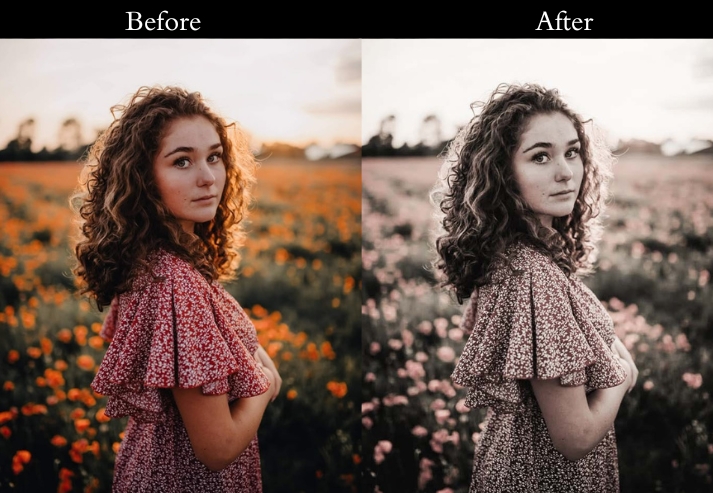
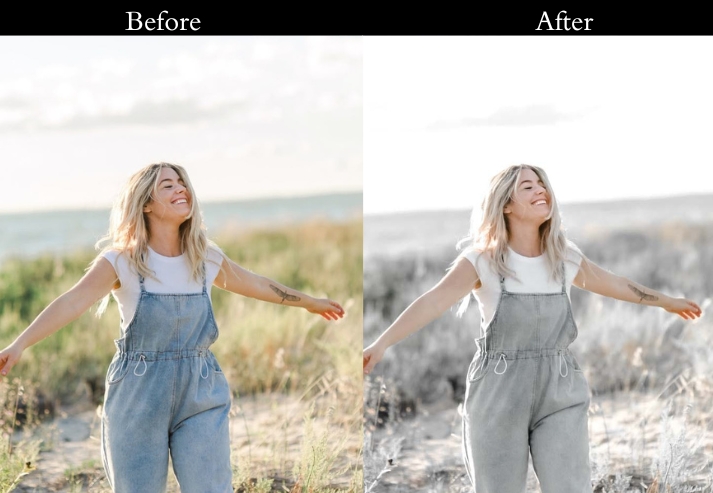
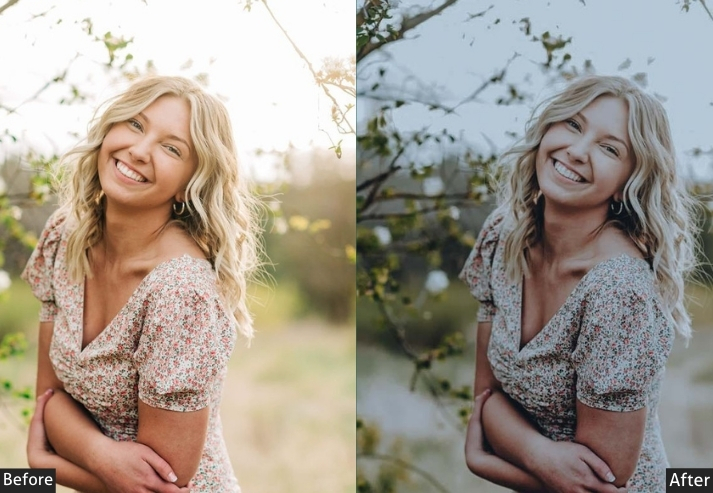
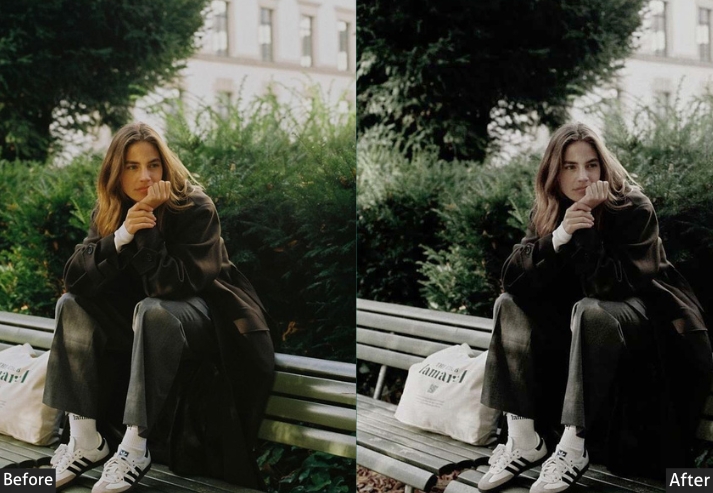
Purpose: a modern, stylish look with muted colors.
Best For: Portraits, editorial photography, and fashion.
Usage: cool, understated vibe.
Style: Muted, stylish, and modern.
5. Matte Cinematic Preset
The Matte finish is achieved by lifting the black point, preventing shadows from going fully black. This gives images a ‘faded’ quality associated with film stocks like Kodak Portra. The effect is inherently nostalgic and soft, which is why it’s become the default aesthetic for wedding and lifestyle photography.
Light Panel: Contrast −20% | Exposure +5% | Shadows +15%.
Color Panel: Saturation −15% | Vibrance +10% | Temp +5% (warm).
Effects Panel: Vignette +15%.
Detail Panel: Sharpening +10%.
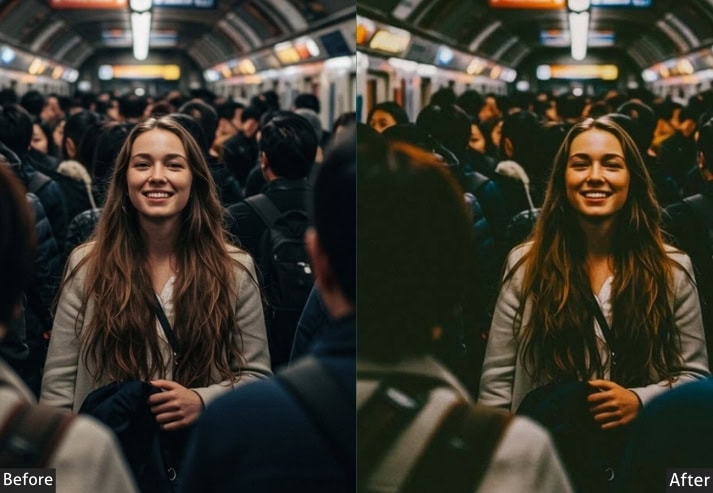
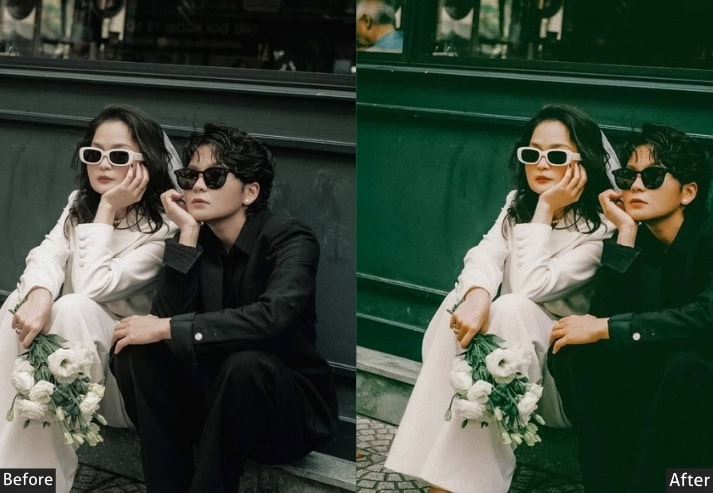
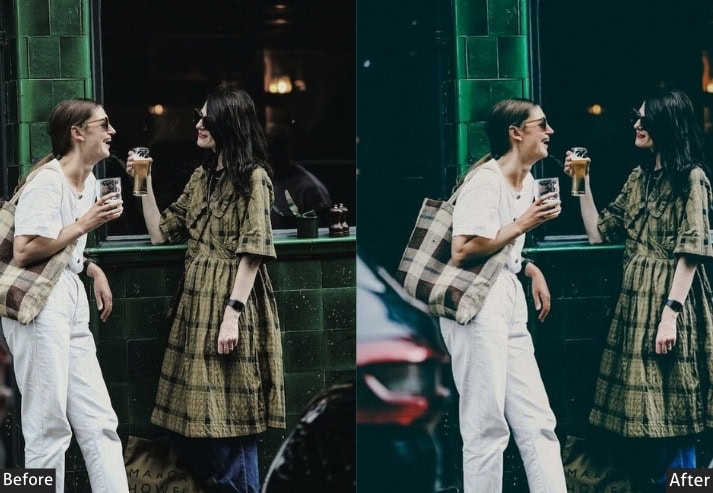
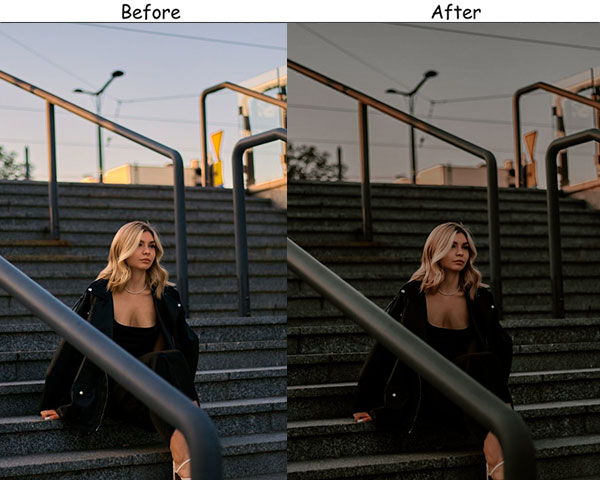
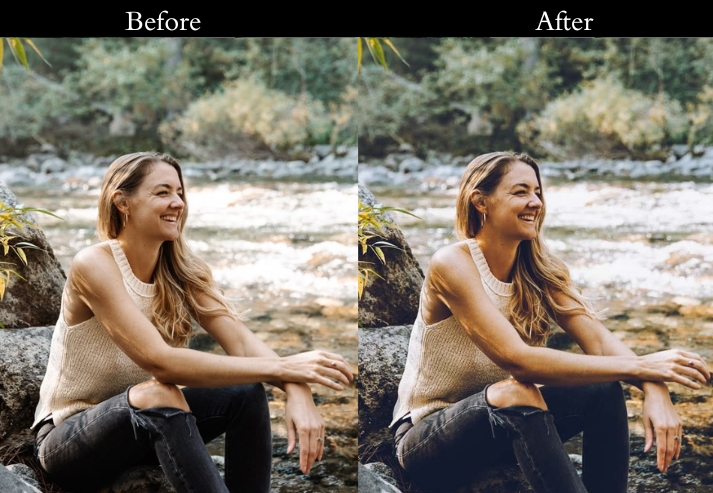
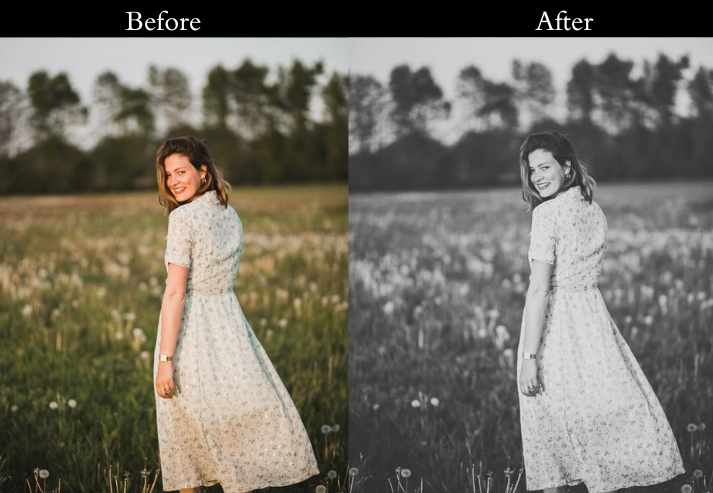
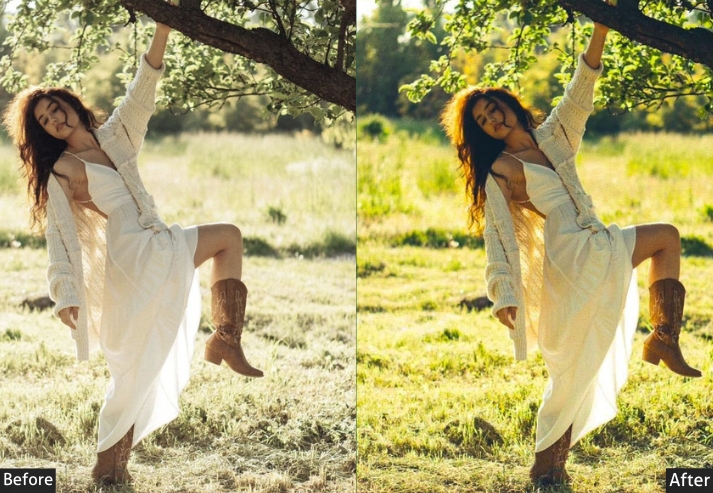
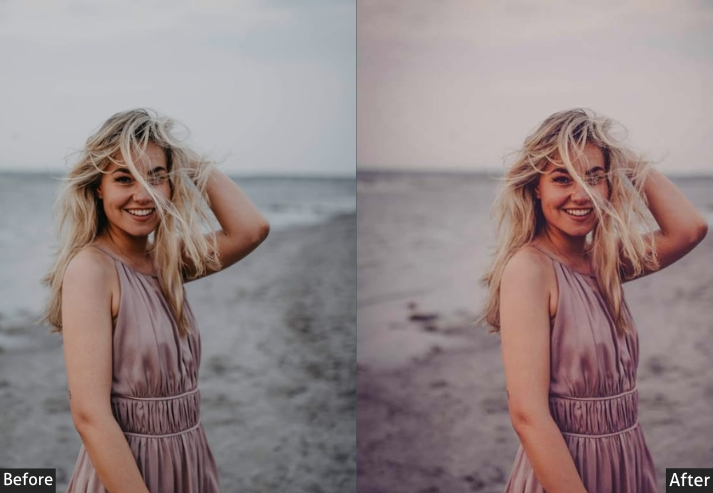
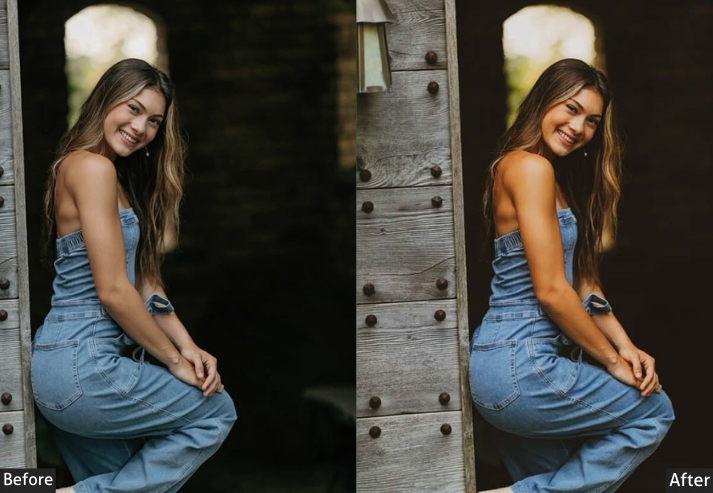
Purpose: soft, nostalgic, and filmic look.
Best For: Portraits, weddings, and lifestyle photography.
Usage: gentle, timeless feel.
Style: Soft, matte, and nostalgic.
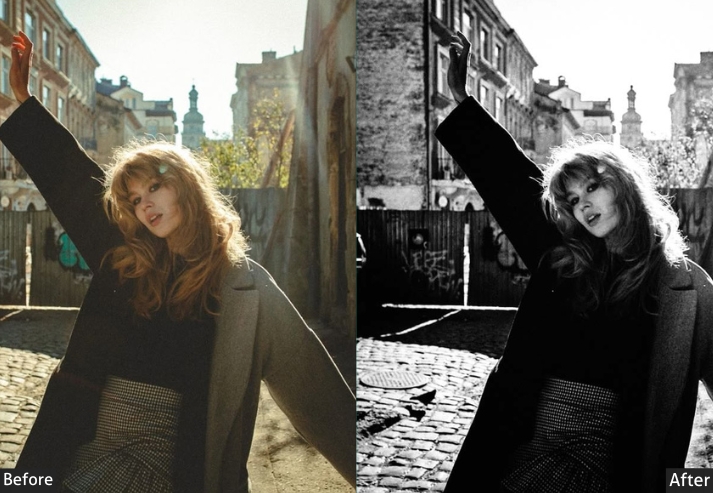
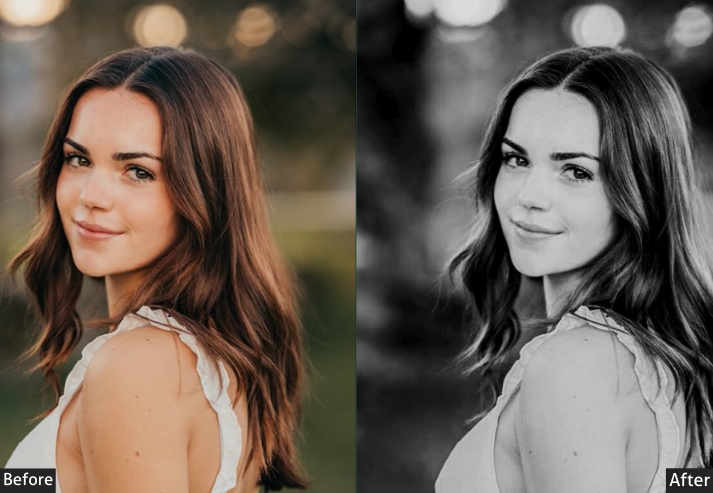
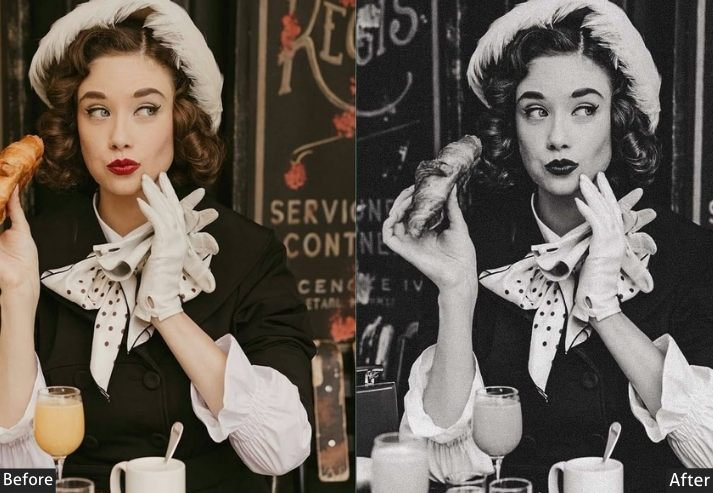
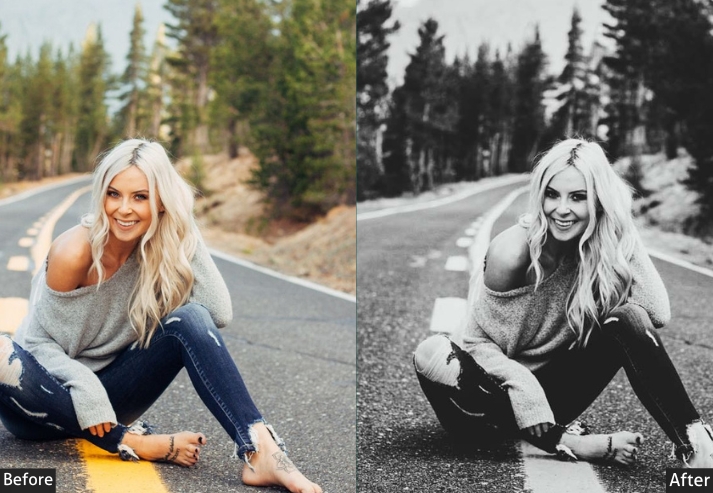
6. Black & White Cinematic Preset
Converting to black and white removes color as a distraction, forcing the viewer to engage with light, shadow, texture, and expression. This preset doesn’t just desaturate. It applies a custom color mix that makes skin tones luminous, skies dramatic, and foliage rich. Think Sebastião Salgado, not Instagram filter.
Light Panel: Contrast +25% | Exposure (adjust as needed) | Shadows −15%.
Color Panel: Black & White (Saturation −100%) | Vibrance +5% (tone contrast boost).
Effects Panel: Grain +25%.
Detail Panel: Sharpening +30%.
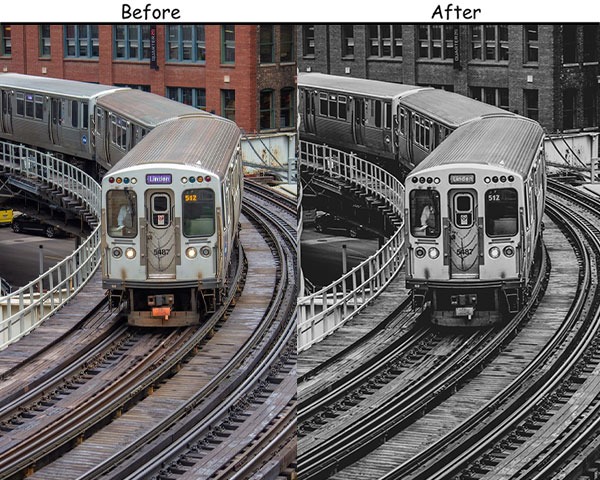

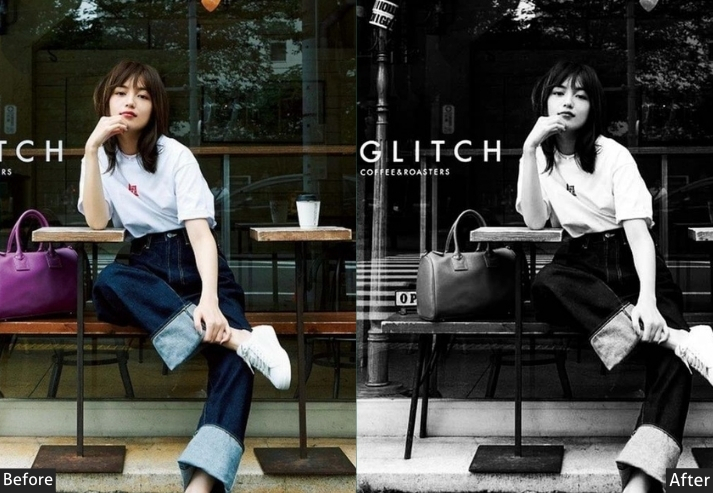
Purpose: powerful, timeless images.
Best For: Portraits, street photography, and architectural shots.
Usage: emotion and texture.
Style: Classic, bold, and powerful.
7. Epic Cinematic Preset
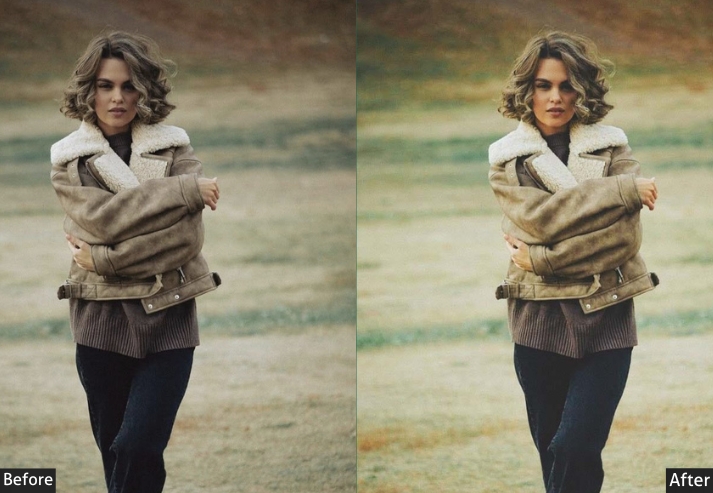
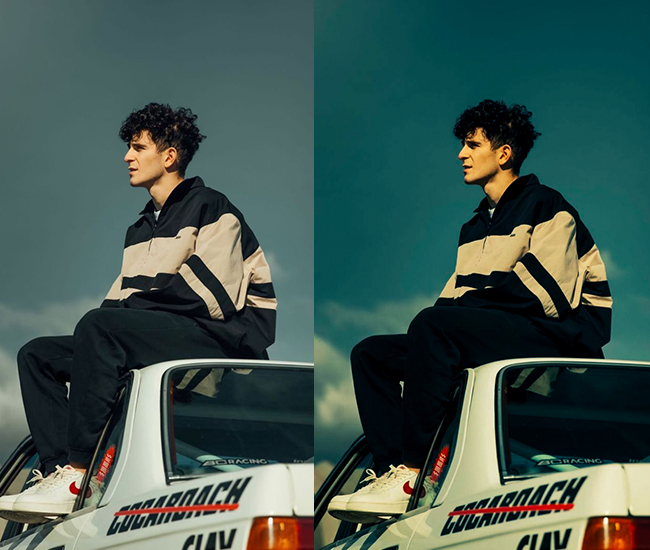
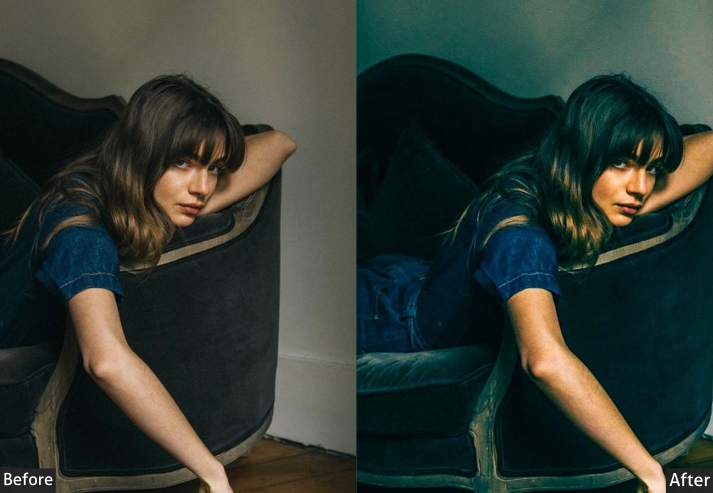
Epic Cinematic is built for scale. Wide landscapes, towering architecture, dramatic storm clouds. This preset makes everything feel larger-than-life by boosting dynamic range contrast: pulling down an already dark sky while lifting subject-level shadows to create an HDR-like separation without the artificial HDR look.
Light Panel: Contrast +30% | Exposure (adjust for brightness) | Shadows +20%.
Color Panel: Vibrance +20% | Temp +10% (warm golden tone).
Effects Panel: Vignette +10%.
Detail Panel: Sharpening +25%.
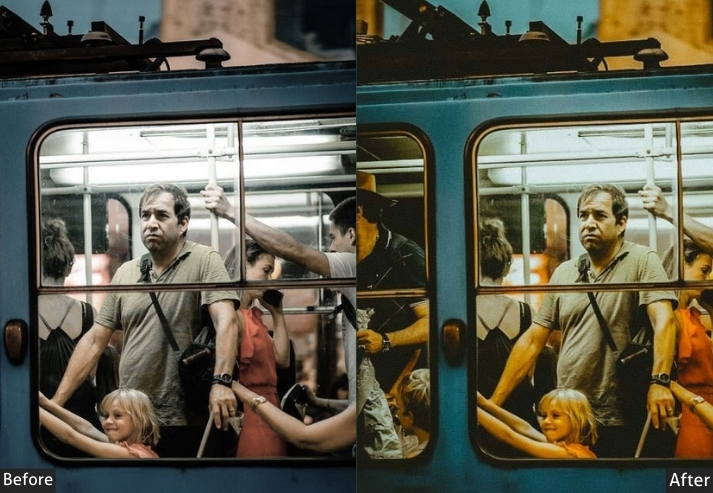
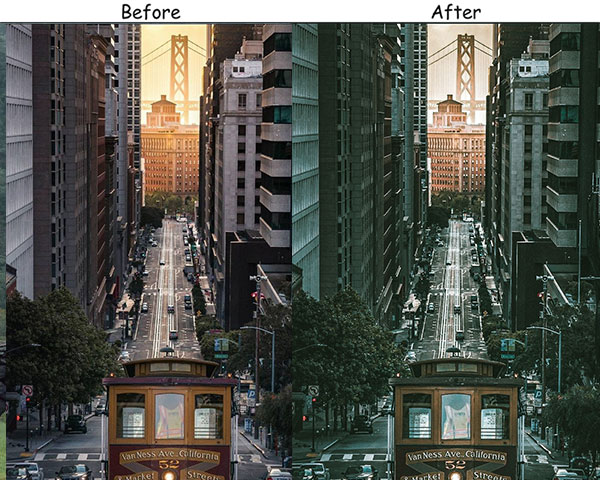
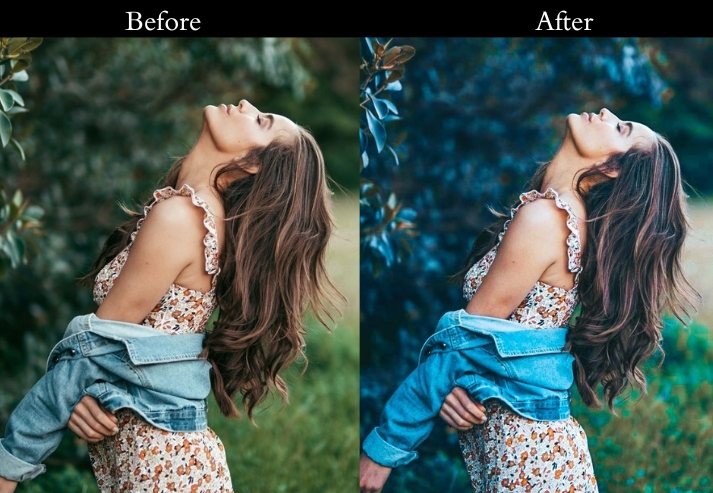
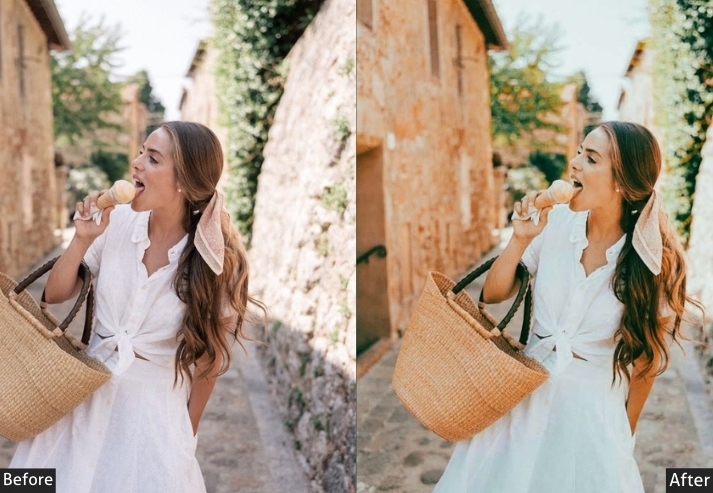
Purpose: large-scale, dramatic photos.
Best For: Landscapes, wide-angle shots, and architecture.
Usage: feel epic and grand.
Style: Grand, dramatic, and vibrant.
8. Vintage Cinematic Preset
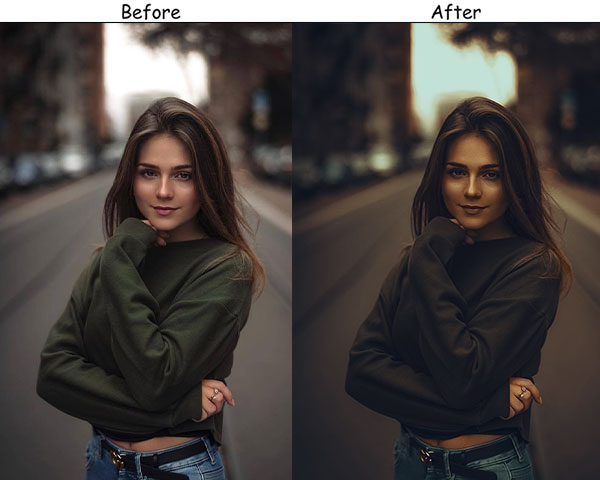
The Vintage Cinematic is modeled after Super-8 and early 35mm negative film: warm, slightly faded, with a characteristic yellow-green shadow bias that’s impossible to achieve with modern digital shooting. It triggers genuine nostalgia without looking like a cheap Instagram filter.
Light Panel: Exposure +5% | Contrast −10% | Vignette +10% (soft center focus).
Color Panel: Temp +15% (warm) | Saturation −10% | Vibrance +10%.
Effects Panel: Grain +15%.
Detail Panel: Sharpening +10%.
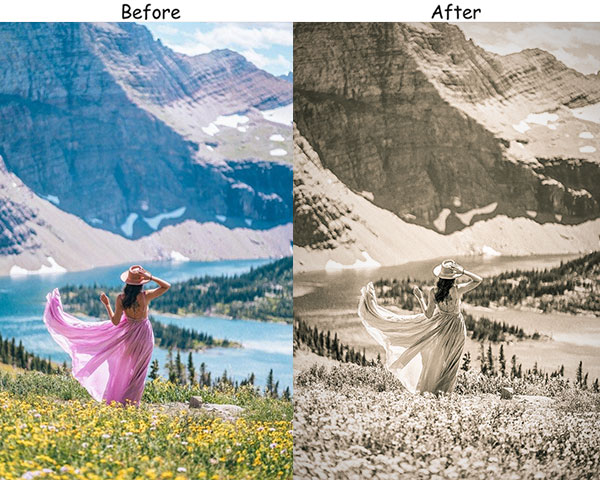
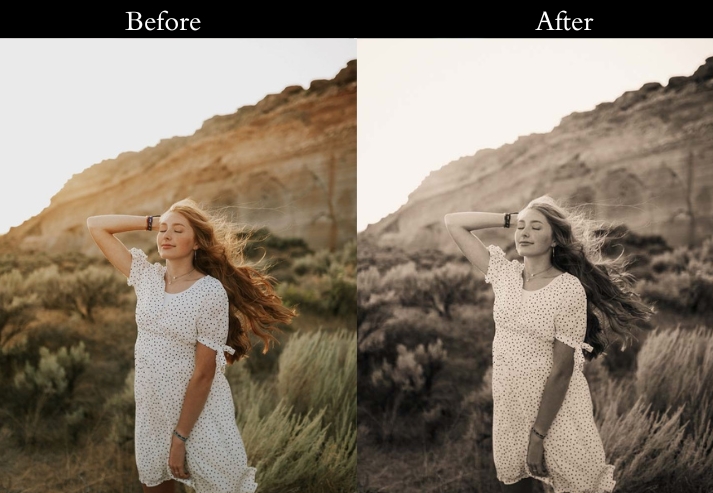
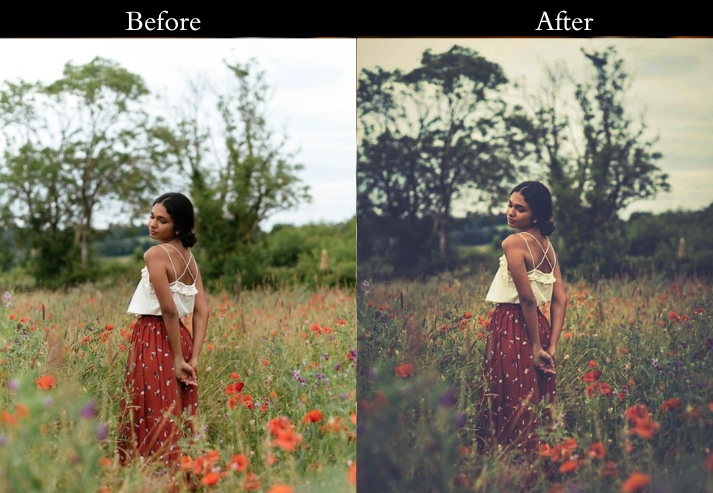
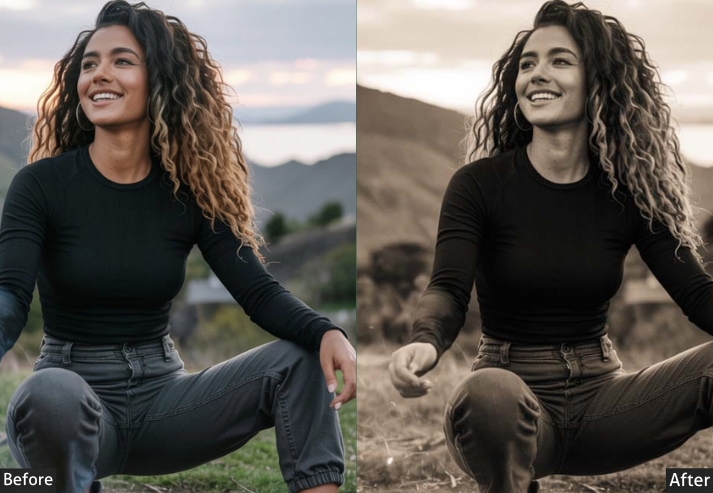
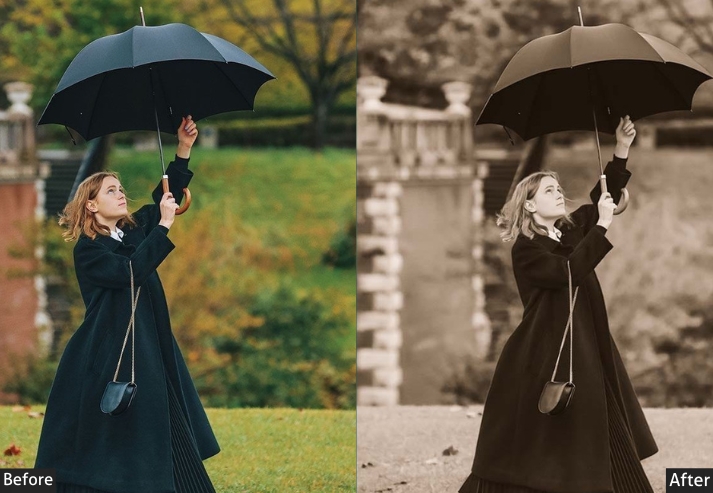
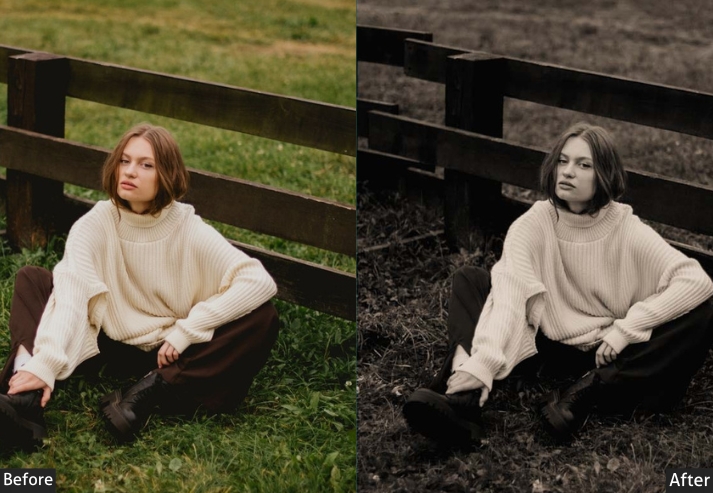
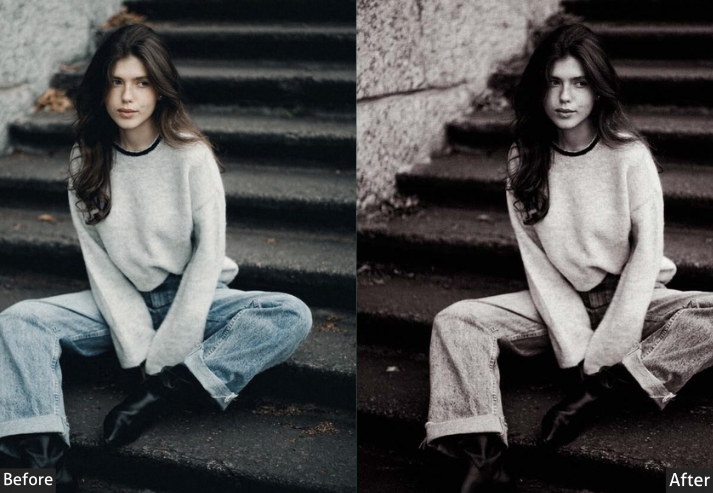
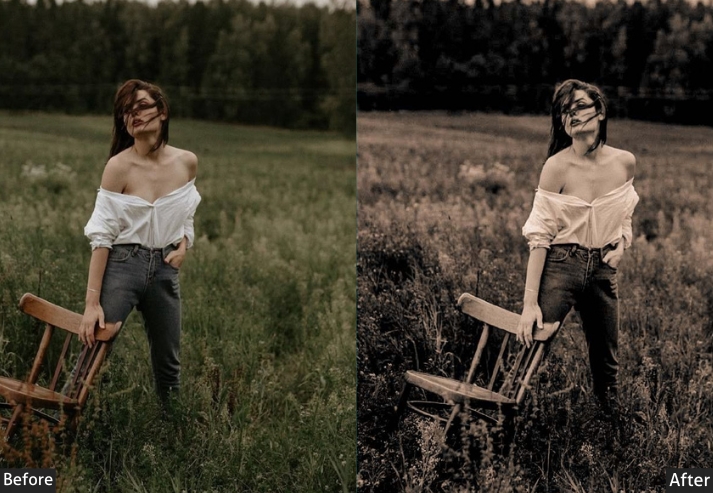
Purpose: nostalgic, warm images.
Best For: Portraits, family photos, and travel photography.
Usage: classic, retro feel.
Style: Warm, soft, and nostalgic.
9. Cinematic Street Presets
Street photography lives and dies by contrast and grit. The Cinematic Street is high-contrast, slightly desaturated, and cool-toned. It captures the energy and edge of urban environments, the way great photojournalists see them. Think Henri Cartier-Bresson in color.
Light Panel: Contrast +20% | Exposure (balance as needed) | Highlights −10%.
Color Panel: Temp −10% (cool) | Vibrance +15% | Saturation −5%.
Effects Panel: Vignette +10%.
Detail Panel: Sharpening +20%.
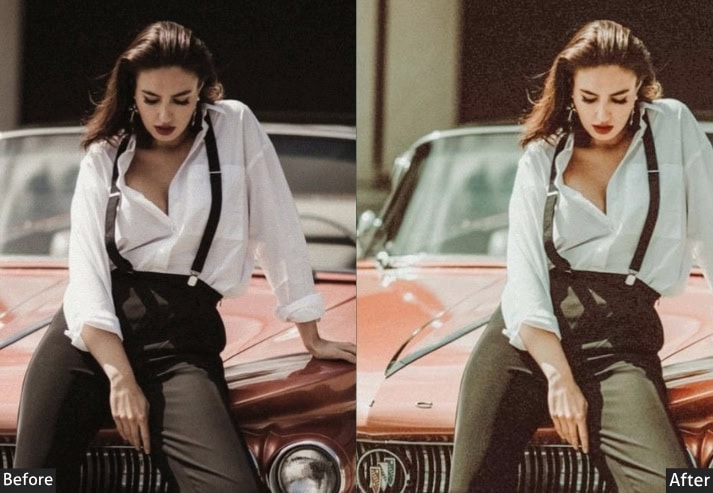
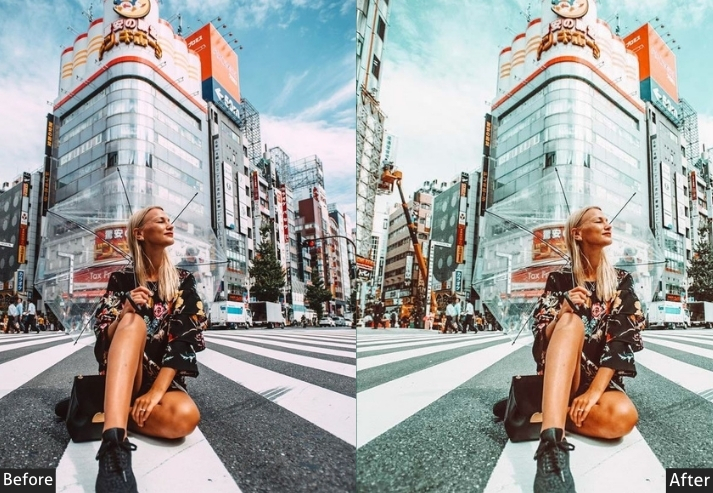
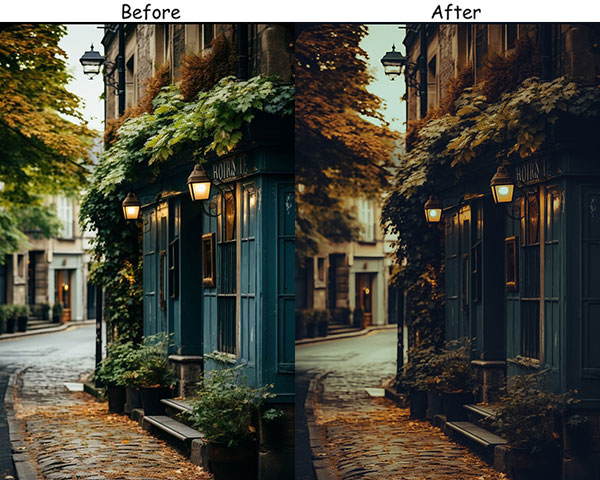
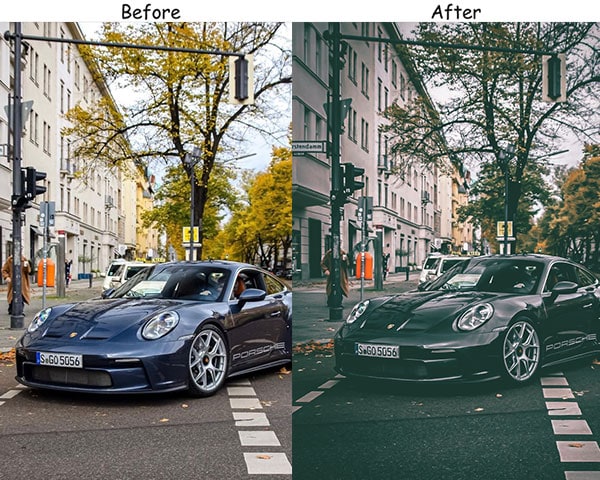
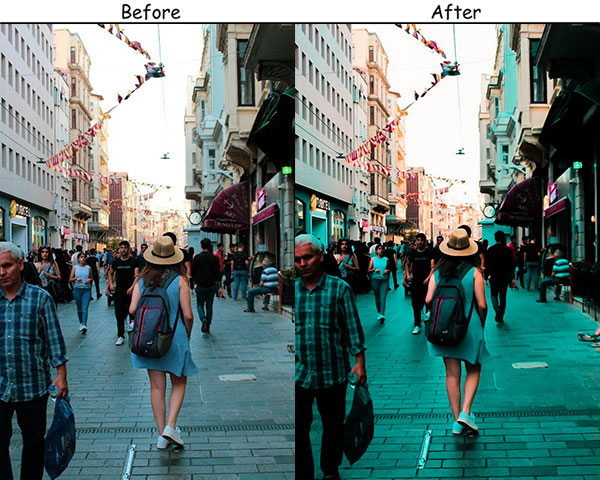
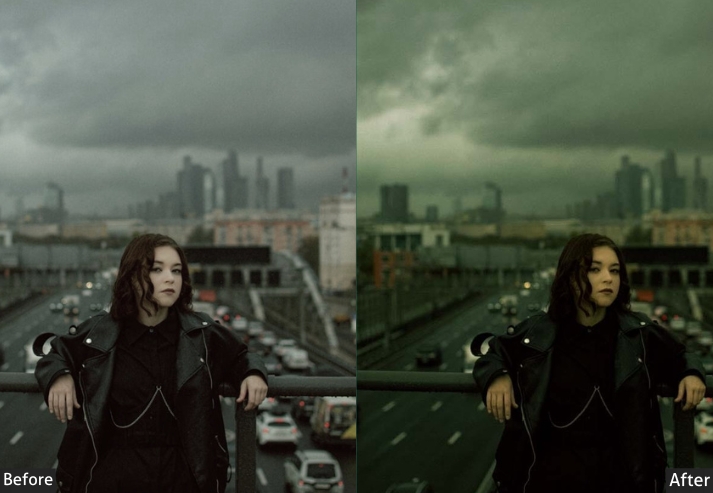
Purpose: dramatic, movie-like street photography.
Best For: Urban scenes, street photography, and nighttime shots.
Usage: gritty, dynamic energy of the city.
Style: Bold, dynamic, and urban.
10. Cinematic Light Preset
Light Cinematic captures the rare quality of backlit photography, where the subject is surrounded by a luminous, glowing ambiance. It’s inspired by the ‘magic hour’ cinematography of directors like Terrence Malick, where light itself becomes a character. This is not merely a bright preset. It’s a controlled brightness that maintains depth and dimension.
Light Panel: Exposure +20% | Highlights −15% | Shadows +10%.
Color Panel: Temp +20% (warm glow) | Vibrance +15% | Saturation −5%.
Effects Panel: Vignette +10%.
Detail Panel: Sharpening +10%.
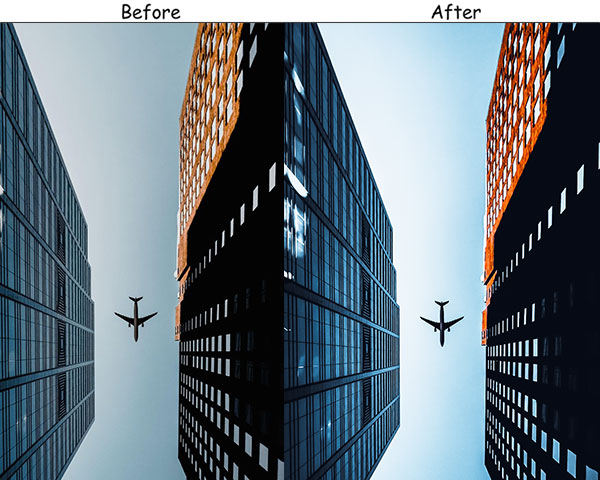
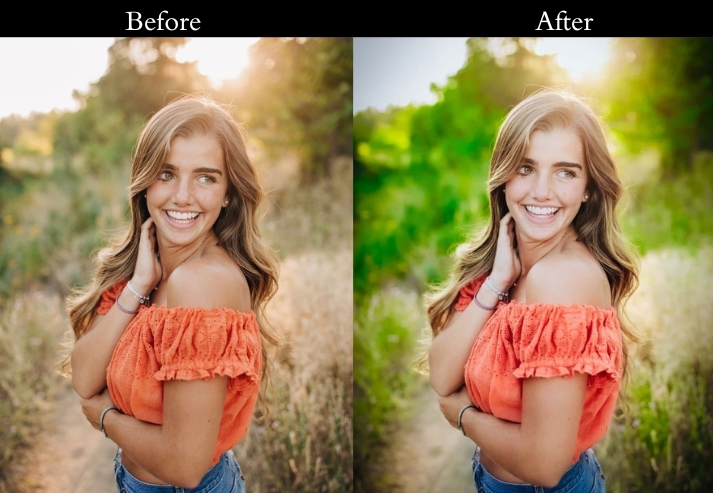
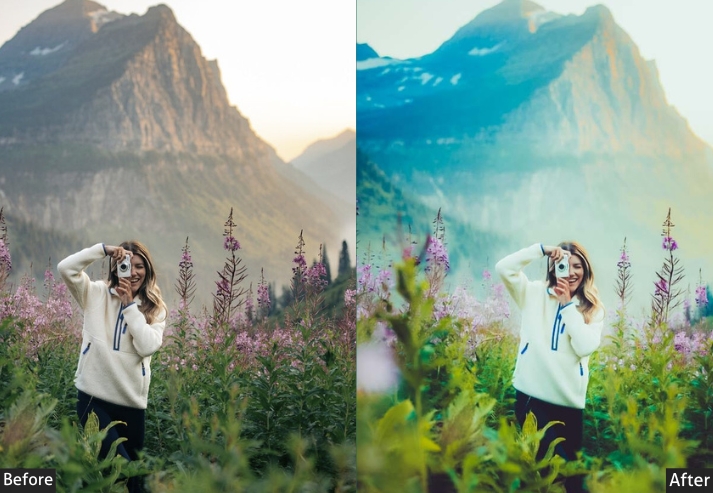
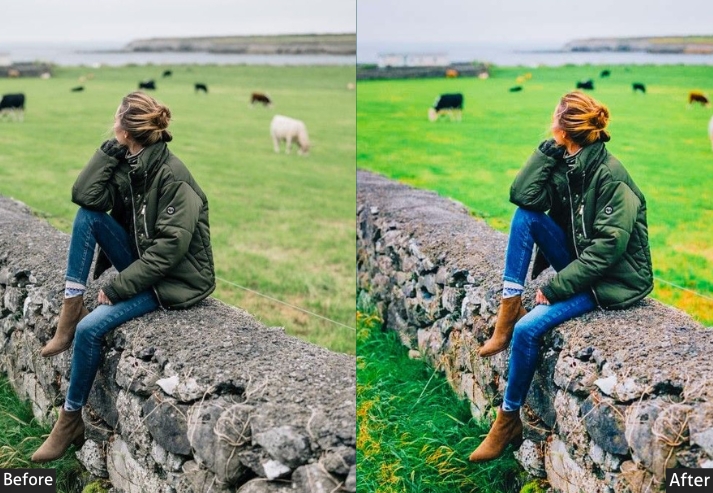
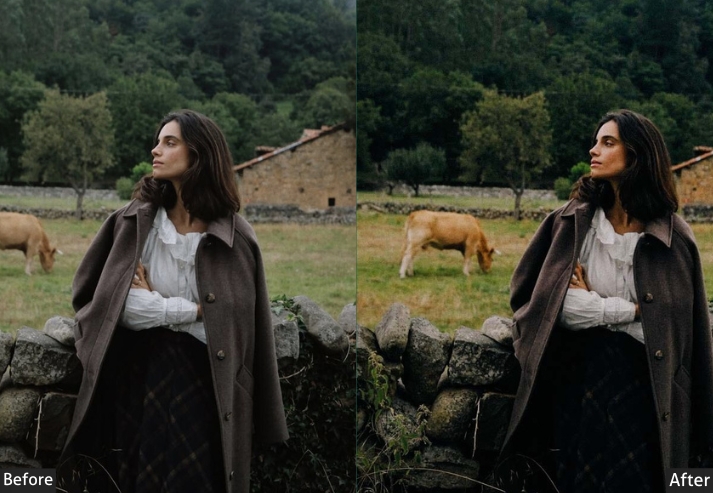
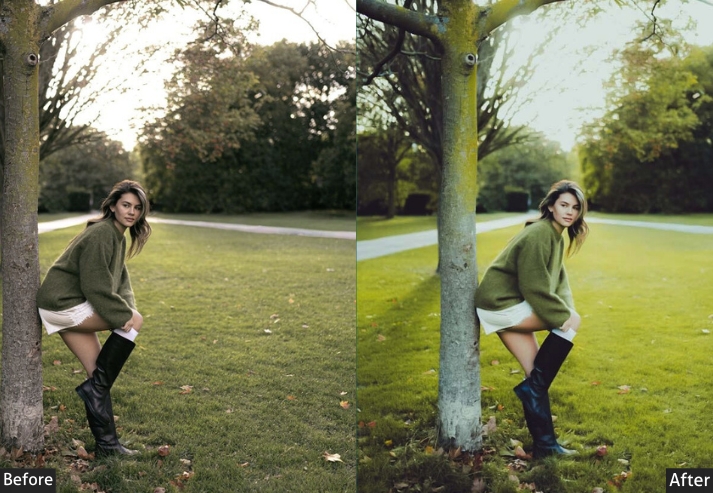
Purpose: soft, glowing photos that emphasize natural light.
Best For: Outdoor portraits, landscapes, and backlit scenes.
Usage: Light in your shots.
Style: Soft, glowing, and cinematic.
11. Serum Cinematic Presets
This one goes where most presets won’t! It deliberately breaks conventional color rules to create something surreal and unmistakably editorial. color-grade techniques used in science fiction films like Dune or Blade Runner 2049: exaggerated color contrasts, desaturated backgrounds against hyper-vivid focal points, and unusual hue shifts that shouldn’t work but absolutely do. If your aesthetic goal is to stop someone mid-scroll, Serum is your tool.
Light Panel: Exposure (adjust to mood) | Contrast +25% | Shadows −20%.
Color Panel: Temp −15% (cool futuristic tone) | Vibrance +20% | Saturation (experiment / bold control).
Effects Panel: Vignette +15% | Grain +10%.
Detail Panel: Sharpening +20%.
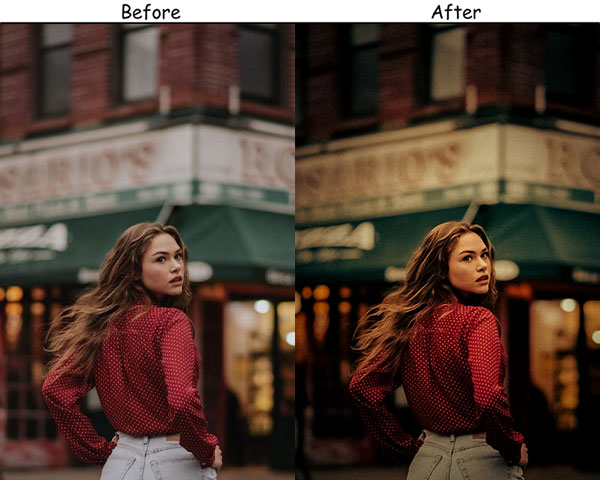
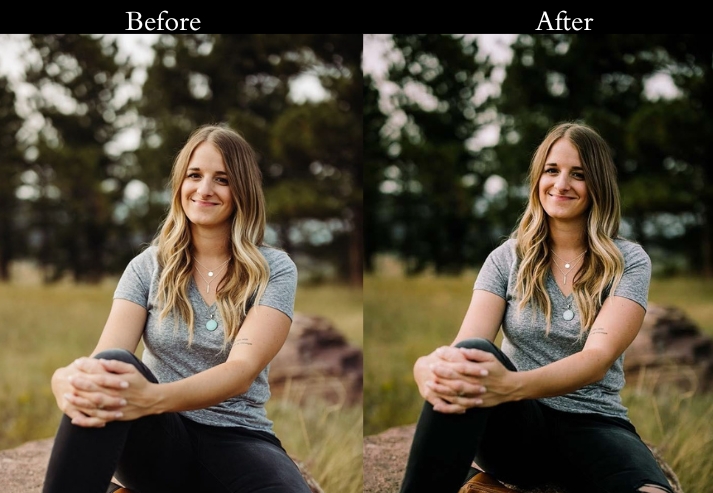
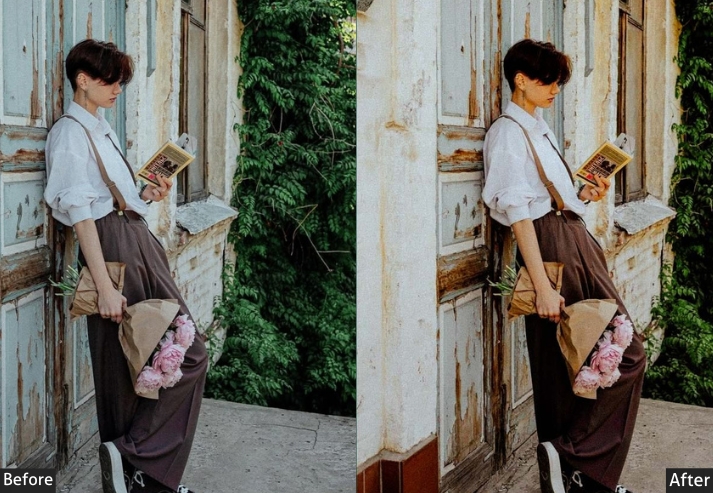
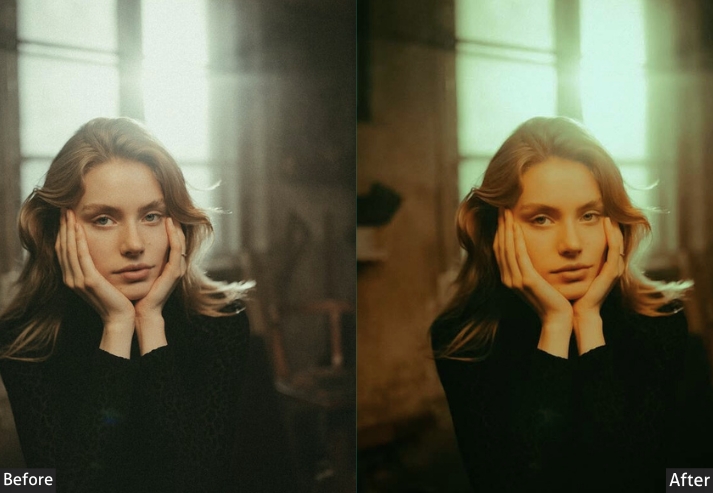
Purpose: bold, experimental images with a cinematic edge.
Best For: Conceptual photography, urban scenes, and creative portraits.
Usage: creative boundaries and experimenting with color and light.
Style: Bold, experimental, and surreal.
12. Dark Cinematic Presets
Dark Cinematic is not simply moody with more shadow. It’s a completely different visual language. Where Moody lifts blacks slightly for that TV-drama feel, Dark Cinematic crushes them, pushing your shadows into deep, rich blacks that border on silhouette territory. The result is high-stakes, high-contrast imagery where light is scarce and every highlight becomes precious.
Light Panel: Exposure −20% | Contrast +25% | Highlights −10%.
Color Panel: Temp −10% (cool) | Saturation −10% | Vibrance +10%.
Effects Panel: Vignette +20%.
Detail Panel: Sharpening +20%.
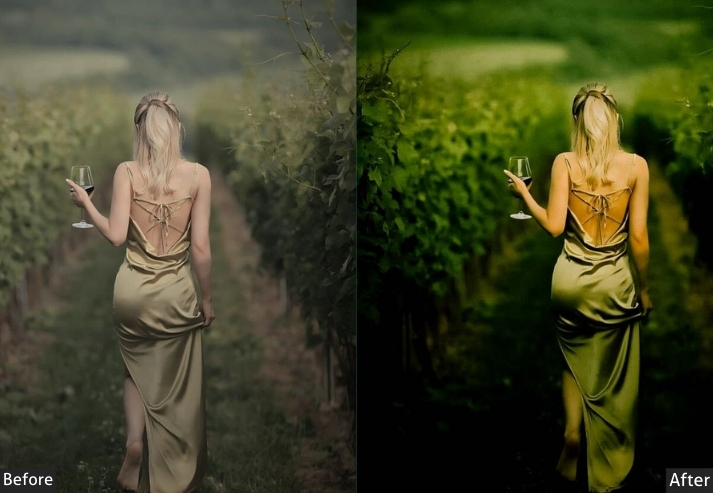
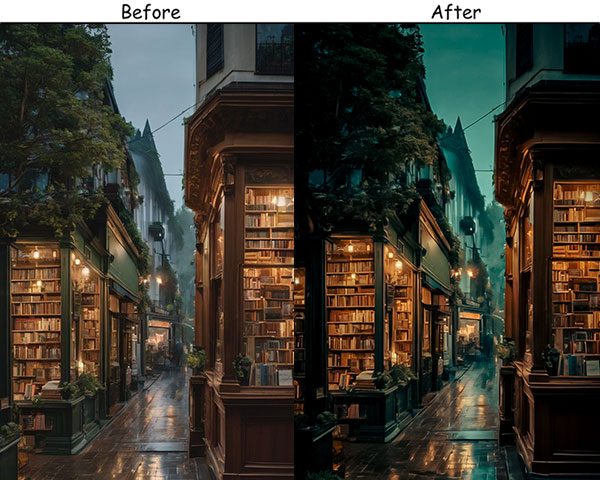
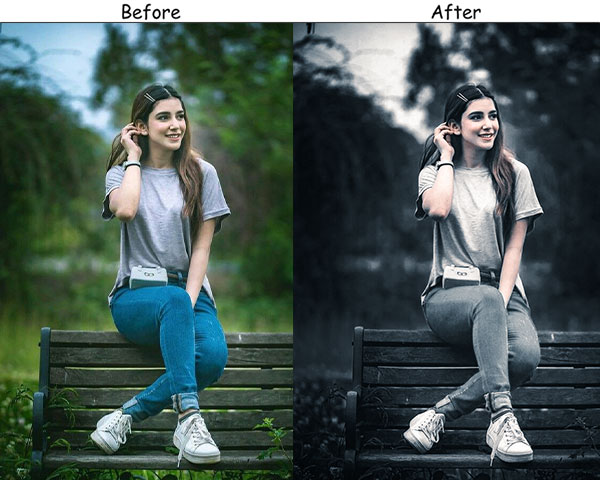
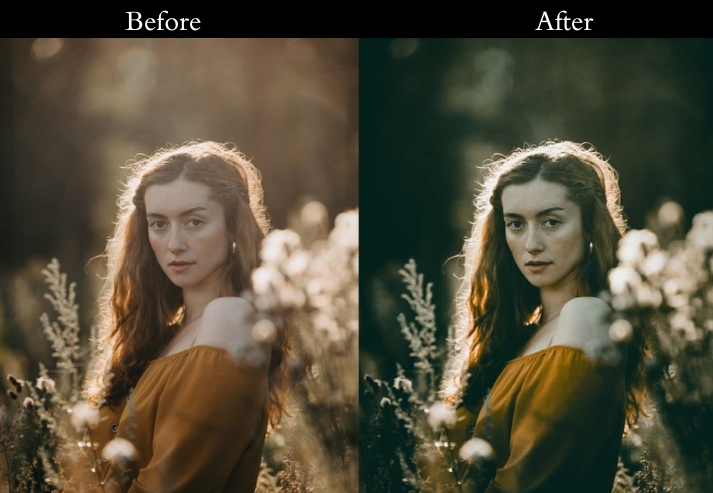
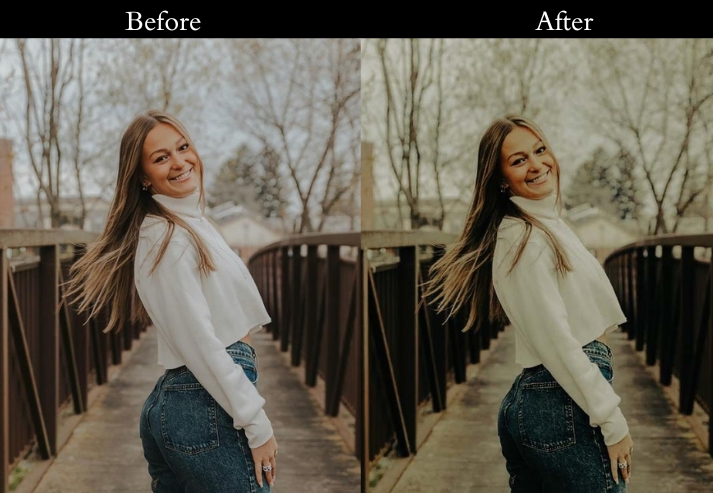
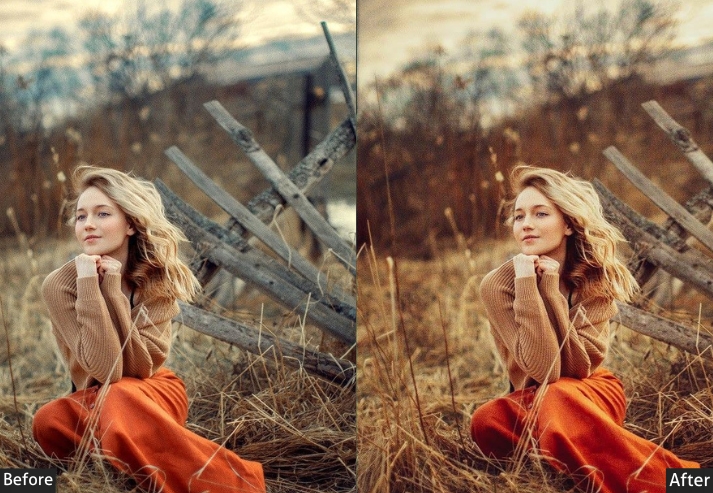
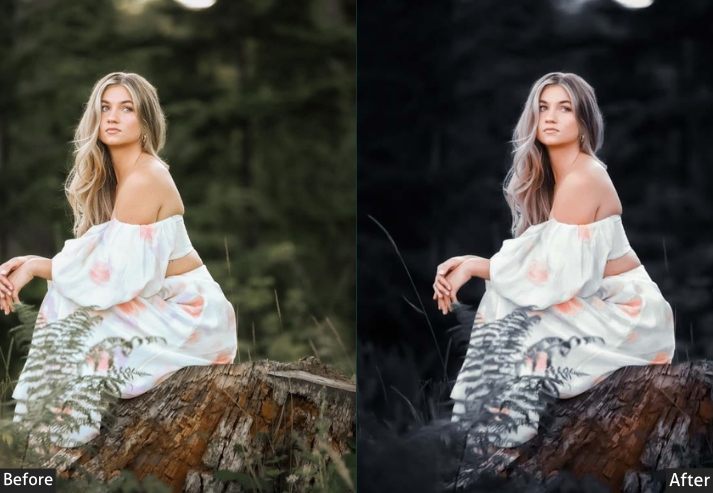
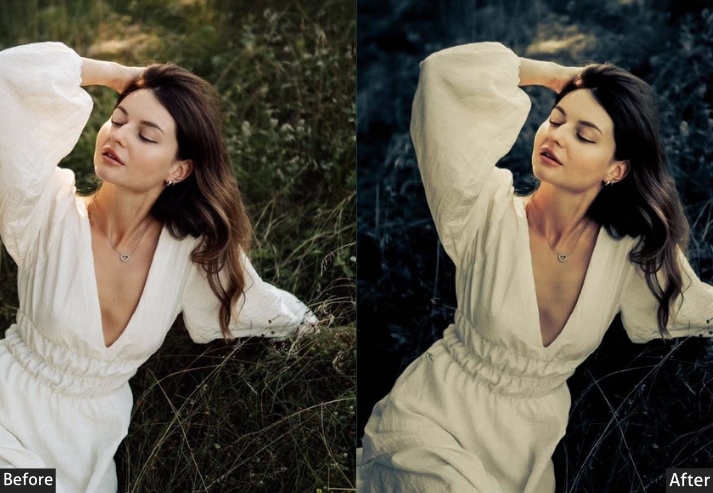
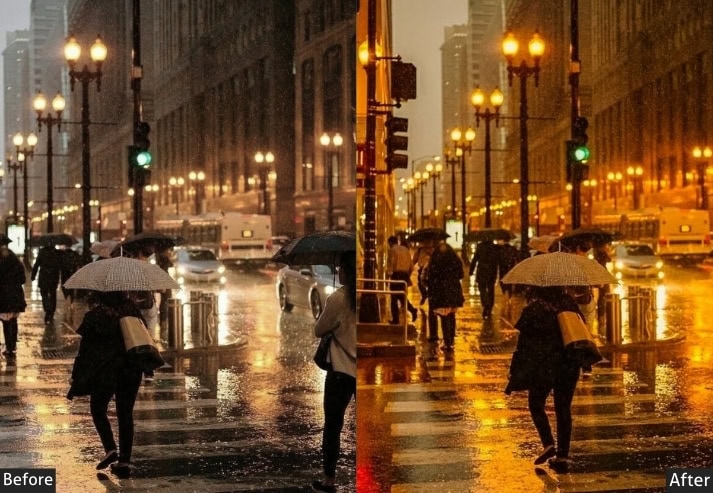
Purpose: moody, dramatic photos.
Best For: Portraits, urban scenes, and low-light photography.
Style: Dark, intense, and dramatic.
13. VSCO Film Presets
VSCO Film draws its inspiration from the legendary VSCO Film pack presets. some of the most beloved Lightroom presets ever made, which themselves simulate classic analog film stocks. What makes this aesthetic distinct from other ‘vintage’ presets is its restraint: it mimics the organic, imperfect color reproduction of real film rather than creating an exaggerated filter. Subtle green casts in shadows, slightly faded highlights, and gentle grain all work together to make digital photos feel genuinely analog.
Light Panel: Exposure +10% | Contrast −15% | Highlights −10%.
Color Panel: Temp +15% (warm) | Saturation −10% | Vibrance +5%.
Effects Panel: Grain +15%.
Detail Panel: Sharpening +10%.
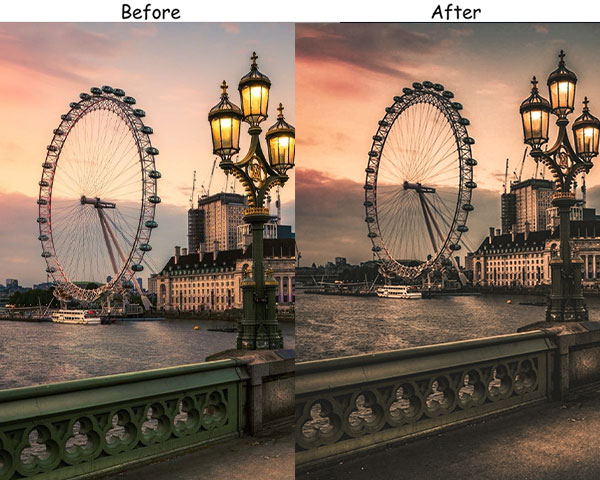
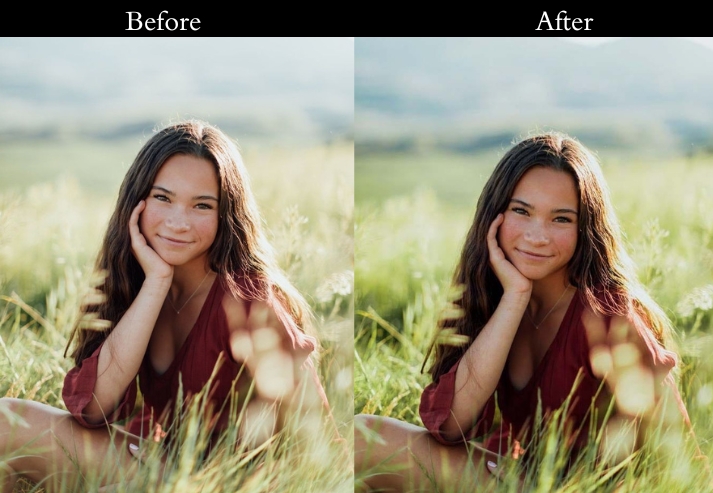
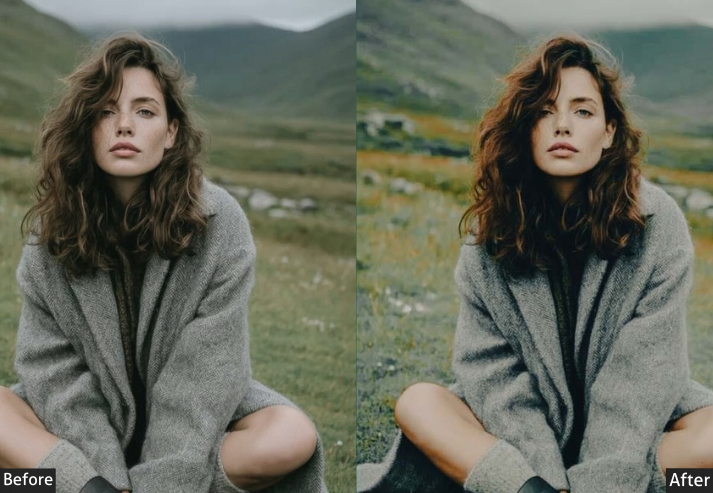
Purpose: the look of vintage film in your photos.
Best For: Portraits, lifestyle photography, and everyday moments.
Usage: warm, nostalgic feel.
Style: Soft, faded, and nostalgic.
14. 35mm Film Preset
The 35mm Film preset is specifically calibrated to replicate the look of consumer 35mm color negative film, not the cleaned-up, color-corrected version you see in professional lab scans, but the raw, honest output of a drugstore scan or a budget home scanner. That means slightly warm tones, a noticeable grain, rich but not artificially saturated colors, and a characteristic softness in the shadows. It’s the look that’s driven the resurgence of analog photography.
Light Panel: Exposure +5% | Contrast +20% | Highlights −10%.
Color Panel: Temp +10% (warm) | Vibrance +15% | Saturation −5%.
Effects Panel: Grain +20%.
Detail Panel: Sharpening +15%.
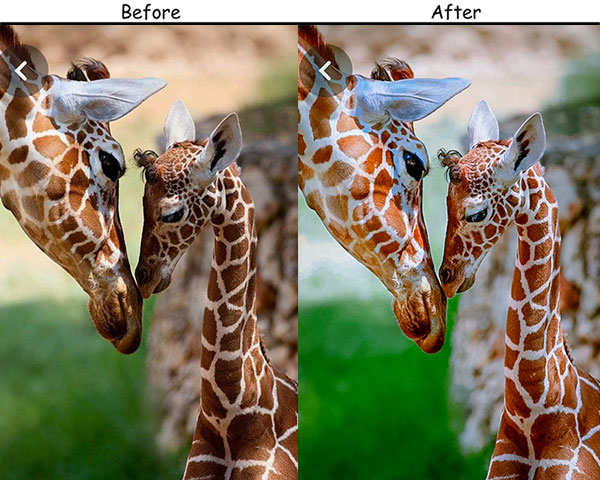
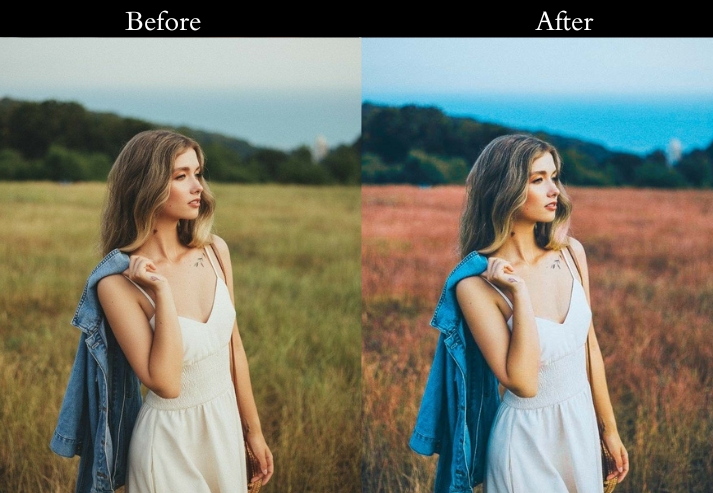
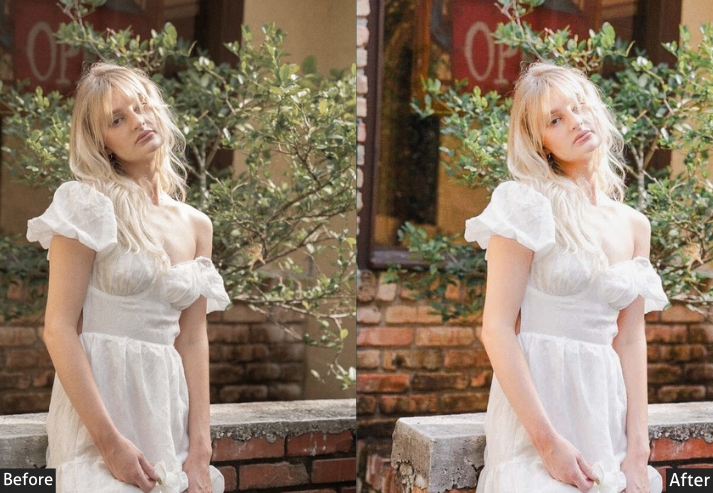
Purpose: the classic look of 35mm film.
Best For: Portraits, landscapes, and travel photography.
Usage: Authentic feel of film.
Style: Rich, textured, and classic.
15. Disposable Film Preset
The Disposable Film look has had a massive resurgence over the past five years, from fashion editorials to wedding photography, thanks to its cheerfully imperfect, democratic aesthetic. Nobody’s trying to be technically perfect with a disposable camera. That carefree energy is exactly what this preset captures: slightly overexposed, warm, color-shifted, with unpredictable grain that feels alive rather than calculated.
Light Panel: Exposure +15% | Contrast −10% | Shadows +10%.
Color Panel: Temp +10% (warm nostalgic tone) | Vibrance +10% | Saturation −5%.
Effects Panel: Grain +25%.
Detail Panel: Sharpening +10%.
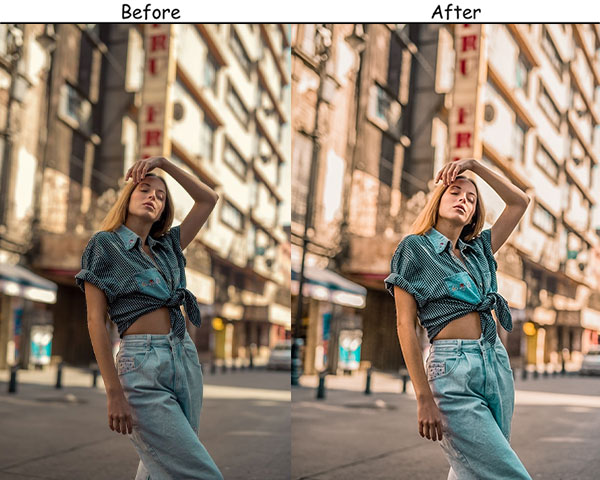
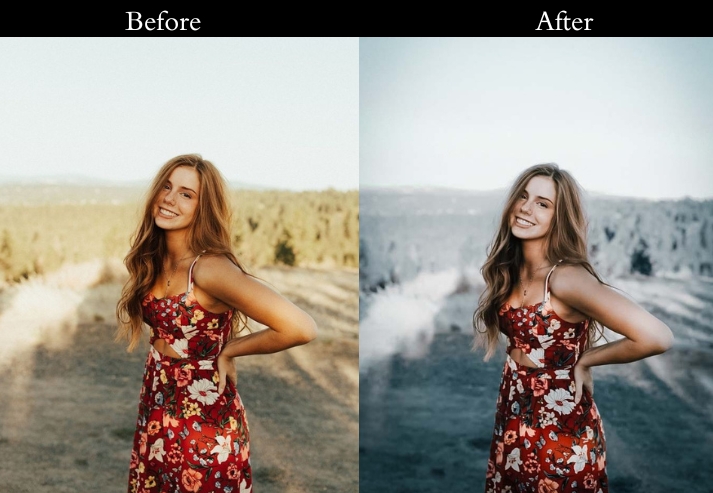
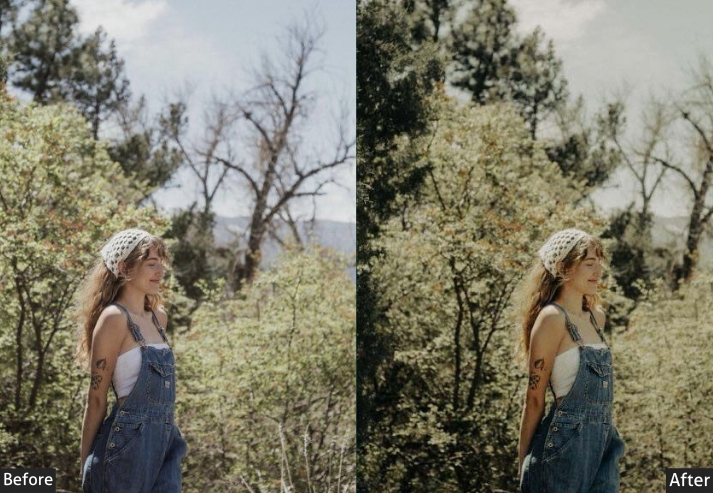
Purpose: the casual, nostalgic look of disposable cameras.
Best For: Everyday moments, candid shots, and travel photography.
Usage: playful, nostalgic touch.
Style: Soft, grainy, and nostalgic.
16. Fuji Film Simulation Presets
Fujifilm has built an entire camera ecosystem around its proprietary film simulations: Velvia, Provia, Classic Chrome, and Astia. The Fuji Film Simulation preset attempts to capture the signature that made Fuji film stocks legendary: accurate, vivid greens, slightly cooler skin tones than Kodak’s, and tack-sharp clarity. that made Fuji the preferred film of nature and travel photographers for decades. This preset suits photographers who want punchy, true-to-life color without artificial Instagram saturation.
Light Panel: Exposure +5% | Contrast +15% | Highlights −10%.
Color Panel: Temp +10% (warm Fuji tone) | Vibrance +20% | Saturation −5%.
Effects Panel: Grain +10%.
Detail Panel: Sharpening +15%.
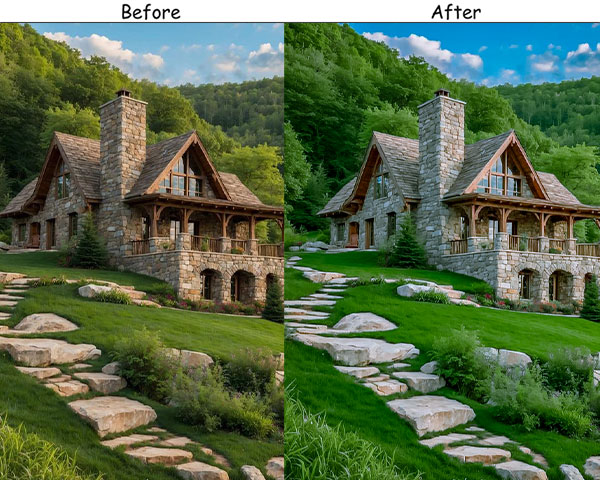
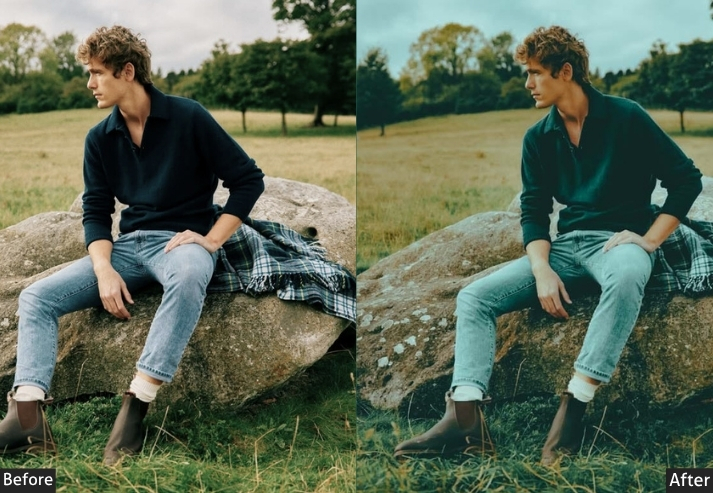
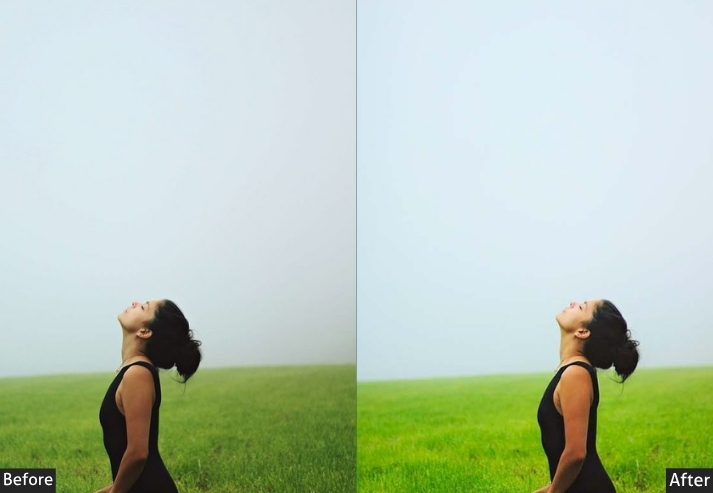
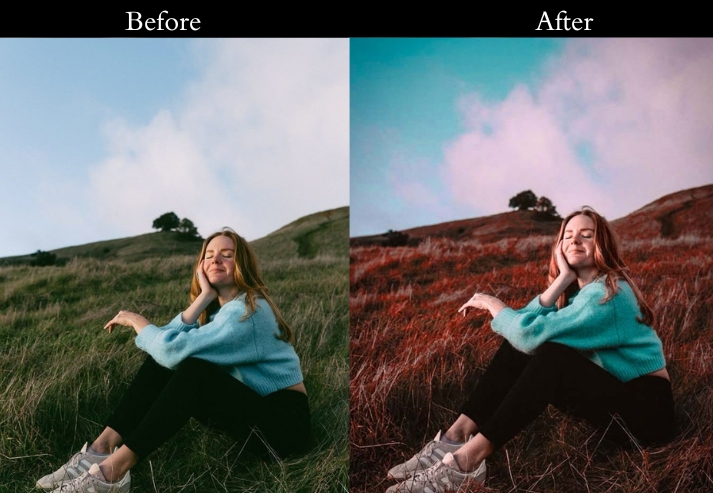
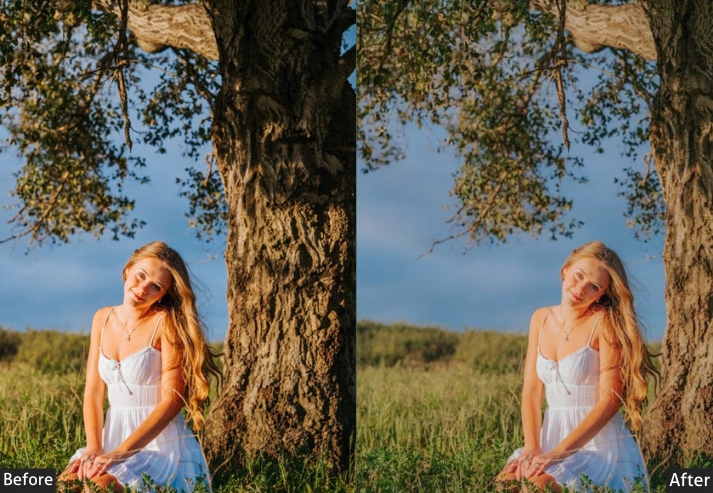
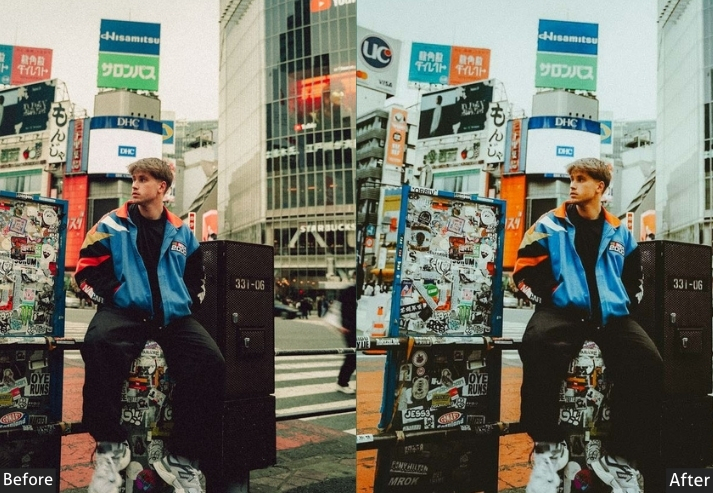
Purpose: the vibrant, true-to-life colors of Fuji film.
Best For: Portraits, landscapes, and street photography.
Usage: vibrant color and depth.
Style: Vibrant, true-to-life, and textured.
17. Kodak Film Presets
Kodak and Fuji have been the great rivals of color film photography for decades, and their aesthetics are genuinely distinct. Where Fuji leans cool and sharp, Kodak (especially Portra 400 and 800) is famous for its exceptionally flattering warm skin tones, smooth tonal transitions, and a characteristic yellow-orange cast that makes every photo feel like a memory. Kodak Film is the preset for photographers who shoot people. Its warmth is deeply flattering across all skin tones.
Light Panel: Exposure +10% | Contrast +15% | Highlights −10%.
Color Panel: Temp +15% (Kodak warmth) | Vibrance +10% | Saturation −5%.
Effects Panel: Grain +15%.
Detail Panel: Sharpening +15%.
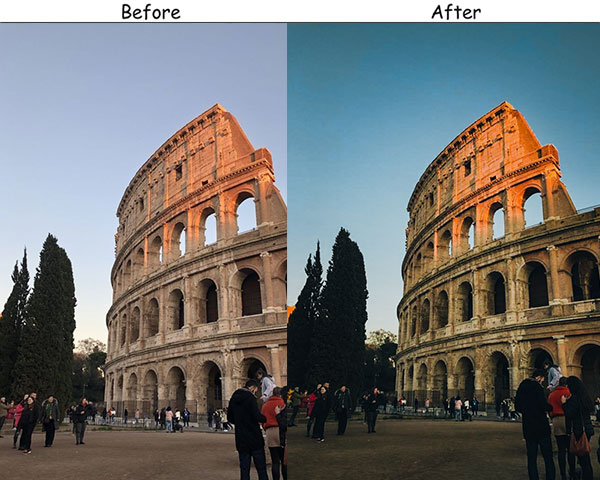
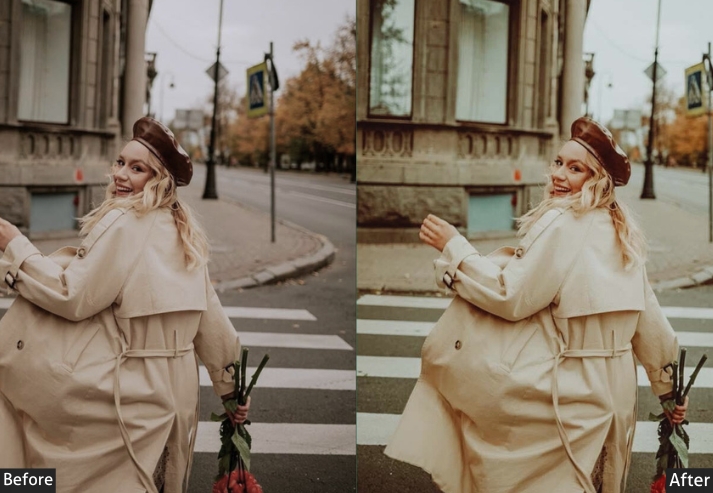
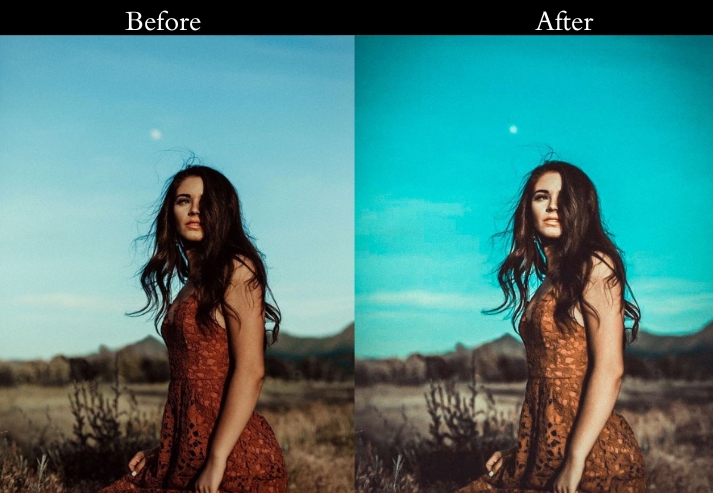
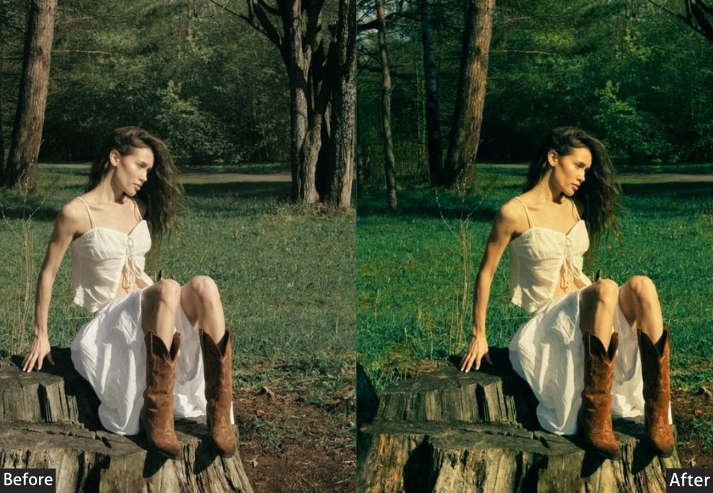
Purpose: the warm, rich tones of Kodak film.
Best For: Portraits, family photos, and travel photography.
Usage: nostalgic, timeless touch to your photos.
Style: Warm, rich, and nostalgic.
18. Cinematic Green Presets
Green-toned cinema has a long artistic history. The Matrix trilogy, Steven Soderbergh’s Traffic, and countless thrillers use green casts to suggest unease, surveillance, or a world slightly off-kilter. But in photography, Cinematic Green doesn’t have to mean unsettling. used in natural settings, it becomes deeply lush and organic, with shadows turning into rich forest tones and highlights taking on a glowing, algae-tinted warmth that makes outdoor photography feel genuinely otherworldly.
Light Panel: Exposure +15% | Contrast +20% | Highlights −10%.
Color Panel: Green +20% | Temp +5% (warm) | Saturation −5%.
Effects Panel: Vignette +10%.
Detail Panel: Sharpening +15%.
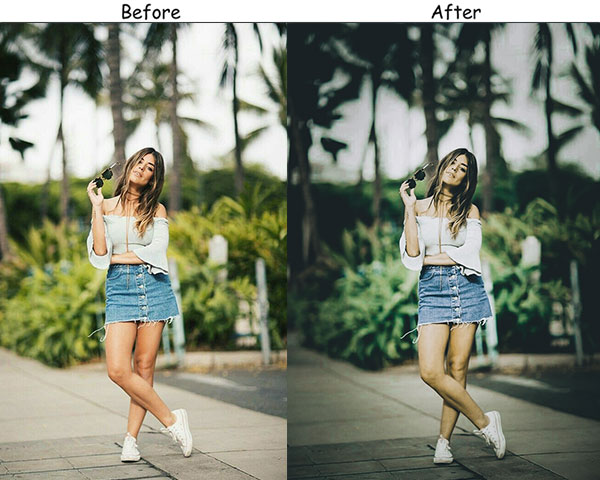
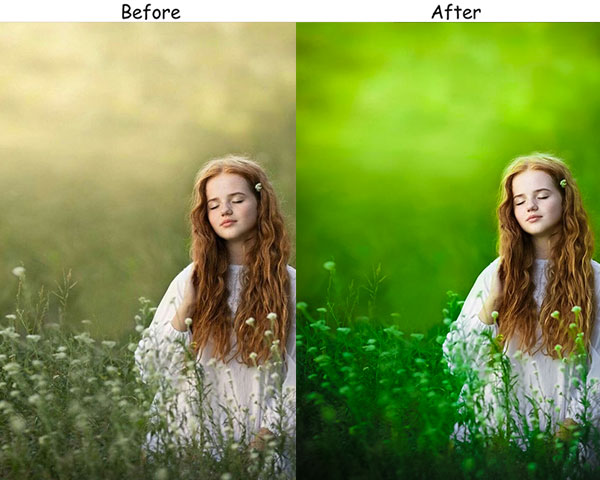
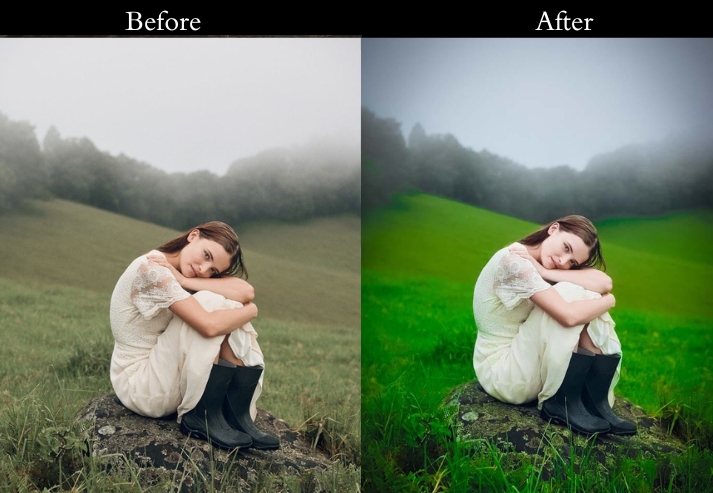
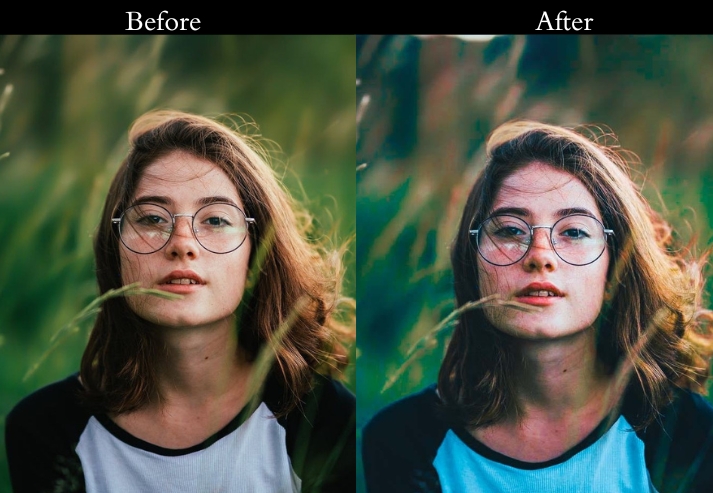
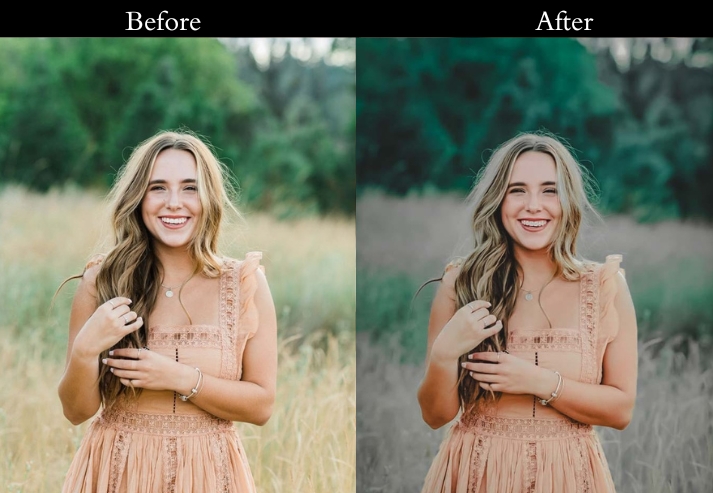
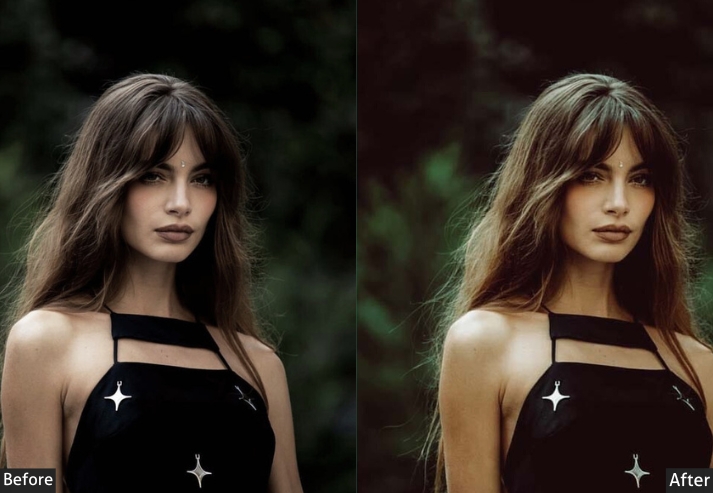
Purpose: vibrant, earthy photos with rich green tones.
Best For: Nature photography, outdoor portraits, and landscapes.
Usage: the beauty of nature with a cinematic touch.
Style: Vibrant, earthy, and cinematic.
19. Dramatic Presets
Dramatic Cinematic is the preset equivalent of turning up every dial to 11 in a controlled way. High contrast, deep shadows, boosted clarity, and vivid but not cartoonish color. It’s the look that makes an ordinary photo feel like a movie poster. The key to Dramatic working rather than looking overdone is restraint in exposure: if your shot is well-exposed, the contrast boost creates definition. If it’s already slightly flat, the drama completely covers it.
Light Panel: Contrast +30% | Exposure (adjust for balance) | Shadows −20%.
Color Panel: Vibrance +25% | Temp +10% (warm) | Saturation −5%.
Effects Panel: Vignette +20%.
Detail Panel: Sharpening +20%.
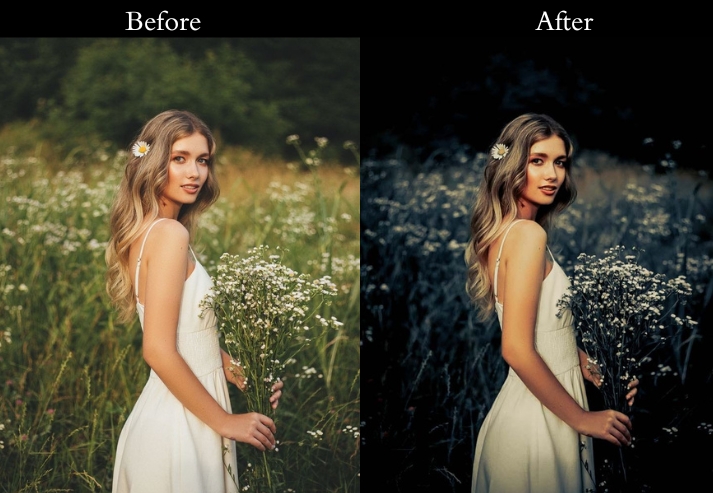

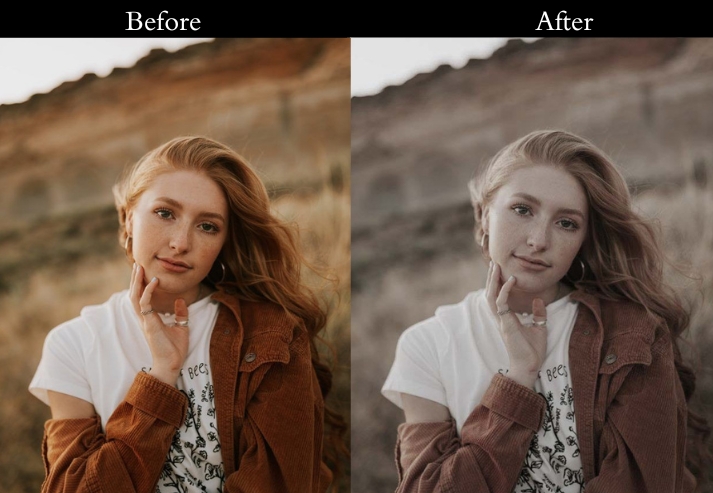
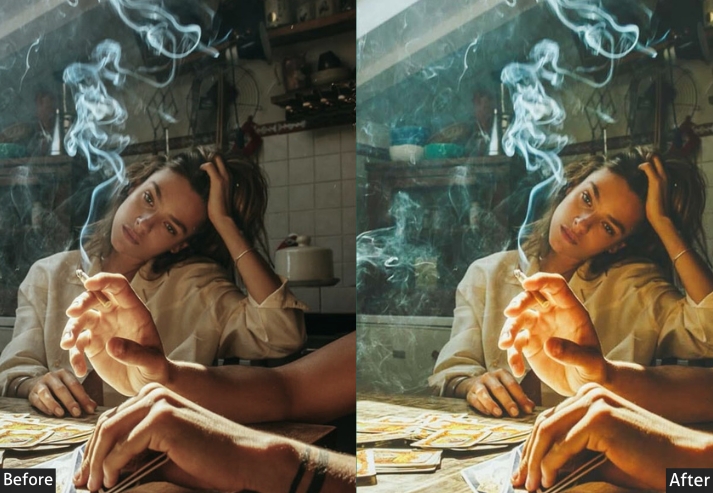
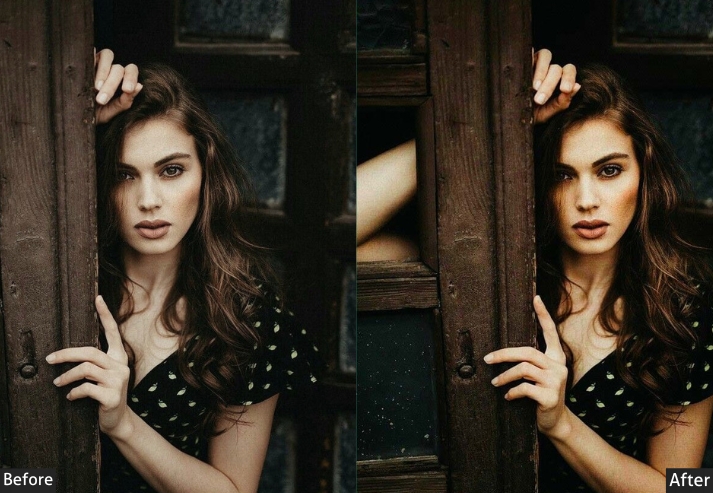
Purpose: bold, powerful images with intense contrast.
Best For: Portraits, urban scenes, and landscapes.
Usage: dramatic flair.
Style: Bold, intense, and striking.
20. Brighten Cinematic Presets
Brighten Cinematic solves a specific problem: how to make a photo feel bright and optimistic while still maintaining the cinematic quality that keeps it from looking like a generic, cheerful snapshot. The answer is in how you add brightness, not by raising exposure globally, but by lifting the midtones and shadows while keeping highlights in check, creating a photo that feels evenly luminous rather than washed out. Think wellness brands, Scandinavian lifestyle photography, and high-key editorial.
Light Panel: Exposure +25% | Contrast −10% | Shadows +20%.
Color Panel: Temp +10% (warm) | Vibrance +15% | Saturation balanced.
Effects Panel: Vignette +5%.
Detail Panel: Sharpening +10%.
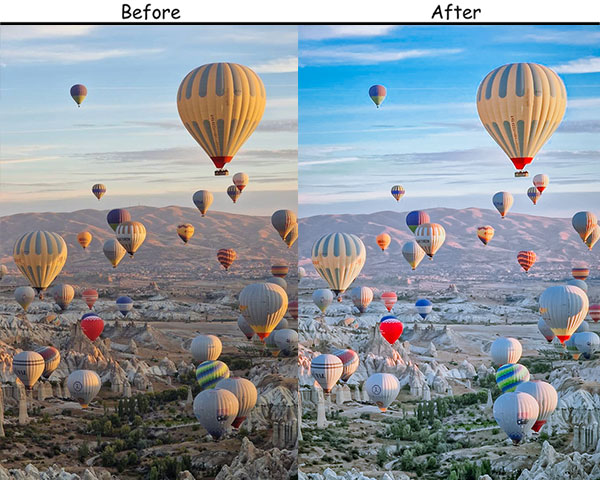
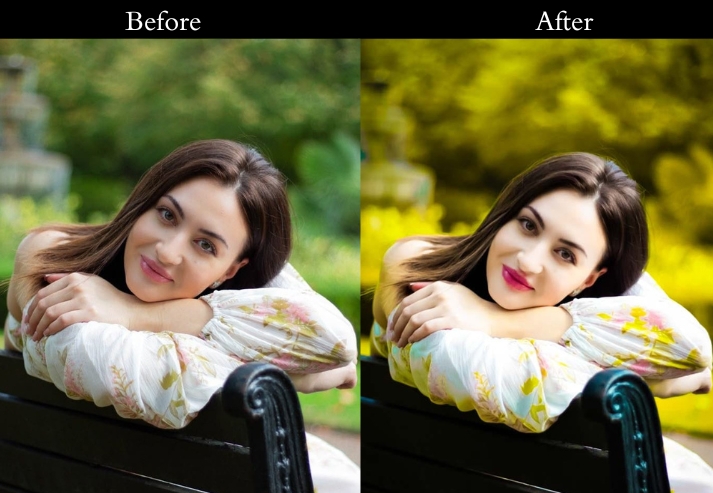
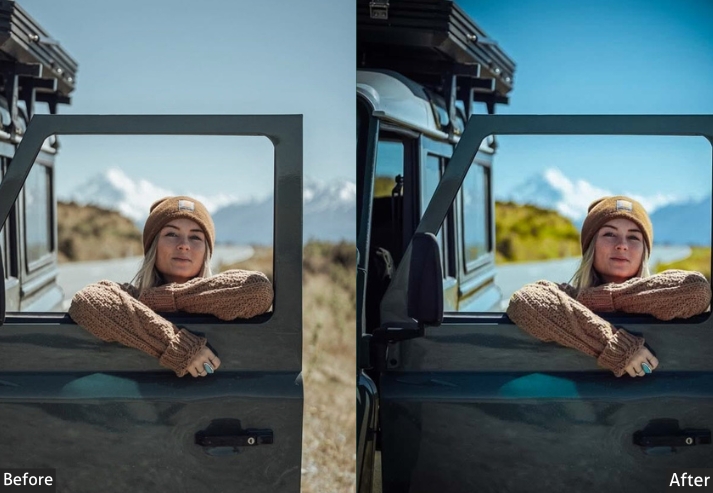
Purpose: bright, airy photos with a cinematic touch.
Best For: Portraits, weddings, and lifestyle photography.
Usage: lightness and warmth to your images.
Style: Bright, airy, and cinematic.
21. Creamy Cinematic Presets
Cream Cinematic occupies a distinct space between Matte and Brighten. It uses a warm, creamy highlight lift, combined with slightly desaturated shadows, to create images that feel as if they were shot through a soft-focus filter. The warmth here is in the highlights, not the shadows, which is what makes it feel luxurious rather than retro. It’s the aesthetic of high-end real estate photography, luxury brand campaigns, and premium editorial portraits.
Light Panel: Exposure +15% | Contrast −15% | Shadows +10%.
Color Panel: Temp +15% (warm creamy tone) | Vibrance +10% | Saturation −5%.
Effects Panel: Vignette +10%.
Detail Panel: Sharpening +10%.
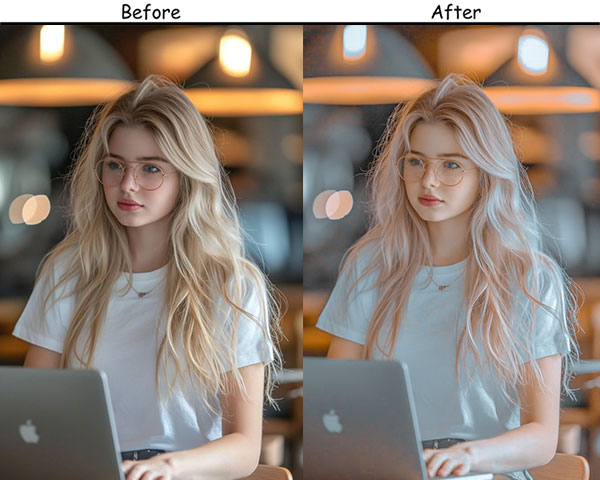
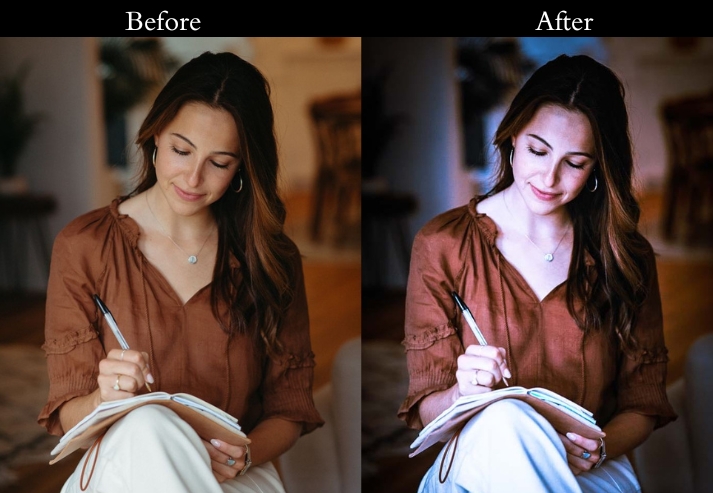
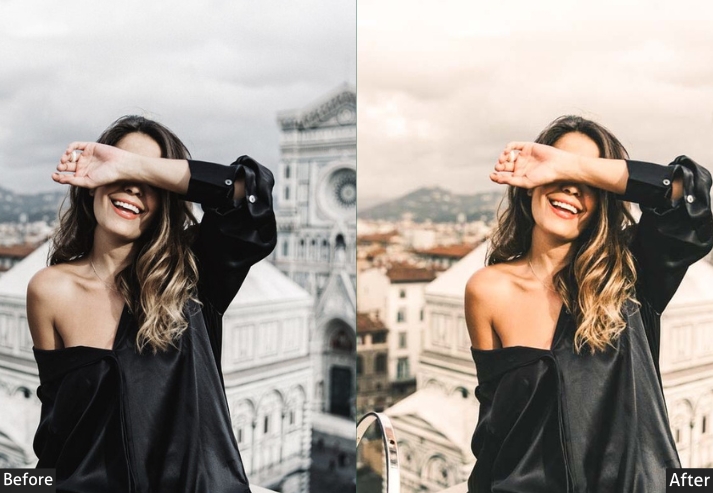
Purpose: To create soft, smooth, and dreamy photos.
Best For: Portraits, weddings, and lifestyle photography.
Usage: creamy, cinematic touch to your images.
Style: Soft, smooth, and warm.
22. Warm Brown Cinematic Presets
Warm Cinematic is deliberately, unapologetically warm! It pushes well past neutral into golden-amber territory, evoking the feeling of late-afternoon light even in photos taken at other times of day. Unlike Vintage Cinematic, which layers warmth with fade and grain, Warm Cinematic is clean and modern: the warmth is the only manipulation. This makes it extremely versatile and safe to use across a wide range of subjects without looking overprocessed.
Light Panel: Exposure +10% | Contrast +15% | Shadows +10%.
Color Panel: Temp +20% (warm) | Vibrance +10% | Saturation −5%.
Effects Panel: Vignette +15%.
Detail Panel: Sharpening +15%.
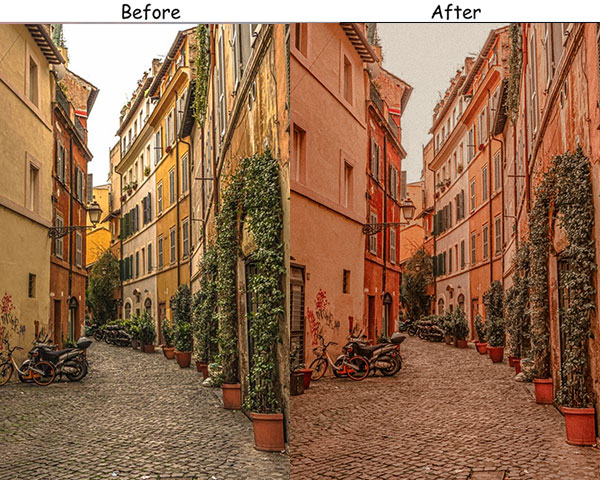
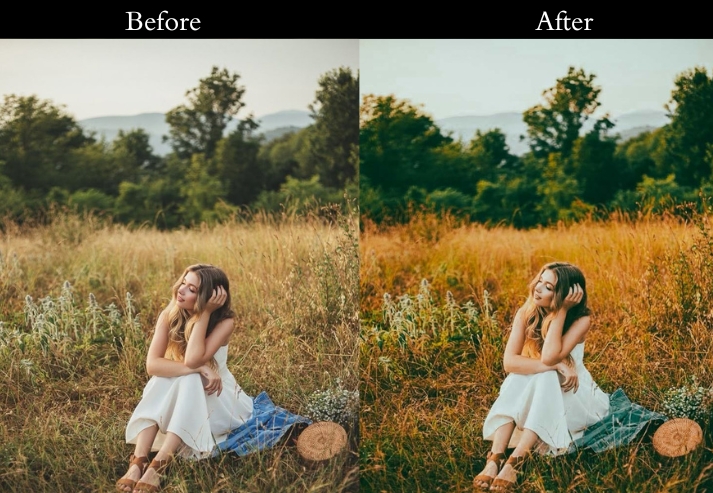
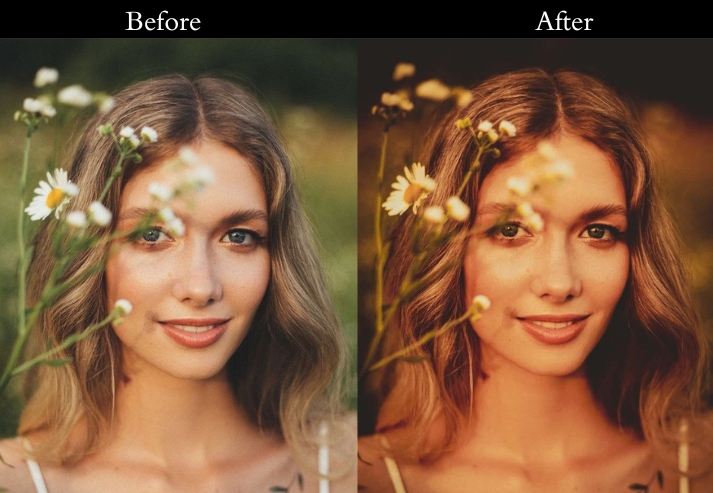
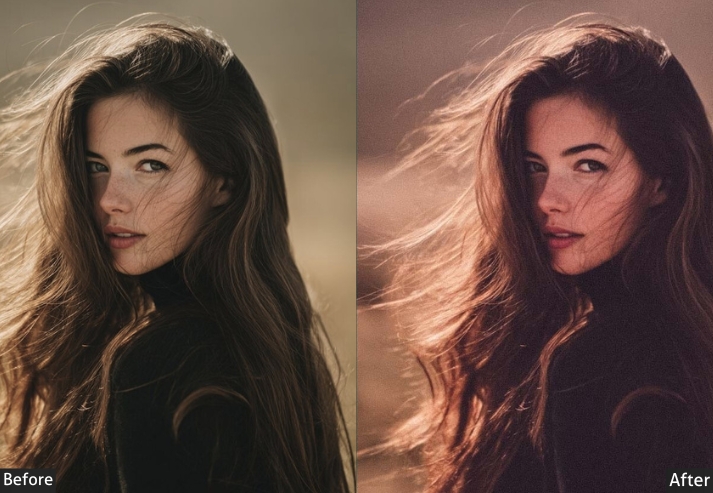
Purpose: cozy, inviting photos with warm brown tones.
Best For: Portraits, lifestyle photography, and autumn scenes.
Usage: warmth and richness to your images.
Style: Warm, cozy, and cinematic.
23. Cinematic Red & Sepia Preset
Create a cinematic effect in portraits and urban photography with a strong emphasis on red hues.
Light Panel: Exposure −10% to −20% | Contrast +30% to +40% | Highlights −20% to −30% | Shadows +10% to +20% | Whites −10% to −20% | Blacks −20% to −30%.
Color Panel: Temp +10% to +20% | Vibrance +10% to +20%.
HSL / Color Mix: Reds Saturation +20% to +30% | Reds Luminance −10% to −20%.
Effects Panel: Clarity +20% to +30% | Dehaze +10% to +20%.
Color Grading: Highlights H10/S20 | Shadows H220/S20.
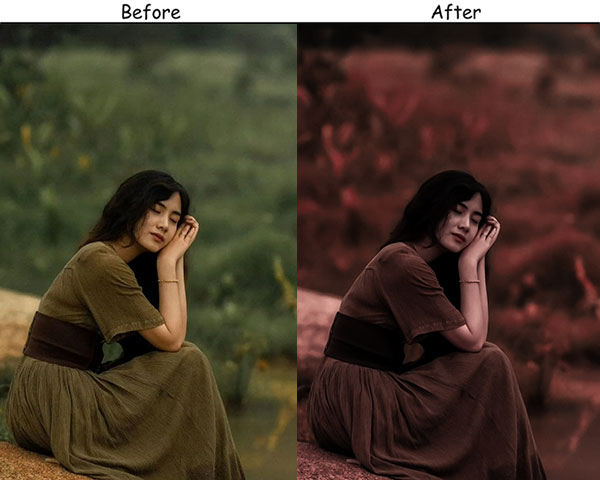
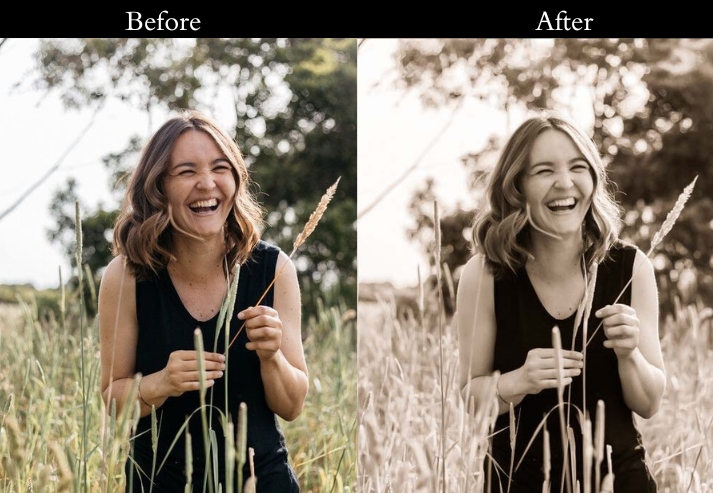
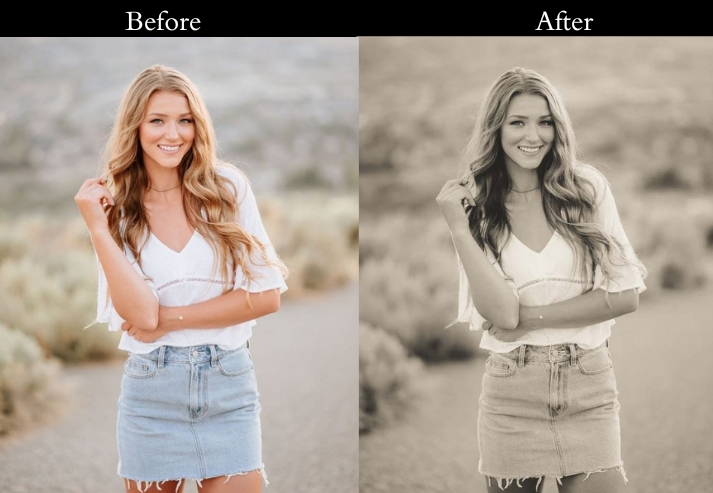
Purpose: a bold, dramatic look with intensified red tones.
Best For: Portraits, urban scenes, and any photo.
Style: Bold and passionate with rich red tones.
24. Cinematic Wedding Preset
Capture the emotion and warmth of weddings and other romantic events with a cinematic touch.
Light Panel: Exposure +10% to +20% | Contrast +20% to +30% | Highlights −10% to −20% | Shadows +10% to +20% | Whites +10% to +20% | Blacks −10% to −20%.
Color Panel: Temp +10% to +20% | Vibrance +10% to +20%.
HSL / Color Mix: Pinks/Warm Tones Saturation +20% to +30%.
Effects Panel: Clarity +10% to +20% | Vignette −10% to −20%.
Color Grading: Highlights H350/S20 | Shadows H50/S10.
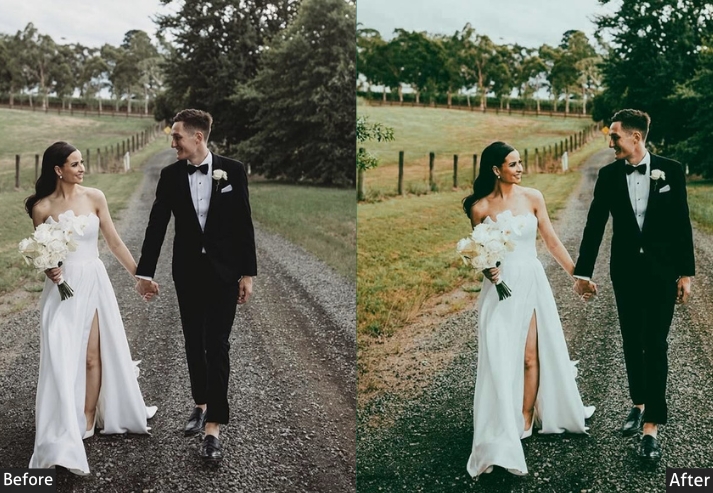
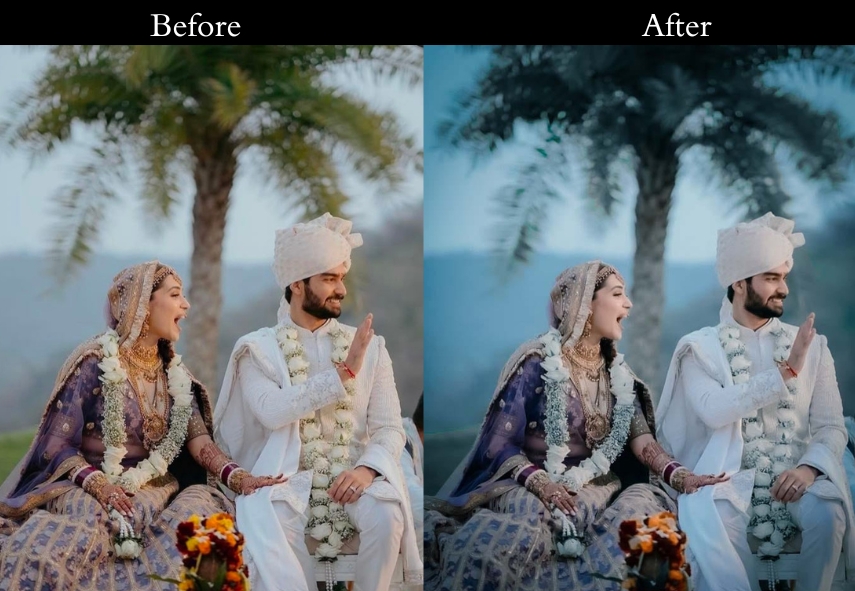
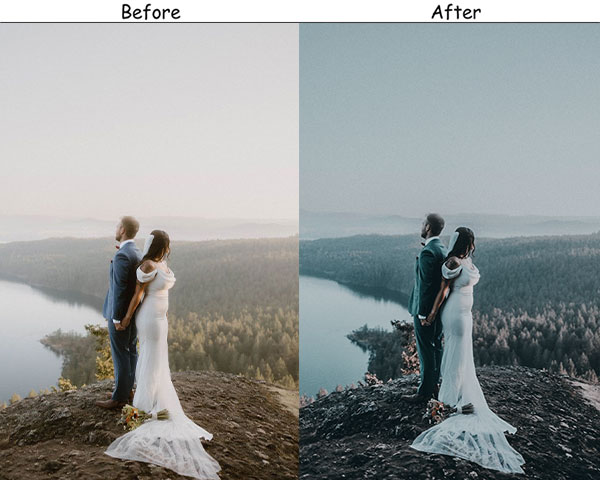
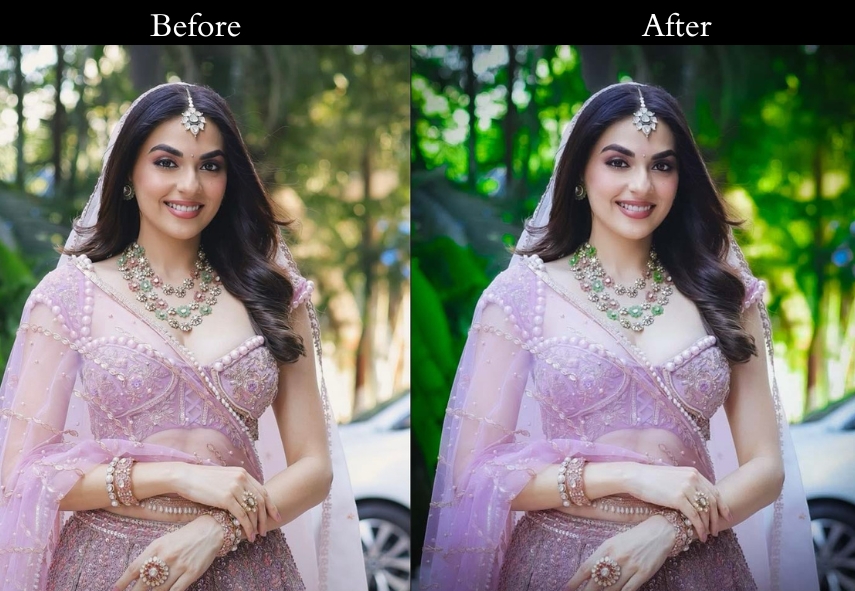
Purpose: soft, romantic atmosphere perfect for wedding photos.
Best For: Wedding photography, engagement sessions, and romantic portraits.
Style: Soft, warm, and romantic with a cinematic flair.
25. Cinematic Night Preset
Night photography is the hardest environment for preset application: high ISO noise, mixed color temperatures from different artificial sources, crushed shadows, and blown highlights from light sources all conspire against you. Cinematic Night is specifically built for this challenge. Rather than trying to ‘fix’ night photos to look like day, it leans fully into the darkness, noise, and color chaos of artificial nighttime light, transforming those flaws into atmosphere.
Light Panel: Exposure −10% to −20% | Contrast +30% to +40% | Highlights −20% to −30% | Shadows +10% to +20% | Whites −10% to −20% | Blacks −30% to −40%.
Color Panel: Temp −10% to −20% | Vibrance +20% to +30%.
HSL / Color Mix: Blues/Cyans Saturation +20% to +30%.
Effects Panel: Clarity +20% to +30% | Dehaze +10% to +20%.
Color Grading: Highlights H220/S20 | Shadows H240/S20.
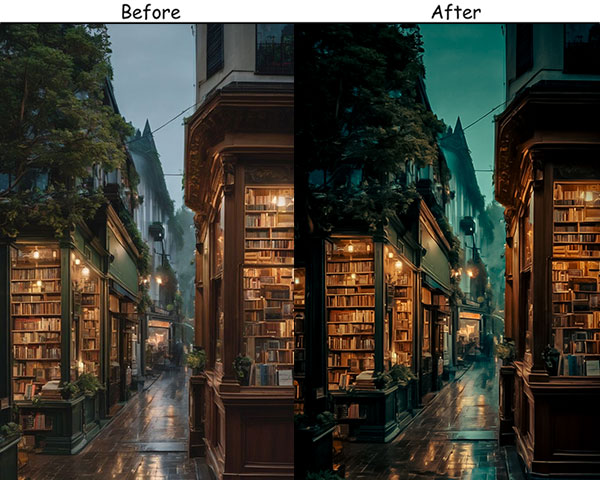
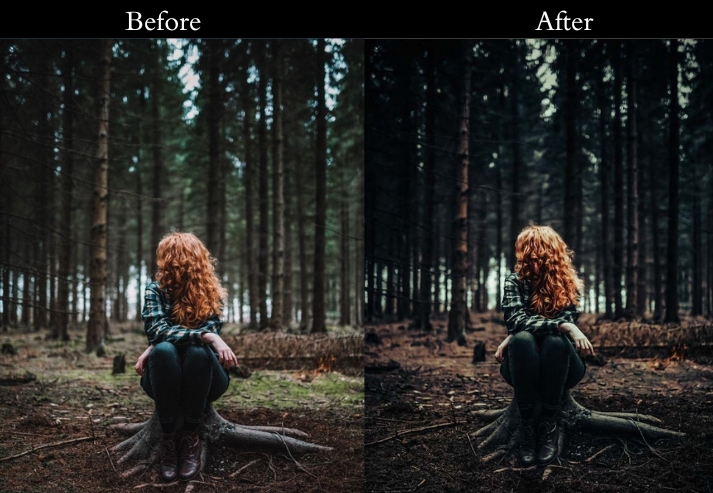
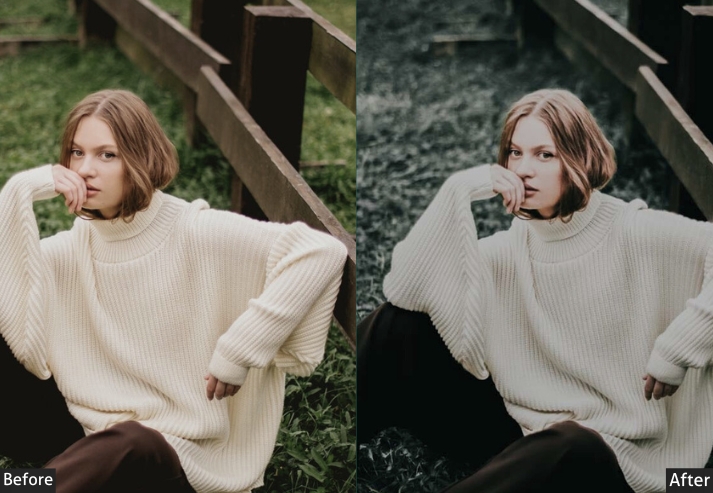
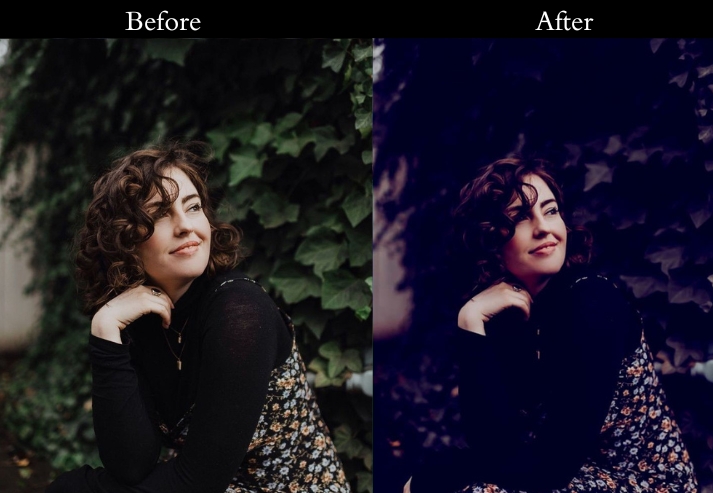
Purpose: night scenes with a cinematic look, emphasizing cool tones and deep contrasts.
Best For: Night photography, urban nightscapes, city lights.
Style: Cool, dramatic, and vibrant with deep shadows and bright highlights.
How to Install Cinematic Lightroom Presets?
Installing presets takes less than 2 minutes. Follow the steps for your version of Lightroom:
Desktop Lightroom Classic
- Download the preset file (.xmp or .lrtemplate).
- Open Lightroom Classic → Go to Develop Module.
- In the Presets panel (left side), right-click any folder → Import Presets.
- Select your downloaded file → Click Import.
- Your preset will appear in the Presets panel. Click any photo to apply it instantly.
Lightroom Mobile (iOS & Android)
- Download the preset file (.dng format works best for mobile).
- Import the .dng file into your Lightroom Mobile photo library.
- Open the .dng file → tap the three-dot menu → Create Preset.
- Name your preset → Save to your preferred group.
- Apply to any photo by opening it → Presets → tap your saved preset.
Few Words
With these presets at your fingertips, you’re all set to turn your everyday shots into blockbuster-worthy scenes. It’s about creating an experience, setting a mood, and telling a story that lingers. Each preset is like a different lens through which you see the world, helping you bring out the drama, the emotion, the intensity of every moment.
So, go ahead, grab those presets, start editing, and let your imagination run wild. Play with the colors, dial in those shadows, add some grain, and watch your photos come alive with cinematic flair. Don’t be afraid to experiment and make the edits your own. After all, every great filmmaker starts with a vision, and that’s exactly what you’re doing here, frame by frame, edit by edit.
Can’t wait to see what you create! Share your cinematic creation, inspire others, and keep pushing those creative boundaries. Until next time, stay inspired, keep shooting, and always chase that perfect shot. Lights, camera, action… and edit!
More Presets:
Fujifilm Lightroom Presets Free Download
Street Lightroom Presets Free Download
Black And White Lightroom Presets Free Download
Drone Photography Lightroom Presets Free Download
Moody Lightroom Presets Free Download
Urban Lightroom Presets Ready To Download
Lightroom Portrait Presets Free Download
Instagram Lightroom Presets Free Download
Indoor Lightroom Presets Free Download