Let me take you back to the first time I edited a photo in Lightroom.
I stared at roughly 37 different sliders. I moved one. The photo turned orange. I moved another. It looked like a Renaissance painting – not in a good way. I moved a third one… and I genuinely don’t know what happened next, but I do know I closed Lightroom and stared at the wall for ten minutes. 😅
Sound familiar? Yeah, thought so… Here’s what nobody told me back then: Lightroom Presets exist specifically to solve that problem. And once I discovered them, my photos went from “accidental art project” to “actually looks professional” almost overnight. They are, without a doubt, one of the most powerful tools for photographers at every skill level.
In this guide, I’m going to walk you through literally everything: what presets are, how they work, how to install them, how to use them without making your photos look like an Instagram cliché, and even how to create your very own. Let’s make your photos look incredible!
TABLE OF CONTENTS
- What Are Lightroom Presets?
- How Do Presets Work?
- Types of Lightroom Presets
- Why Should You Use Presets?
- Presets vs. Instagram Filters.
- Presets vs. Profiles.
- How to Install Presets on Desktop.
- How to Install Presets on Mobile.
- How to Use Presets Like a Pro.
- How to Create Your Own Preset.
- Common Beginner Mistakes to Avoid.
- Frequently Asked Questions.
QUICK RECAP
What are Lightroom presets?
Pre-saved collections of editing adjustments applied to a photo with one click.
How do they work?
They instantly move Lightroom’s sliders to saved values. Non-destructive – always fully reversible.
Types?
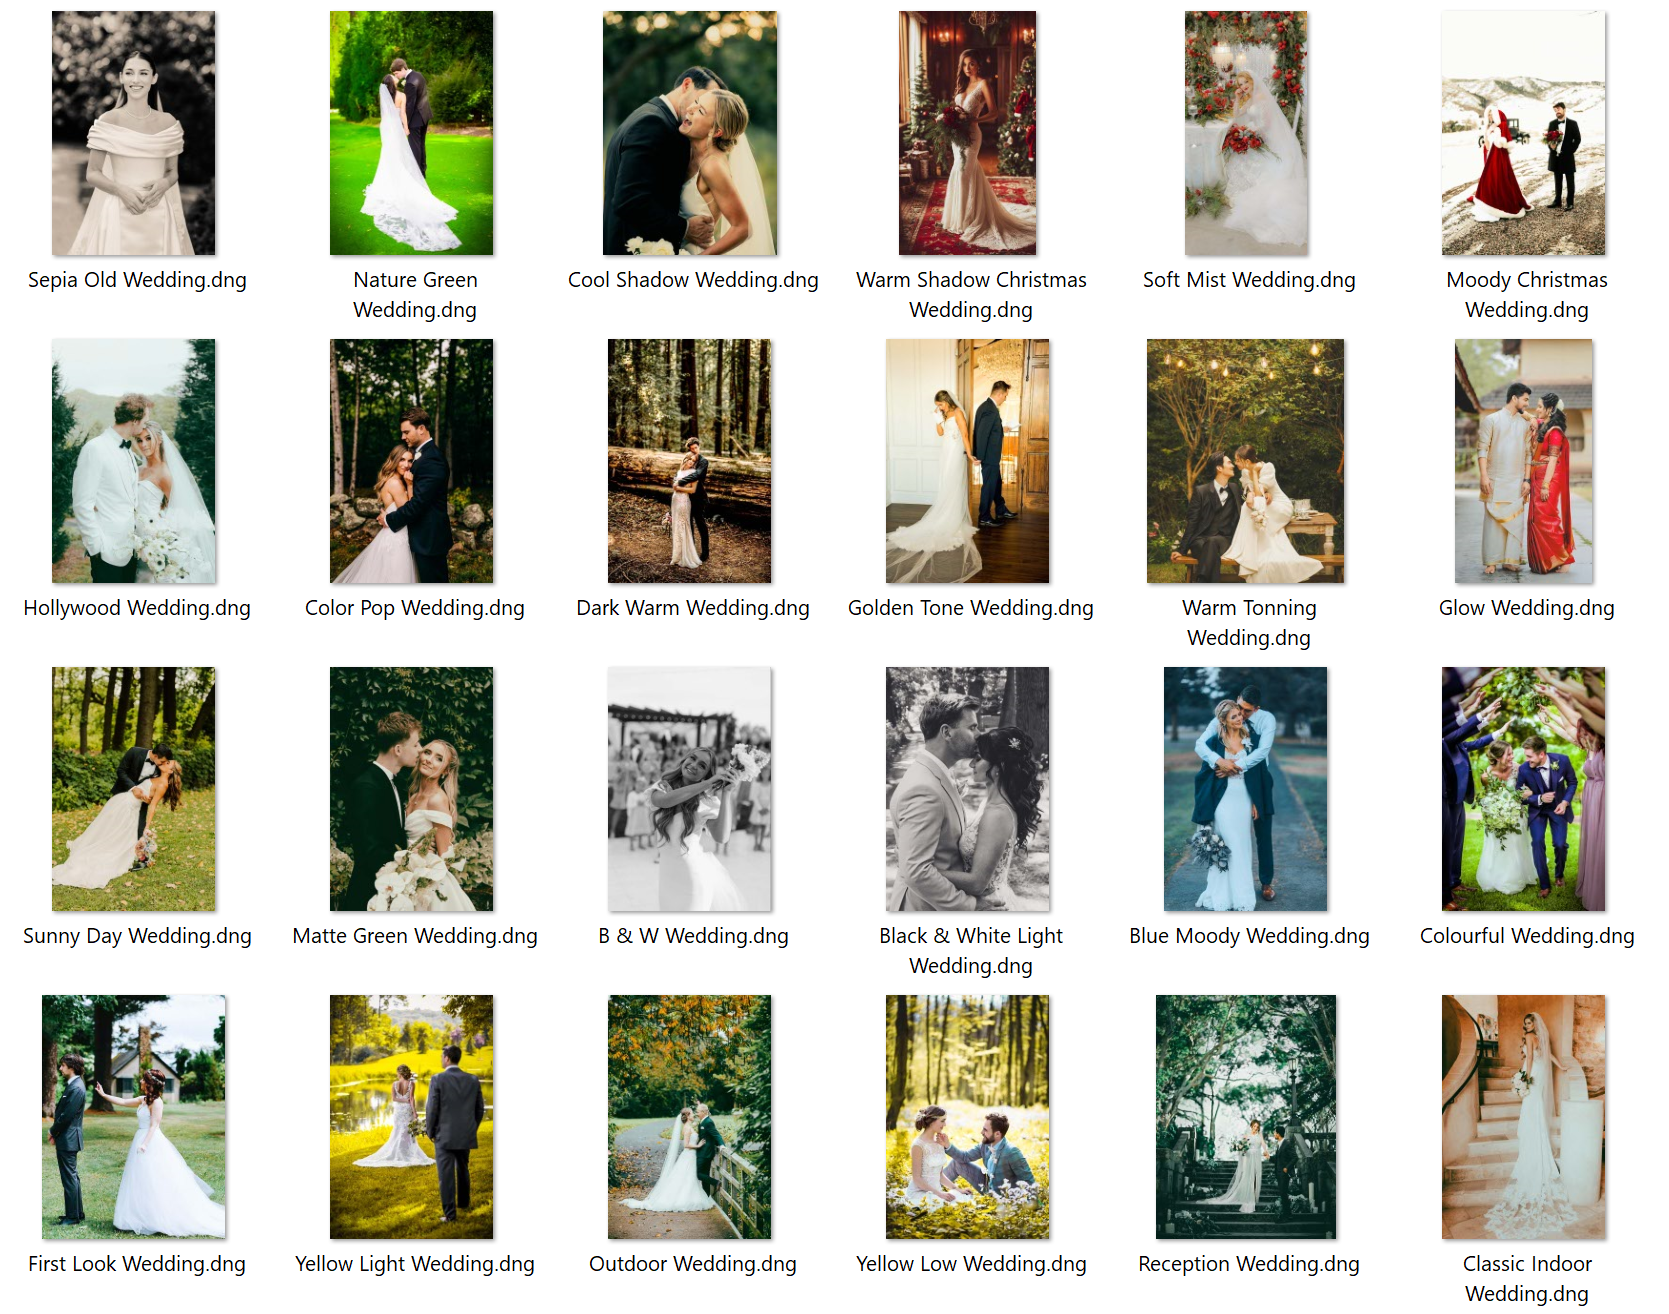
Built-in, free, paid, and custom. Styles include light & airy, moody, film, cinematic, B&W, vibrant, and natural.
Why use them?
Speed, consistency, learning, experimentation, and building a personal visual style.
Installing on desktop:
Develop module → Presets panel → “+” → Import Presets → select your XMP files.
Installing on mobile:
Import DNG files into Lightroom → open each one → Create Preset → done.
Using them well:
Fix white balance first → apply preset → adjust exposure & WB → check skin tones → sync to batch edit.
Creating your own:
Edit a photo you love → “+” in Presets panel → Create Preset → name it → test and refine.
Remember the golden rule: A preset is a starting point, not a destination. Apply, adjust, and make it yours. Happy editing! 📸✨
SECTION 01 – WHAT ARE LIGHTROOM PRESETS?
Okay, let’s start with the basics. At its core, a Lightroom Preset (.DNG/.XMP) is a saved collection of editing settings that can be applied to any photo with a single click.
“A preset is like a recipe for your photo. You write it once, and then you can cook the same meal a thousand times – with a little pinch of seasoning each time to taste.”
When you apply a preset, Lightroom automatically moves a whole bunch of sliders – things like:
☀️ Exposure & Light – Brightness, highlights, shadows, whites, blacks.
🎨 Color & Tone – Saturation, vibrance, hue, HSL color mixing.
📈 Tone Curve – Contrast shaping, lift in shadows, cinematic S-curves.
🌡️ White Balance – Color temperature (warm/cool), tint.
✨ Detail & Grain – Sharpening, noise reduction, film grain effects.
🔲 Vignette & Lens – Edge darkening, lens corrections, distortion.
And all of that happens the moment you click – or tap – on a preset name. One click. That’s it. No PhD in photo editing required.
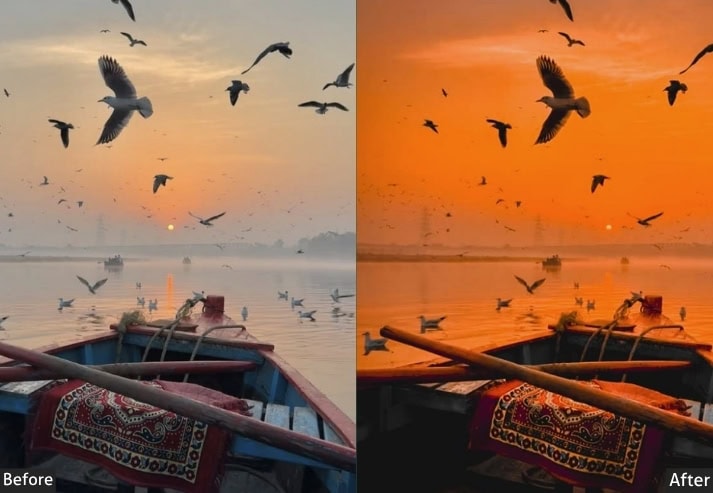
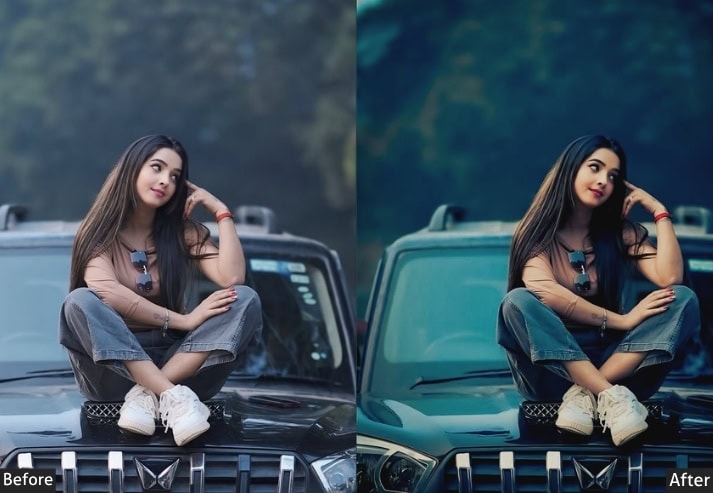
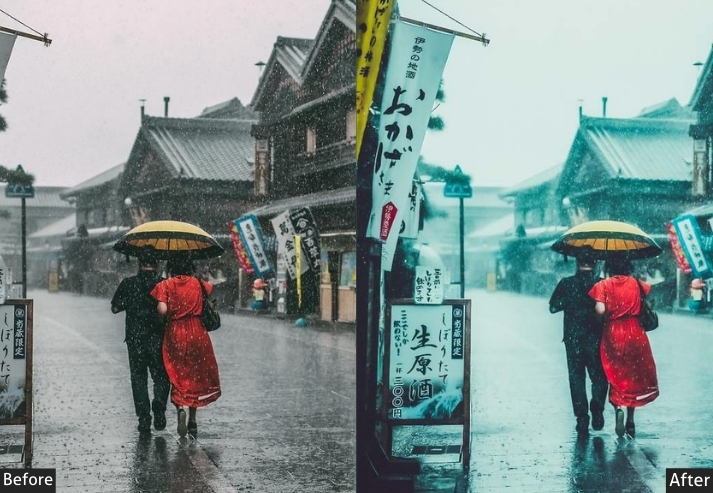
See the difference between Before & After Using Lightroom presets.
Fun Fact: Technically, presets are stored as XMP files (on desktop) or DNG files (for mobile). But you absolutely don’t need to know that to use them. I’m just throwing it in so you can impress people at parties. 😄
SECTION 02 – HOW DO LIGHTROOM PRESETS ACTUALLY WORK?
Here’s the thing that really blew my mind when I first learned it: Lightroom is non-destructive. When you edit a photo – with or without a preset – you’re not actually changing the original image file at all. Lightroom just writes a set of instructions in a separate file that says, “when I display this photo, apply these adjustments.”
A preset is basically a pre-written version of those instructions. So when you click a preset, Lightroom goes: “Oh! I know what to do here” and applies those saved instructions to your photo instantly.
The beautiful side effect of this? You can undo absolutely everything. Hit “Reset” in Lightroom, and your photo snaps right back to exactly how it came off your camera. No damage done. No anxiety needed. You’re always safe to experiment.
💡 IMPORTANT FOR BEGINNERS: Never be afraid to apply a preset and mess around with it. Your original photo is always 100% safe. The worst thing that can happen is you press “Reset” and start over. That’s it.
What Happens Under the Hood?
When you apply a preset, Lightroom reads the .XMP file (which is basically just a text file full of numbers) and moves all the corresponding sliders to the saved values. If the preset says Exposure = +0.35, the exposure slider jumps to +0.35. If it says “Clarity = +15,” then clarity jumps to +15. And so on, for every single setting saved in that preset.
After applying, all those sliders are yours to play with. Change anything you like. It’s your photo!
SECTION 03 – TYPES OF LIGHTROOM PRESETS
Not all presets are the same – in fact, they vary a lot in terms of where they come from, what they do, and how you get them. BY SOURCE:
🎁 Built-in Presets
Lightroom comes pre-loaded with a bunch of presets organized by style: B&W, Color, Creative, and more. A great starting point for experimenting before you download anything external.
🌐 Free Presets
Tons of photographers give away presets for free. Quality varies – some are amazing, some are… let’s say “character-building.” Download from trusted creators only.
💎 Premium / Paid Presets
Created by professional photographers and refined over years of real-world use. More consistent across different photos and lighting conditions. Prices typically range from $10 to $60 per pack.
🛠️ Your Own Custom Presets
The holy grail. Presets you build yourself, tailored to your editing style. We’ll cover how to make these in Section 10!
BY STYLE / CATEGORY:
☁️ Light & Airy – Bright, soft, pastel tones, lifted shadows. Best for portraits, lifestyle, and Instagram feeds.
🌑 Moody & Dark – Deep shadows, desaturated colors, dramatic contrast. Best for landscape, street, and editorial photography.
🎞️ Film / Vintage – Faded blacks, warm tones, grain, halation effects. Great for travel, fashion, and nostalgic vibes.
🖤 Black & White – Desaturated, often high contrast. Classic choice for portraits, street photography, and fine art.
🌿 Natural / Clean – Balanced, accurate-looking, minimal processing. Perfect for weddings, family portraits, and real estate.
🌈 Vibrant – Boosted colors, punchy and saturated. Great for travel, food, and adventure photography.
🎬 Cinematic – Teal shadows, orange highlights, filmic look. Popular for portraits and dramatic landscapes.
SECTION 04 – WHY SHOULD YOU ACTUALLY USE PRESETS?
I know what you might be thinking: “Isn’t using presets kind of cheating?” I hear this all the time, and honestly? No. Absolutely not.
Professional chefs use pre-made stocks, spice blends, and sauces. Professional musicians use effects pedals and studio plugins. Using tools that streamline your craft doesn’t diminish the art – it frees you to focus on what actually matters: the creative decisions.
Here are the real reasons presets are worth your time:
- SPEED – Edit 100 Photos in Minutes, Not Hours
Without presets, editing a batch of 200 wedding photos could take an entire day. With presets, you apply your base look in one click, make small tweaks per image, and you’re done in a fraction of the time. This is how working photographers actually survive deadlines.
- CONSISTENCY – A Cohesive Feed & Portfolio
You know those Instagram feeds where every photo looks like it belongs to the same visual universe? That’s presets at work. Using the same preset (with small adjustments) across your images creates a signature aesthetic that makes your portfolio or feed immediately recognizable.
- LEARNING – The World’s Best Editing School
This one’s massively underrated. When you apply a preset and then look at which sliders moved and by how much, you start to understand why certain edits look the way they do. Presets are actually a brilliant way to reverse-engineer professional editing techniques. I learned more about color grading from studying presets than from any YouTube tutorial.
- EXPERIMENTATION – Explore Styles Risk-Free
Not sure if you’re a “light and airy” person or a “dark and moody” person? Apply a few presets and see which one makes your heart go “yes, THAT.” It’s like trying on clothes without undressing. 😄
- PERSONAL BRANDING – Your Signature Look
For photographers running a business or content creators building an audience, a consistent visual style is part of your brand identity. Presets are the engine that keeps that style consistent, photo after photo, client after client.
SECTION 05 – LIGHTROOM PRESETS VS. INSTAGRAM FILTERS
Here’s a question I get all the time: “Why would I use Lightroom presets when Instagram has filters for free?” Great question. The answer comes down to one word: control.
INSTAGRAM FILTERS:
- Fixed look, very limited tweaking.
- Compresses and degrades image quality.
- JPEG only – no RAW support.
- Inconsistent results across different lighting.
- One photo at a time, no batch editing.
- Free ✅
LIGHTROOM PRESETS:
- Full control over every single setting.
- Non-destructive, preserves full resolution.
- Works on RAW, JPEG, PNG, HEIF, TIFF, and more.
- Fully adjustable to match different lighting conditions.
- Apply to hundreds of photos at once with batch sync.
- Free to paid (from $0 to ~$60).
Instagram filters are like a one-size-fits-all hoodie – convenient, but it won’t look exactly right on everyone. Lightroom presets are like a tailor – they give you a starting point and then let you fine-tune everything until it fits perfectly.
SECTION 06 – PRESETS VS. PROFILES – WHAT’S THE DIFFERENCE?
This trips up a LOT of beginners, so let me clear it up once and for all.
Both presets and profiles affect how your photo looks in Lightroom, but they work at different levels.
PROFILES work at the RAW interpretation level. Think of a profile as the “foundation” of your edit. It changes how Lightroom renders colors and tones in your RAW file before any sliders are touched. It doesn’t move any sliders – it changes the underlying color science. Profiles are selected from the top of the Basic panel in the Develop module.
PRESETS work at the adjustment level. Presets move the actual sliders: exposure, contrast, tone curve, color grading, etc. They’re applied on top of whatever profile is already active. Most professional preset packs include a recommended profile.
The short version: Profiles shape the raw material, and presets are the actual edit.
Many photographers use both together for the most polished results. Don’t stress about this too much when you’re starting out – it becomes intuitive pretty quickly.
SECTION 07 – HOW TO INSTALL LIGHTROOM PRESETS ON DESKTOP?
Okay, let’s get practical. You’ve found some presets – maybe you downloaded free ones, maybe you bought a pack, maybe a friend sent them to you. Now what? Here’s exactly how to install them in Lightroom Classic:
STEP 1 – Open Lightroom Classic & Go to the Develop Module
Click on “Develop” in the top menu bar (or press D on your keyboard). This is where all your editing tools live.
STEP 2 – Find the Presets Panel on the Left Side
Look to the left side of your screen. You should see a panel called “Presets.” Click the little triangle to expand it if it isn’t already open.
STEP 3 – Click the “+” Icon → Import Presets
At the top of the Presets panel, you’ll see a tiny + icon. Click it and choose “Import Presets…” from the dropdown menu.
STEP 4 – Your Preset Files & Import
Find the .XMP or .lrtemplate files on your computer (wherever you saved or unzipped them). Select them all and click Import. Done! ✅
STEP 5 – Find Your New Presets in the Panel
Your imported presets will appear in a new folder inside the Presets panel. Hover over any preset name to see a live preview in the Navigator window above. Click to apply it to your photo. 🎉
⚠️ NOTE ON FILE FORMATS: Modern Lightroom (2018 and later) uses .XMP files. Older presets might come as .lrtemplate files. Lightroom Classic can still import these, but it’s worth knowing the difference. Lightroom CC (the cloud version) only accepts .XMP.
SECTION 08 – HOW TO INSTALL PRESETS ON LIGHTROOM MOBILE
Don’t have a fancy computer setup? No worries! Lightroom mobile is genuinely powerful, and installing presets on it is super easy. The trick? Mobile presets come as DNG files, not XMP.
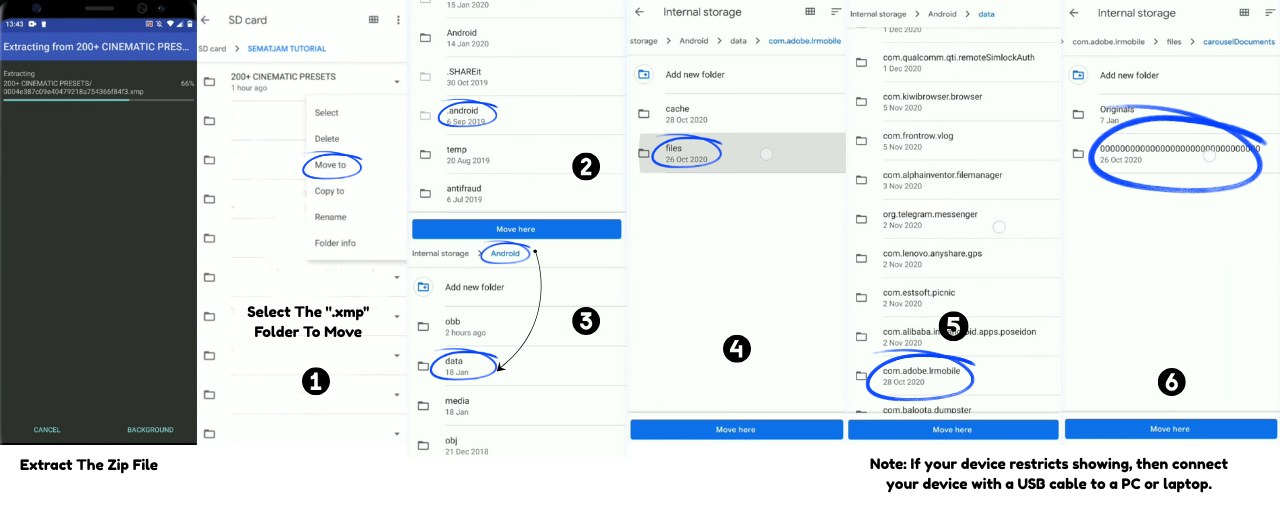

STEP 1 – Save the ”.DNG” Preset Files to Your Phone
Download or transfer the .DNG preset files to your Camera Roll / Photos app. Most preset sellers include mobile-compatible DNG files in their download package.
STEP 2 – Import the DNG Files into Lightroom Mobile
Open Lightroom mobile, tap the + icon to add photos, and import the DNG files as you would regular photos.
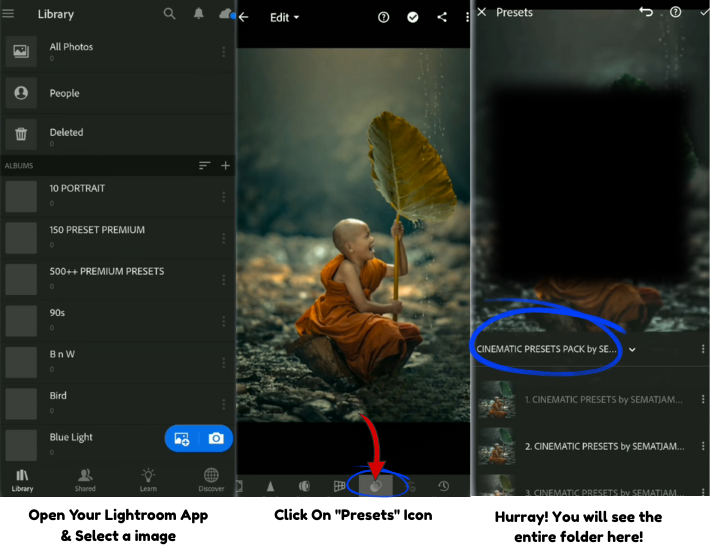
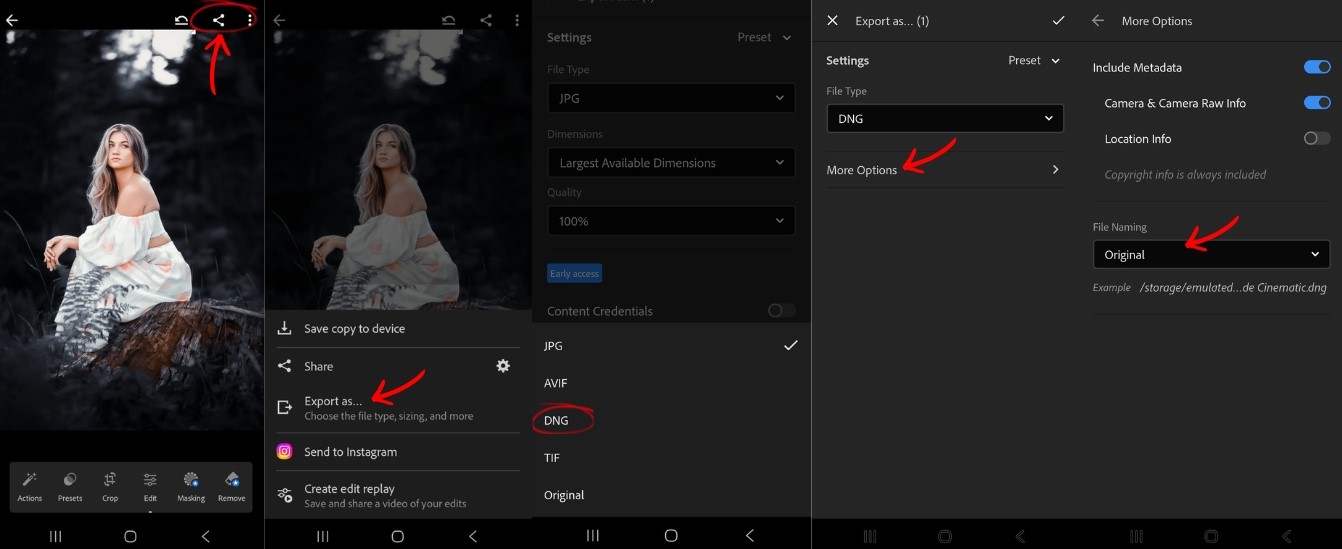
STEP 3 – Open a DNG Preset File
Tap on one of the imported DNG files to open it in the editing view. It’ll look like a gray or colored card – that’s normal, it’s just the preset’s “carrier” image.
STEP 4 – Tap the Three Dots → Create Preset
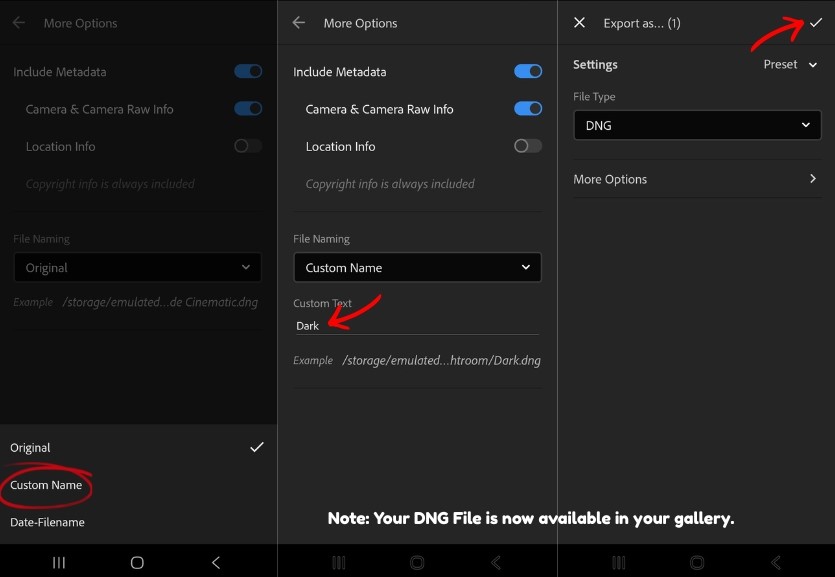
Tap the ⋯ icon (top right corner), then tap “Create Preset.” Name it, choose a group to save it to, and hit the checkmark. ✅
STEP 5 – Repeat for Each DNG File & Start Editing!
Do this for each preset in your pack. Once saved, all your presets will appear in the Presets panel whenever you’re editing any photo. Just tap to apply!
⭐ PRO TIP: If you have a Creative Cloud subscription, presets sync automatically between Lightroom desktop and mobile. Install on your computer once. They appear on your phone without any manual DNG processing needed. Worth it if you edit across both devices regularly.
SECTION 09 – HOW TO USE LIGHTROOM PRESETS LIKE AN ACTUAL PRO
Here’s where most beginners go wrong: they apply a preset, think “hmm, this doesn’t look right,” and give up. The key insight that separates good preset users from great ones is this:
“A preset is a starting point, not a finish line.”
No preset looks perfect right out of the box on every single photo. Different lighting, different cameras, different scenes – they all mean you need to make some tweaks after applying. Here’s my personal step-by-step workflow:
STEP 1 – Fix White Balance First, Before Applying Any Preset
Before you even touch a preset, make sure your white balance is roughly correct. A preset designed for warm golden-hour light will look very weird on a photo with a strong blue indoor cast. Fixing WB first gives the preset the best chance to work its magic.
STEP 2 – Hover to Preview Presets Before Applying
In Lightroom Classic, hovering over preset names in the panel shows a live preview in the Navigator window above. Use this! Scroll through presets without committing to any of them until you find the vibe you want.
STEP 3 – Apply the Preset, Then Fix Exposure
After applying, look at your exposure first. Is the photo too dark or too bright? Adjust the Exposure slider. Even just ±0.5 stops can make a huge difference in how polished the result looks.
STEP 4 – Tweak Highlights and Shadows
Drag Highlights down a bit to recover any blown-out sky. Lift Shadows gently to open up dark areas. Most professional presets are calibrated conservatively here – your specific image will likely need a personal touch.
STEP 5 – Adjust White Balance & Tint
This is the biggest source of complaints about “this preset looks off”. Shift the Temperature slider warmer or cooler by 200-500K to match the preset’s intended mood to your specific lighting. Don’t skip this step!
STEP 6 – Check Your Skin Tones (If People Are in the Shot)
If the skin looks too orange, go to the HSL panel and drag the Orange Hue slider slightly to the left, or reduce Orange Saturation. If it looks too pink or red, bring the Red Saturation down a touch. Your subjects should always look like actual humans. 😄
STEP 7 – Sync Settings for Batch Editing
Happy with one photo? Select all your similar photos in the filmstrip, right-click → “Develop Settings” → “Sync Settings” to apply the same edit to all of them at once. This is the true power move. ⚡
🎯 THE GOLDEN RULE: If your preset-edited photo looks like it has a preset on it, it’s not done yet. The goal is for the edit to look natural and intentional – like that’s just how the photo looks, not “oh that’s one of those Instagram presets.”
SECTION 10 – HOW TO CREATE YOUR OWN LIGHTROOM PRESET
Once you’ve been using presets for a while, you’ll inevitably reach a moment where you think: “I want a preset that looks exactly like THIS.” Good news: creating your own is surprisingly easy.
STEP 1 – Edit a Photo Until It Looks Exactly How You Want
Work on a well-lit photo that’s representative of your typical shots. Adjust everything – exposure, colors, tone curve, details – until you’re completely happy with it. This will be the blueprint for your preset.
STEP 2 – Click the “+” in the Presets Panel
In the Develop module, go to the Presets panel on the left side. Click the + icon, then choose “Create Preset…”.
STEP 3 – Name Your Preset and Choose What Settings to Include
Give it a memorable name (like “My Moody Forest Edit” or “Clean Portrait Base”). A dialog box will display checkboxes for each setting type. Choose which ones to include.
Pro tip: Leave “White Balance” and “Exposure” unchecked so the preset adapts naturally to each photo’s unique lighting, rather than forcing your values onto every image.
STEP 4 – Click Create – Your Preset Is Born! 🎉
Your preset now appears in the Presets panel, ready to apply to any photo. Test it on 10 different photos in varied lighting conditions and refine from there.
💡 SHOULD YOU INCLUDE WHITE BALANCE IN YOUR PRESET?
Generally, no – especially as a beginner. If you bake at a specific color temperature, your preset will look great in photos with the same lighting but potentially terrible under different conditions. Leave it out and adjust WB manually per photo for much more consistent, professional results.
SECTION 11 – COMMON BEGINNER MISTAKES TO AVOID
I’ve seen (and personally made) every one of these mistakes. Save yourself the headache:
MISTAKE 1 – Applying a Preset and Calling It Done
A preset is a starting point. Always adjust exposure and white balance afterward. Every single time. Without fail. This one step separates photos that look “preset-y” from photos that look genuinely professional.
MISTAKE 2 – Installing 300 Presets at Once
You’ll be paralyzed by choice and end up using none of them. Start with 10–20 quality presets from 1–2 collections. Less is more. Master a few before expanding your library.
MISTAKE 3 – Downloading from Sketchy Websites
Shady “free presets” sites can bundle malware inside zip files. Stick to presets from known photographers, reputable marketplaces, or well-reviewed creators. Your computer will thank you.
MISTAKE 4 – Applying Heavy Presets to Already-Edited JPEGs
Presets work best on RAW files or clean, unedited JPEGs straight from the camera. Applying a strong preset to an already-processed image is like putting seasoning on a meal that’s already been seasoned twice – the results are usually a mess.
MISTAKE 5 – Being Inconsistent Across Your Gallery
Switching between totally different presets for every photo makes your portfolio look scattered and unfocused. Pick a visual direction and stick to it – at least for a given project, client, or season.
MISTAKE 6 – Never Learning What the Sliders Actually Do
Presets are fantastic, but eventually you need to understand the fundamentals behind them. Spend 20 minutes playing with each slider individually, just to see what it does. It’ll completely transform how thoughtfully you use presets.
SECTION 12 – FREQUENTLY ASKED QUESTIONS
Author: Pauline Jackson
Have a question not answered here? Leave a comment – I read every single one.
Learn More:
Free vs Paid Lightroom Presets
Lightroom Presets Won’t Import, Show, or Apply? Fix Them All