Editing 300 photographs one by one is not dedication. It is a workflow problem. This step-by-step manual shows you how to copy a finished look across a group in Lightroom while keeping exposure, white balance, crops, and masks under control.
There is a moment in almost every large Lightroom job when enthusiasm turns into arithmetic. You finish one photograph. It looks exactly right, and another 247 thumbnails are waiting in the filmstrip. Repeating the same contrast, color, and detail adjustments on each image would waste hours, and it would probably make the final gallery less consistent.
That is what batch editing solves. You edit one representative image, copy the right settings, apply them to a group of similar photographs, and then make small individual corrections. Lightroom Classic calls this synchronization. Lightroom Desktop and Mobile usually present it as copying and pasting edits.
The short answer: Edit one “master” photograph first. Select the other photographs shot under similar light, then use Sync in Lightroom Classic or Copy/Paste Edit Settings in Lightroom Desktop and Mobile. Start with Modified settings. Exclude Crop, Healing/Remove, subject-specific masks, Exposure and White Balance whenever those values should differ between images. Finally, inspect every photograph at thumbnail size and zoom into the important ones.
- What does “batch edit” mean in Lightroom?
- Before you synchronize anything: prepare the batch
- How to batch edit in Lightroom Classic?
- How to batch edit in Lightroom Desktop?
- How to batch edit in Lightroom Mobile
- Which Lightroom settings should you copy?
- How to batch edit AI masks safely
- Batch editing versus presets: which should you use?
- A practical batch workflow for a complete photo shoot
- How to undo a batch edit?
- Common batch-editing problems and how to fix them
- Final checklist
What does “batch edit” mean in Lightroom?
Batch editing means applying the same group of edit instructions to more than one photograph. Those instructions can include a profile, tone curve, contrast, highlights, shadows, color grading, HSL adjustments, sharpening, noise reduction, lens corrections, grain, and, in suitable cases, crop or AI masks.
Lightroom does not permanently paint those changes onto your original RAW files. The edits remain nondestructive instructions in the catalog or cloud library. You can refine, reset, or remove them later.
| Lightroom version | Fastest method | Best use | Main caution |
|---|---|---|---|
| Lightroom Classic | Sync or Auto Sync | Large local catalogs, weddings, events, and studio sets | Auto Sync changes every selected image as you move a slider |
| Lightroom Desktop | Copy Edit Settings → Paste | Cloud and Local photo grids with a modern interface | Confirm which photo supplied the copied settings |
| Lightroom Mobile | Copy Settings → multi-select → Paste edits | Travel, social content and edits made away from a computer | The More menu and wording can vary slightly by platform/version |
| Any version | Preset | Reusable creative starting points across different shoots | A preset still needs exposure and white-balance checks |
The four controls you will use most
The following custom icons mirror the familiar editing actions described in this guide. They are lightweight inline SVG, not screenshots or external icon files, so they stay sharp and cannot slow the page with another library.
Before you synchronize anything: prepare the batch
The quality of a batch edit is decided before you press Sync. A sunset portrait, an indoor reception, and a flash photograph may belong to the same wedding, but they do not belong to the same editing batch.
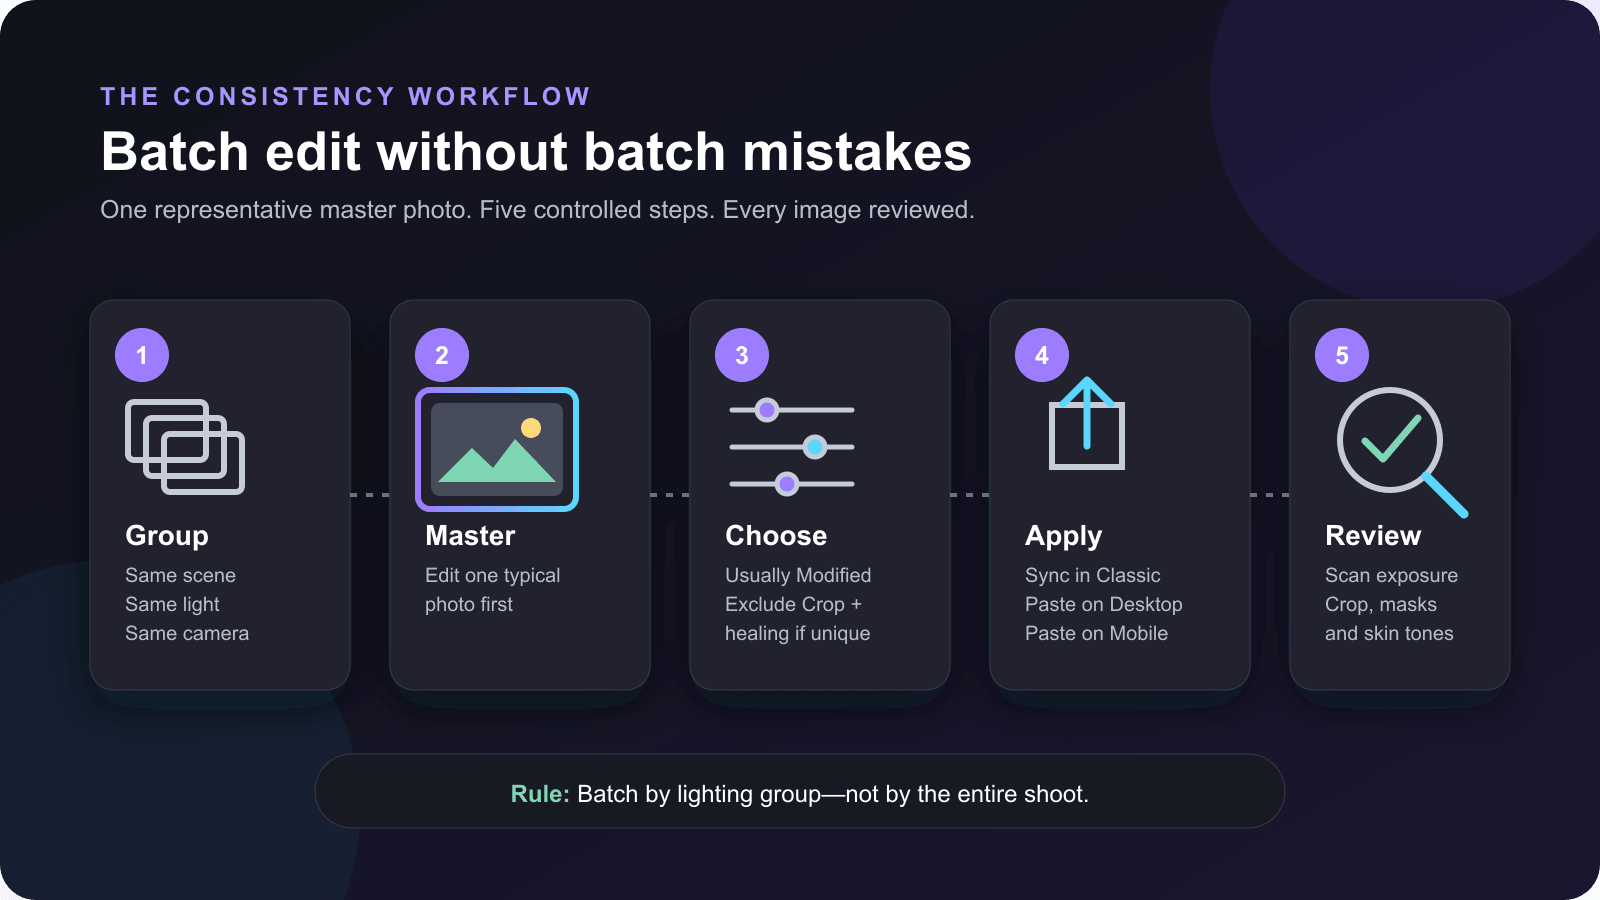
The reliable sequence is Group → Master → Choose → Apply → Review.
- Cull first. Reject obvious blinks, missed focus, and accidental frames. There is no benefit in spending processing time on photographs you will never deliver.
- Divide the shoot into lighting groups. Separate direct sun, shade, indoor window light, tungsten, flash, and nighttime photographs. A group of 15 genuinely similar files is safer than a batch of 500 mixed files.
- Choose a representative master. Pick an image with normal exposure, a useful range of tones, an important subject, and no unusual color cast. Avoid choosing the single brightest, darkest, or most backlit photograph.
- Finish the master edit. Set its profile, white balance, tonal balance, curve, color mix, color grading, detail, and lens corrections. View the photograph at 100% before copying aggressive sharpening or noise reduction.
- Decide what should travel. Creative color and tone usually transfer well. Crop, healing, geometry, subject masks, exposure, and white balance require more judgment.
The mistake that ruins batches: Do not select an entire shoot and synchronize a fixed Exposure or White Balance value just because the photos were taken on the same day. Clouds move, subjects turn, flash power changes and cameras switch angles. Batch photographs by lighting condition, then fine-tune exposure per frame.
How to batch edit in Lightroom Classic?
Lightroom Classic offers the deepest batch workflow. You can synchronize a finished edit once, leave Auto Sync active while working, copy and paste settings, apply presets during import, or use Match Total Exposures for a sequence whose brightness varies.
Method 1: Synchronize a finished master edit
Basic adjustments
- Open Lightroom Classic and switch to the Develop module.
- Edit your master photograph until the overall look is finished.
- Keep that master active. In the Filmstrip, hold Ctrl on Windows or Command on macOS and click the other photographs that should receive the edit. For a continuous range, select the master and Shift-click the last photograph.
- Look at the Filmstrip carefully. The master should have the brighter active border. All target images should remain selected.
- Click Sync… at the lower right of the Develop module, or choose Settings → Sync Settings.
- In the Synchronize Settings dialog, choose Modified as a practical starting point. Review the checked groups and remove anything that should not be identical.
- Click Synchronize. Lightroom applies those settings to the selected photographs.
For most portrait or event batches, synchronize the creative profile, contrast, highlights, shadows, whites, blacks, tone curve, color mix, color grading, calibration, lens corrections, and restrained detail settings. Treat White Balance, Exposure, Crop, Transform, Remove, and Masks as conditional.
Method 2: Use Auto Sync while you edit
Auto Sync sends each adjustment to all selected photographs as soon as you make it. It is powerful when a studio sequence was shot with locked camera settings and unchanging light.
- Select the complete lighting group in the Filmstrip, keeping the most representative image active.
- Click the small switch beside Sync so the button changes to Auto Sync.
- Move a slider or apply a preset. The selected photos update together.
- When the shared edit is finished, turn Auto Sync off before making a correction intended for one photograph.
Auto Sync safety check
Before cropping, healing a blemish or changing one face, look at the button. If it says Auto Sync, your next action can affect every selected photograph. Deselect the batch or turn Auto Sync off first.
Method 3: Copy and paste settings
This method is useful when the target images are elsewhere in the catalog or when you want a more deliberate “copy now, paste later” workflow.
- Open the edited master in Develop and click Copy, or right-click the image and choose Settings → Copy Settings.
- Choose the settings you want and click Copy.
- Select one or more target photographs in the Filmstrip or Library Grid.
- Choose Photo → Develop Settings → Paste Settings, or right-click and choose Settings → Paste Settings.
Method 4: Match Total Exposures
If a sequence was photographed in the same scene but camera exposure drifted, Lightroom Classic can calculate relative exposure adjustments rather than forcing one fixed Exposure number onto every file.
- Correct the exposure of one representative photograph.
- Select it with the other photographs from the same scene. Keep the corrected photograph active.
- Choose Settings → Match Total Exposures in Develop, or Photo → Develop Settings → Match Total Exposures in Library.
- Review the result. The calculation is helpful, but bright dresses, black suits, stage lights, and changing compositions can still need manual correction.
Classic shortcut reference
Ctrl / Cmd + click selects separate photographs. Shift + click selects a range. Lightroom Classic’s exact copy/paste shortcut behavior depends on the active module, so the visible Copy, Paste and Sync controls are the safest choice for beginners.
How to batch edit in Lightroom Desktop?
Lightroom Desktop: the cloud-focused application often called Lightroom or Lightroom CC uses Copy Edit Settings and Paste Edit Settings. It works in the Cloud library and with Local photos.
- Open Lightroom on your computer and select Cloud or Local under My Photos.
- Open and finish the master photograph.
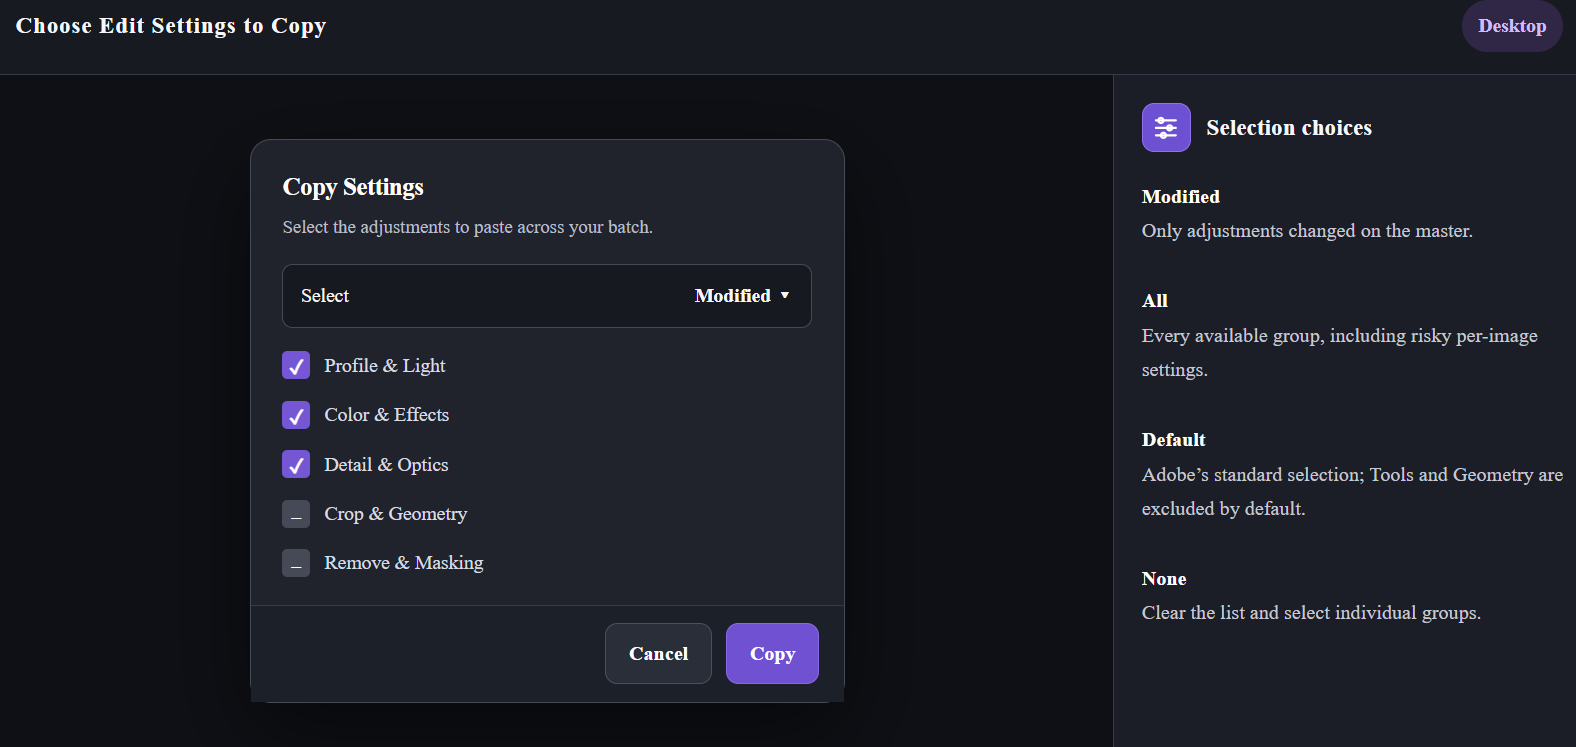
- Choose Photo → Choose Edit Settings To Copy. On Windows, the shortcut is Ctrl+Shift+C; on macOS, use Shift+Cmd+C.
- Choose Modified, All, Default, or None. Expand a group when you need to include or exclude individual settings, then click Copy.
- Return to Photo Grid or Square Grid and select the target images. In Detail view, you can select them in the Filmstrip.
- Choose Photo → Paste Edit Settings. Use Ctrl+V on Windows or Cmd+V on macOS.
- Wait for processing to finish, then scan the grid for frames that now look too bright, too dark, too warm, or too cool.
If you truly want every edited setting, the quick copy shortcut is Ctrl+C on Windows or Cmd+C on macOS. “Choose Edit Settings To Copy” is safer because it forces you to review the payload.
Batch-pasting adaptive masks on Desktop
AI-based masks such as Select Subject and Select Sky can be included in copied settings. Lightroom recalculates supported adaptive masks for each target photo. Create the mask on the master, choose Masking in the Copy Settings dialog, select the target photographs, and use Paste to Entire Selection when that option appears.
Recalculation does not guarantee a perfect selection. Check hair, veils, hands, glasses, gaps between limbs, and skies interrupted by buildings or trees.
How to batch edit in Lightroom Mobile
You can copy edits from one photo and paste them onto multiple selected photos in Lightroom Mobile. The labels and location of the More icon can differ slightly between iOS and Android releases, but the current workflow is the same.
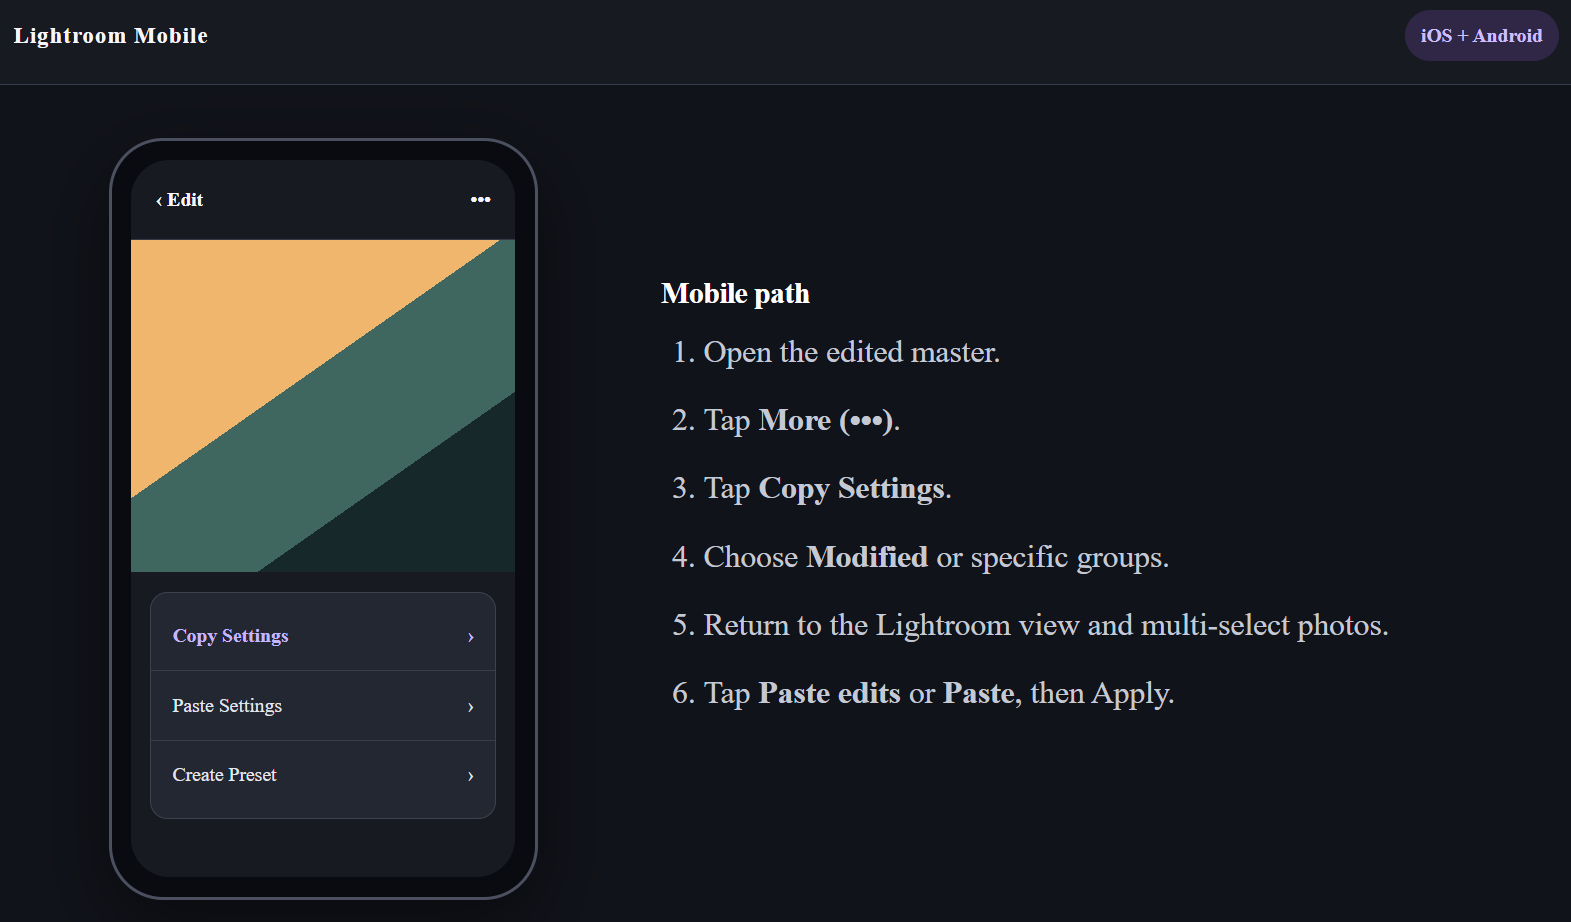
- Open a representative photograph in Detail/Loupe view and complete the edit.
- Tap the More icon (three dots), then choose Copy Settings.
- Open the Select menu and choose Modified, Default, All, or None. Expand groups such as Profile, Light, and Color to select individual settings.
- Confirm the selection with Done.
- Return to the Lightroom tab or library view. Long-press one thumbnail to enter selection mode, then tap the other target photographs.
- Tap Paste edits or Paste in the bottom panel. If a confirmation appears, tap Apply.
- Open several results and correct individual exposure, white balance, crop, and masks.
Mobile speed tip: Build and test one adaptable base preset for your recurring style. Apply it to the batch, then use copy-and-paste only for scene-specific corrections. Presets you create can synchronize across Lightroom Mobile and Desktop when cloud sync is enabled.
Which Lightroom settings should you copy?
“Modified” is a good starting point, but it doesn’t guarantee the right result. The correct choice depends on how similar the source and target photographs are.
| Setting | Recommendation | Why |
|---|---|---|
| Profile | Usually copy | Keeps the rendering foundation consistent; confirm camera/profile compatibility. |
| Tone Curve | Usually copy | Transfers the look’s contrast character. |
| HSL / Color Mix | Usually copy | Creates consistent color relationships across a scene. |
| Color Grading | Usually copy | Useful for a unified creative palette. |
| Texture, Clarity, Dehaze | Usually copy | Works when subject matter and lighting are similar; avoid excessive values. |
| Sharpening | Copy by camera/ISO | Different cameras, crops and noise levels can need different detail settings. |
| Noise Reduction | Copy by ISO group | A low-ISO daylight file and a high-ISO reception file should not share one aggressive value. |
| Lens Corrections | Usually automatic | Safe when Lightroom identifies each lens; inspect mixed-camera batches. |
| Exposure | Conditional | Copy only within tightly controlled light, or use Match Total Exposures in Classic. |
| White Balance | Conditional | Safe under locked studio light; risky across sun, shade, mixed bulbs and auto WB. |
| Crop and Angle | Usually exclude | Subject position changes from frame to frame. |
| Transform / Geometry | Usually exclude | Perspective corrections are often composition-specific. |
| Remove / Healing | Usually exclude | Dust may repeat, but people, blemishes and distractions move. |
| Masking | Adaptive only + review | AI masks can recalculate; brush and position-based masks may not align. |
A safe default recipe for mixed event photographs
Copy the Profile, Contrast, Highlights, Shadows, Whites, Blacks, Tone Curve, Color Mix, Color Grading, Effects, and lens corrections. Leave White Balance, Exposure, Crop, Healing, and non-adaptive masks unchecked. Then adjust Exposure and White Balance by lighting group.
A faster recipe for controlled studio photographs
If the camera, lens, flash power, modifier, subject position, and background are locked, you can usually include White Balance, Exposure, Crop, Geometry, and consistent masks. Test the paste on three images before applying it to the complete set.
How to batch edit AI masks safely
Adaptive masks are different from fixed local adjustments. Select Subject, Select Sky, background, and supported people masks can analyze each target photograph again. A fixed brush stroke, radial gradient, or linear gradient keeps its location and may land in the wrong place if the composition changes.
- Create the AI mask on the master image and make the local adjustment.
- Open the Copy Settings dialog and explicitly include Masking.
- Paste or synchronize the mask to a small test group.
- Wait for Lightroom to update the adaptive selection.
- Open the mask overlay on several photographs. Inspect hair, translucent fabric, glasses, gaps, edges, and similar-toned backgrounds.
- Delete or refine failed masks individually before export.
AI masking is excellent for raising a subject slightly or darkening repeated skies. It is not permission to skip quality control. A subtle failed edge may be invisible in the grid and obvious in a large print.
Batch editing versus presets: which should you use?
A preset is a saved recipe you can reuse next week or next year. Synchronization copies the current state of one photograph to other photographs now. They solve related but different problems.
| Use a preset when… | Use Sync / Copy-Paste when… |
|---|---|
| You want a reusable brand look. | You are matching images from one lighting setup. |
| You regularly begin with the same curve, color mix, and grain. | The master has job-specific exposure or color corrections. |
| You want to apply a base look during import. | You want precise control over the settings transferred this time. |
| You work across Mobile and Desktop with cloud sync. | You are finishing one gallery and may never need this exact correction again. |
The strongest professional workflow combines both. Apply a flexible preset for the creative foundation, correct one representative image per lighting group, synchronize the scene-specific changes, and finish with individual corrections.
If presets are new to you, read What Are Lightroom Presets?. You can also explore the Lightroom Settings Guide and the Lightroom preset recipe directory.
A practical batch workflow for a complete photo shoot
- Import and back up. Do not begin destructive file management before you have a second copy of the originals.
- Cull. Use flags, stars, or color labels to separate rejects, maybes, and deliverable frames.
- Group by scene and light. Collections, albums, filters, and capture-time sequences make this faster.
- Apply a base preset. Use an adaptable preset that does not force exposure or white balance unless your conditions are controlled.
- Edit one master per group. Make it representative, not merely your favorite composition.
- Sync safe global settings. Start with Modified and review the checkboxes.
- Normalize exposure and white balance. Work through smaller subgroups and compare neighboring frames.
- Review at grid size. Inconsistent color or brightness is easiest to spot when many thumbnails are visible together.
- Review priority files at 100%. Check focus, noise, masking edges, skin texture, and healing work.
- Export a small proof batch. Confirm dimensions, color space, sharpening, naming, and destination before exporting everything.
How to undo a batch edit?
If you notice the mistake immediately, use Undo. If you discover it later, select the affected photographs and reset only the incorrect setting group, or return to an earlier History state in Lightroom Classic. Because Lightroom edits are nondestructive, the original pixels remain untouched.
Be precise with Reset. Resetting an entire photo can remove useful work along with the mistake. When possible, restore only Exposure, Crop, White Balance, Masking, or whichever group was pasted incorrectly.
Common batch-editing problems and how to fix them
Every photo received the wrong exposure: You probably synchronized a fixed Exposure value across changing light. Select the affected images, reset only Exposure if appropriate, regroup them by lighting condition, and correct one smaller group at a time. In Lightroom Classic, try Match Total Exposures for a continuous sequence.
Only one photo changed in Lightroom Classic: Confirm that multiple Filmstrip thumbnails are selected and that the correct image is active. Sync applies the chosen settings to the selection. If the interface shows Previous instead, Lightroom sees only one selected photograph.]
The crop moved to the wrong place: The crop coordinates were copied from a photograph with a different composition. Undo the paste or reset Crop on the targets. Exclude Crop in future batches unless the camera and subject stayed fixed.
Skin tones became orange, green, or inconsistent: Fixed White Balance often causes this across mixed light. Separate daylight, shade, flash, and artificial-light frames. Correct Temp and Tint for each group, then evaluate the Orange and Red channels at moderate saturation, not only on a bright phone screen.
An AI mask missed the subject: Open the Masking panel, update or recreate the adaptive selection, then inspect the overlay. If only a few images fail, repair them individually. If most fail, remove Masking from the copied settings and use a gentler global adjustment.
Lightroom becomes slow while pasting to hundreds of files: Large RAW files, AI masks, Denoise, and cloud downloads require significant processing. Work in smaller batches, let previews finish, keep free storage available, and avoid stacking several large paste operations. On Classic, optimized previews and a healthy catalog/cache setup also help.
Final checklist
- Group photographs by scene, light, camera, and ISO when useful.
- Edit a representative master, not an unusual frame.
- Start with Modified settings and inspect the list.
- Exclude fixed Exposure, White Balance, Crop, Remove, and masks unless the batch truly matches.
- Turn Auto Sync off before making a one-photo correction.
- Inspect the grid for consistency and key files at 100%.
- Export a small test before processing the complete delivery.
Batch editing is not about making every photograph identical. It is about removing repeated work so you can spend your attention where it matters: expression, composition, skin tone, local corrections, and the story of the final set.
Edit one strong master, copy only what belongs to the group, and always complete the loop with a human review. That is how batch editing becomes both faster and better.