Hey there, photography enthusiasts! So, you’ve bought some killer Lightroom presets that promise to make your photos pop like they’re straight out of a Vogue spread, and now you’re wondering, “Okay, but how the heck do I install these things?” Don’t worry; I’ve got your back! I’m going to walk you through the process step-by-step-whether you’re on an iPhone, Android, Mac, or Windows (Lightroom Classic or CC), we’re covering it all. Think of this as a cozy chat between friends where I share all the secrets. Ready? Let’s begin!
How to Install Lightroom Presets: Your Ultimate Step-by-Step Guide for Every Device!
Presets are like magic buttons that take your shots from “Aghhh” to wow with just one click. But then you realize you don’t actually know how to install them? Yup, I’ve been there. Let’s start!
1. Installing Lightroom Presets on Android
Alright, iPhone users, let’s get you set up first. Lightroom Mobile has become a lifesaver for editing on the go, but installing presets can feel a bit like a maze. Don’t worry, though-I’m here to be your guide!
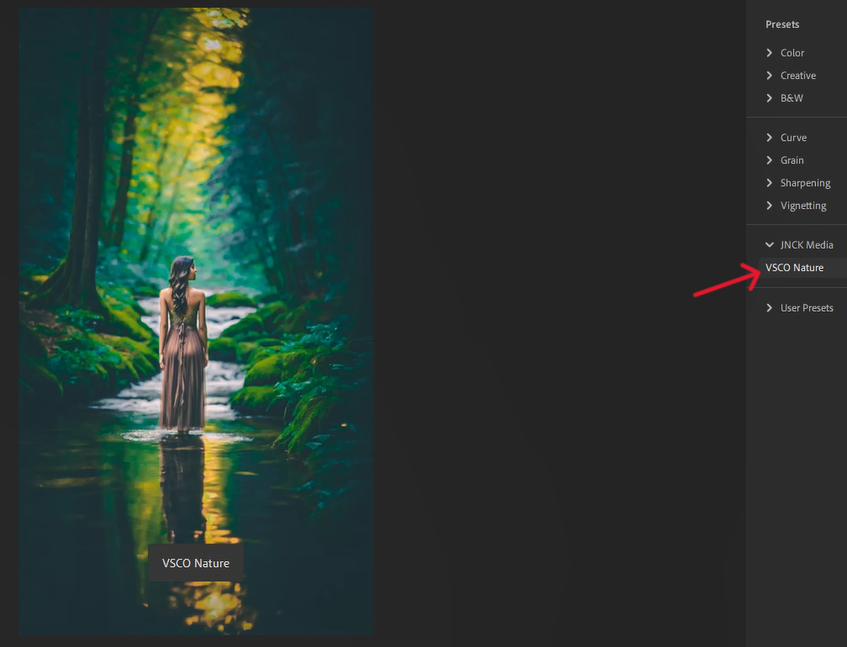
Simple Process: Presets Show By Folder In Lightroom

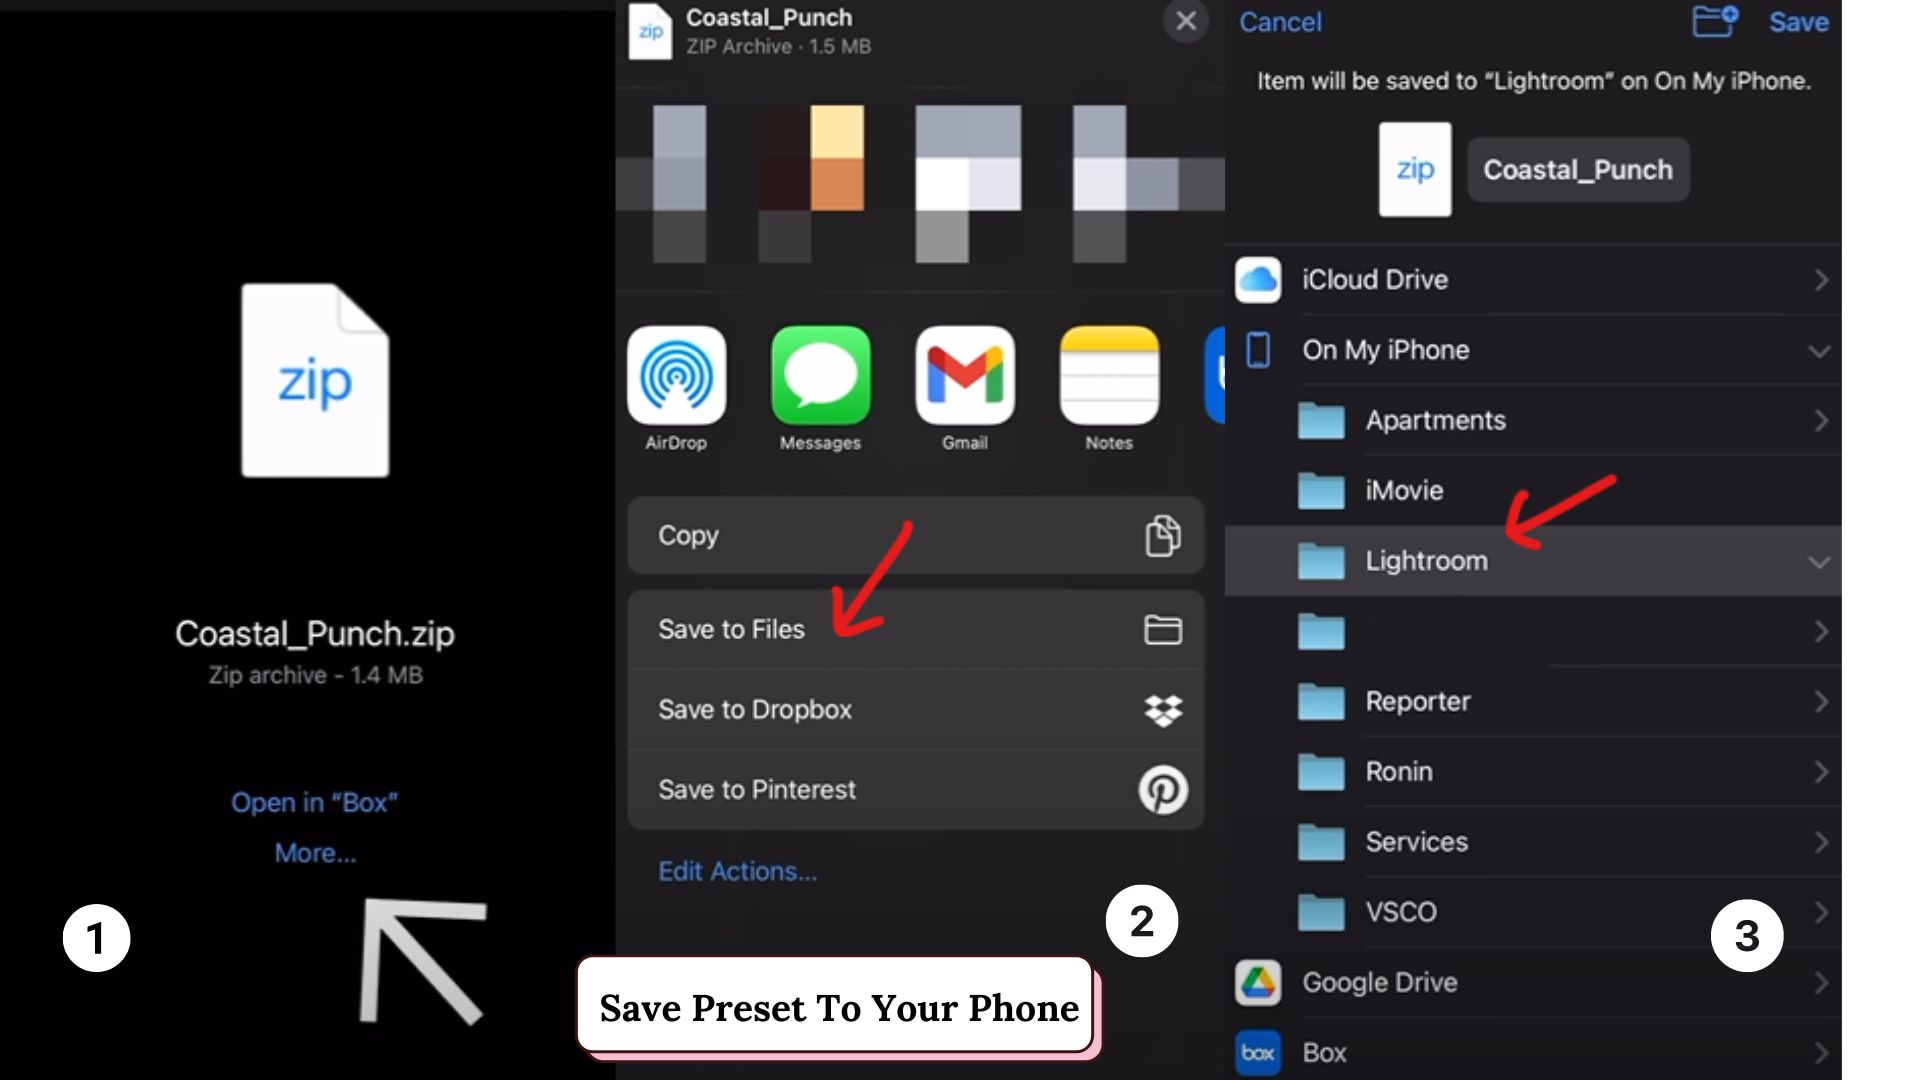
Step 1: Download and Unzip Your Presets (Save Preset)
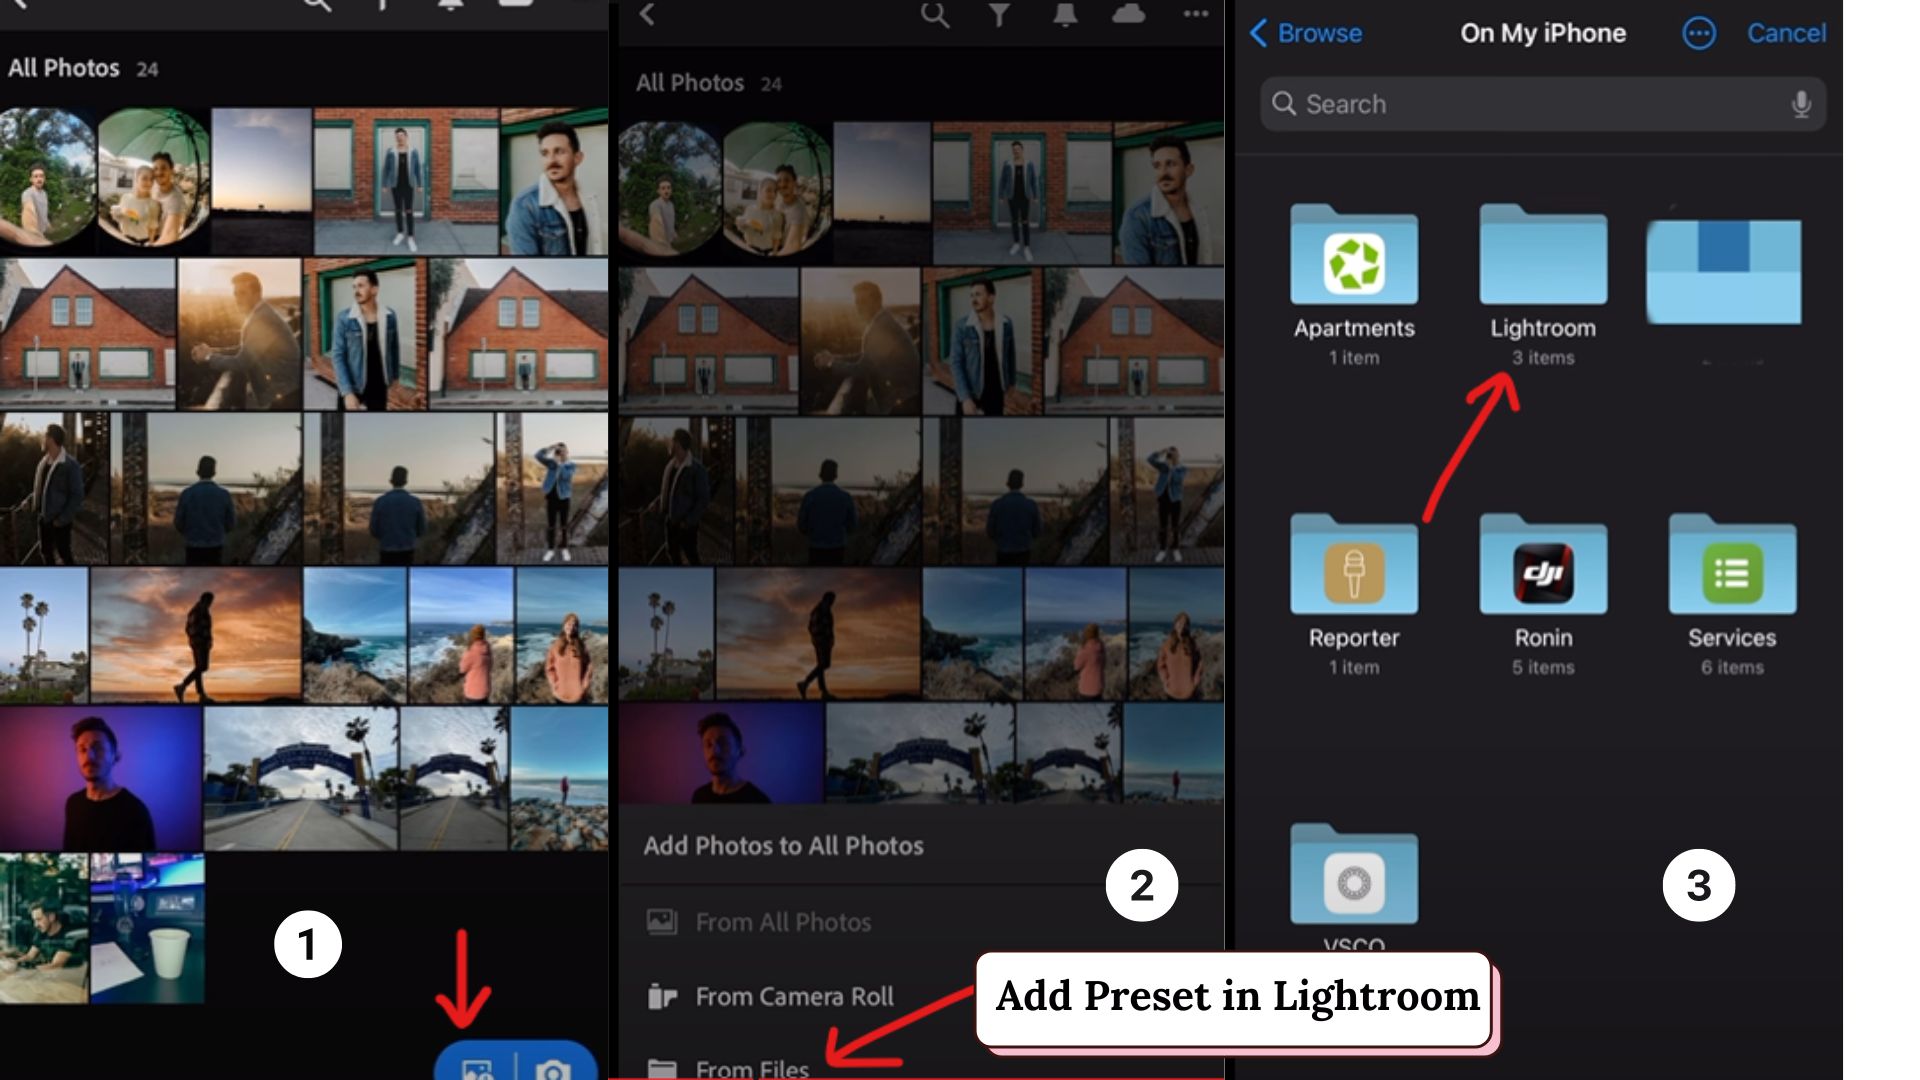
First things first, download the presets to your iPhone. Usually, they come as a ZIP file. Don’t panic if you’re thinking, “ZIP file on an iPhone? Really?” Yes, really! Luckily, iPhones now have built-in functionality to unzip files.
- Download the ZIP file from your email or the website where you purchased the presets.
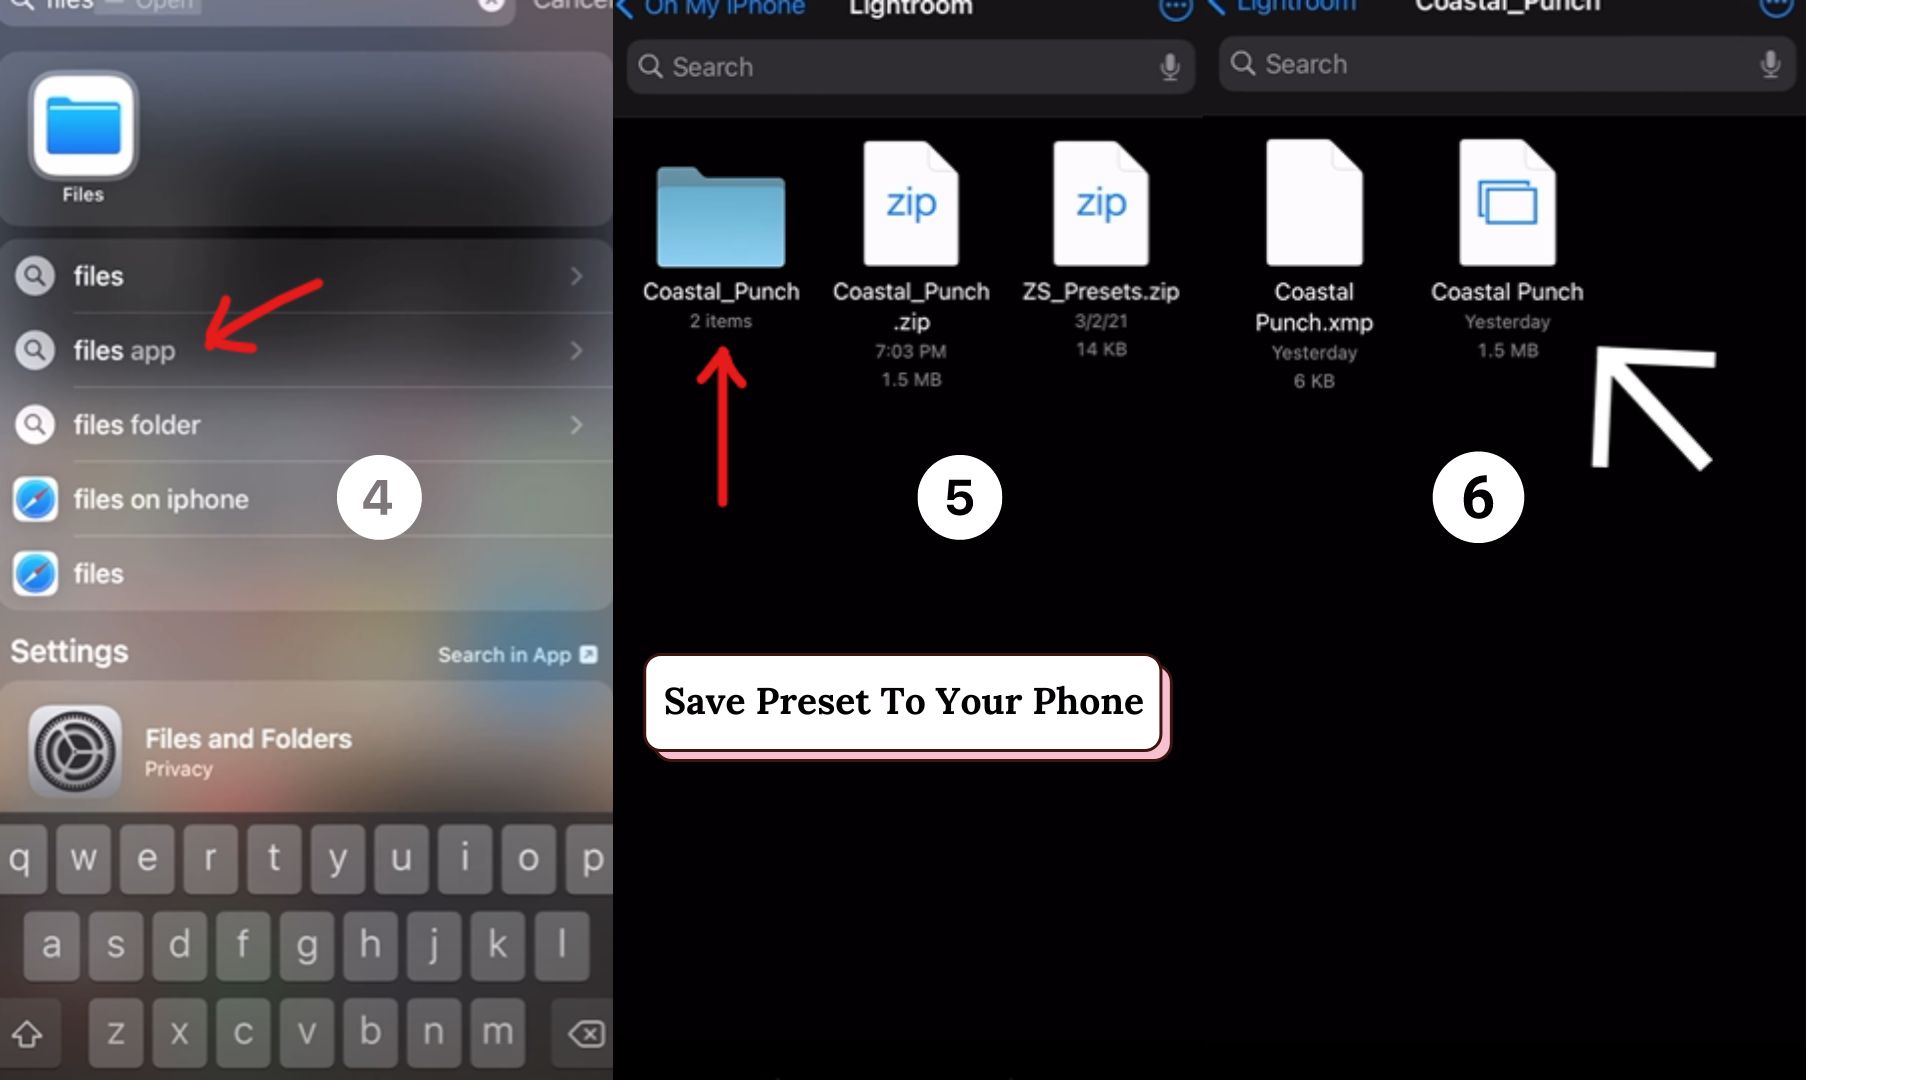
- Tap on the file, and it should open in the “Files” app. Tap on it again, and voilà! It unzips into a neat little folder.
Step 2: Open Lightroom Mobile (Adding Preset Into Lightroom)
Now, let’s open up Lightroom Mobile. If you haven’t already installed it, you can download it from the App Store. Go ahead; I’ll wait… Done? Great! Open it up and create a new album. Let’s call it “Presets” for simplicity. Creative, right? 😂
Step 3: Import the Presets into Lightroom
Time for some action!
- Open the folder where you unzipped your presets.
You’ll see files with a “.DNG” extension. These are the heroes of our story! Select all the DNG files (hold and drag to select if there are a bunch), and tap “Share.”
- Choose “Lightroom” from the sharing options. They’ll pop into your new “Presets” album.
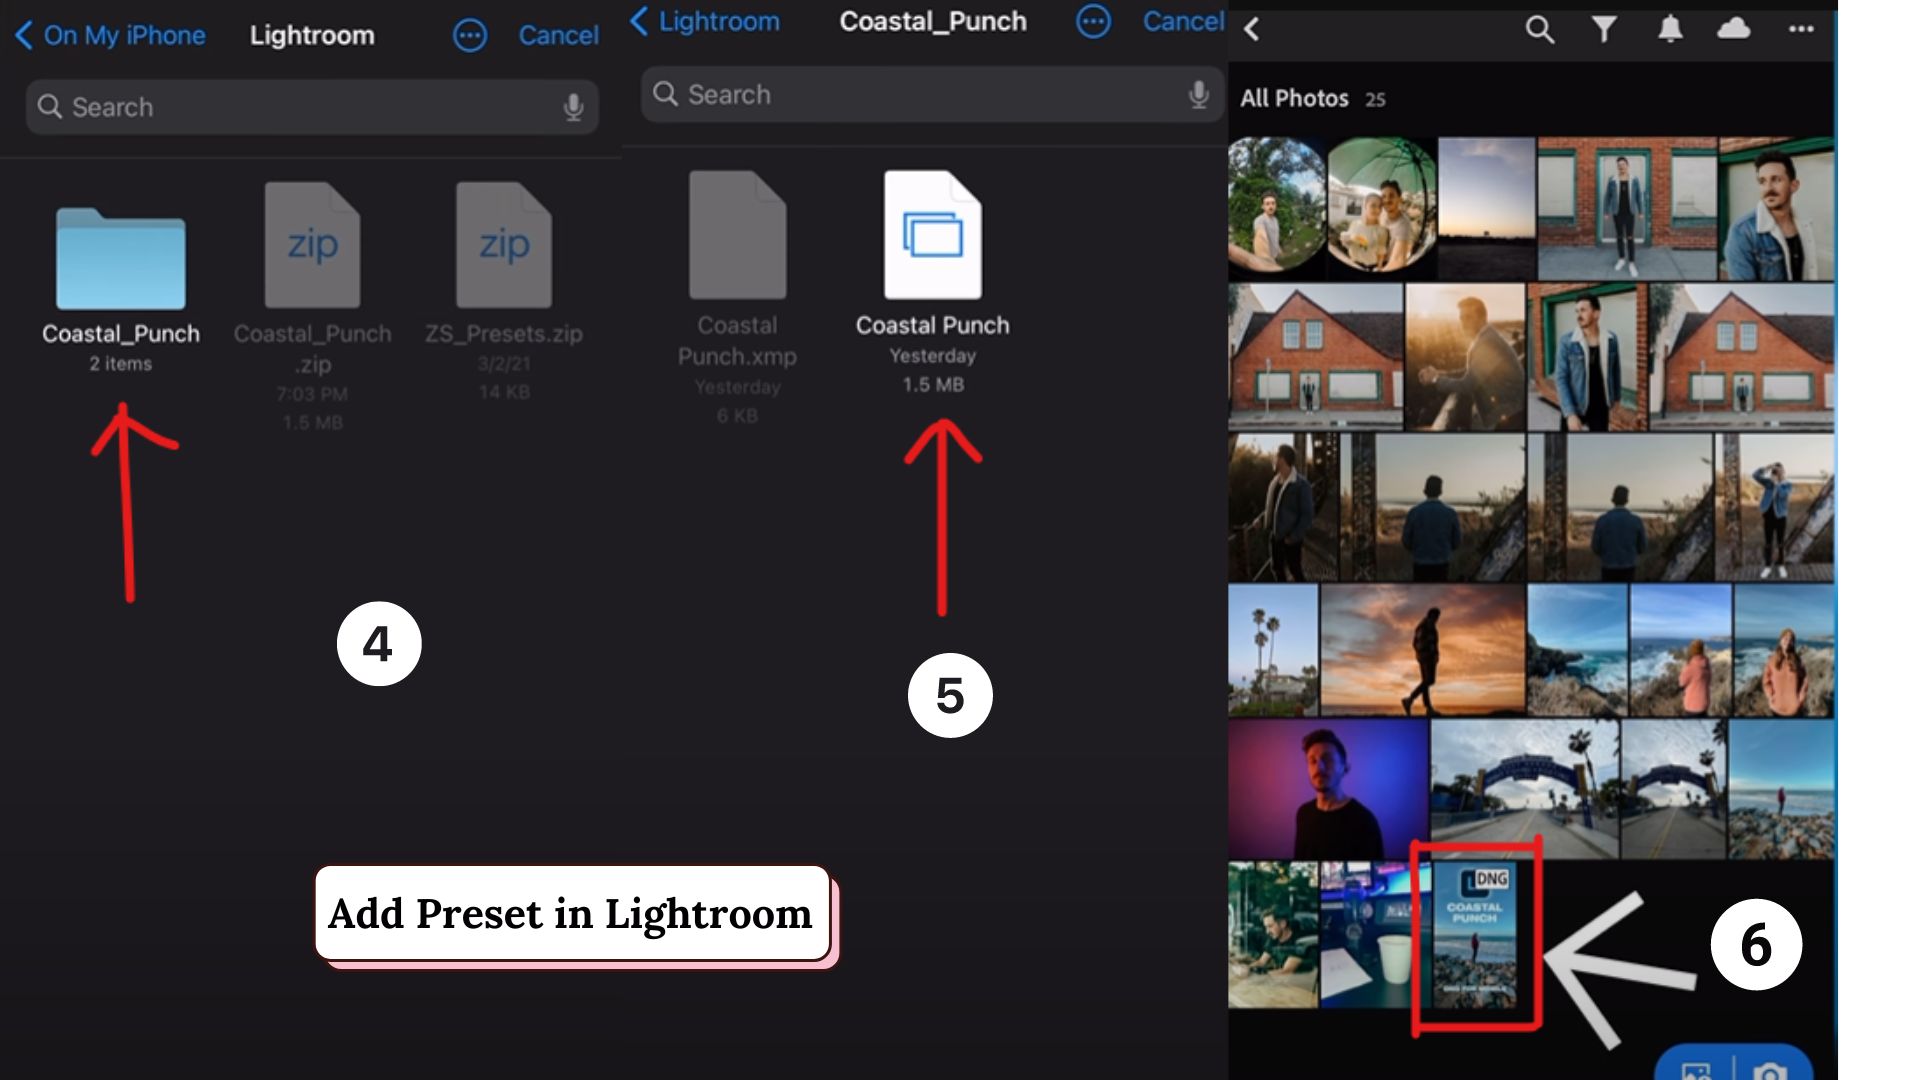
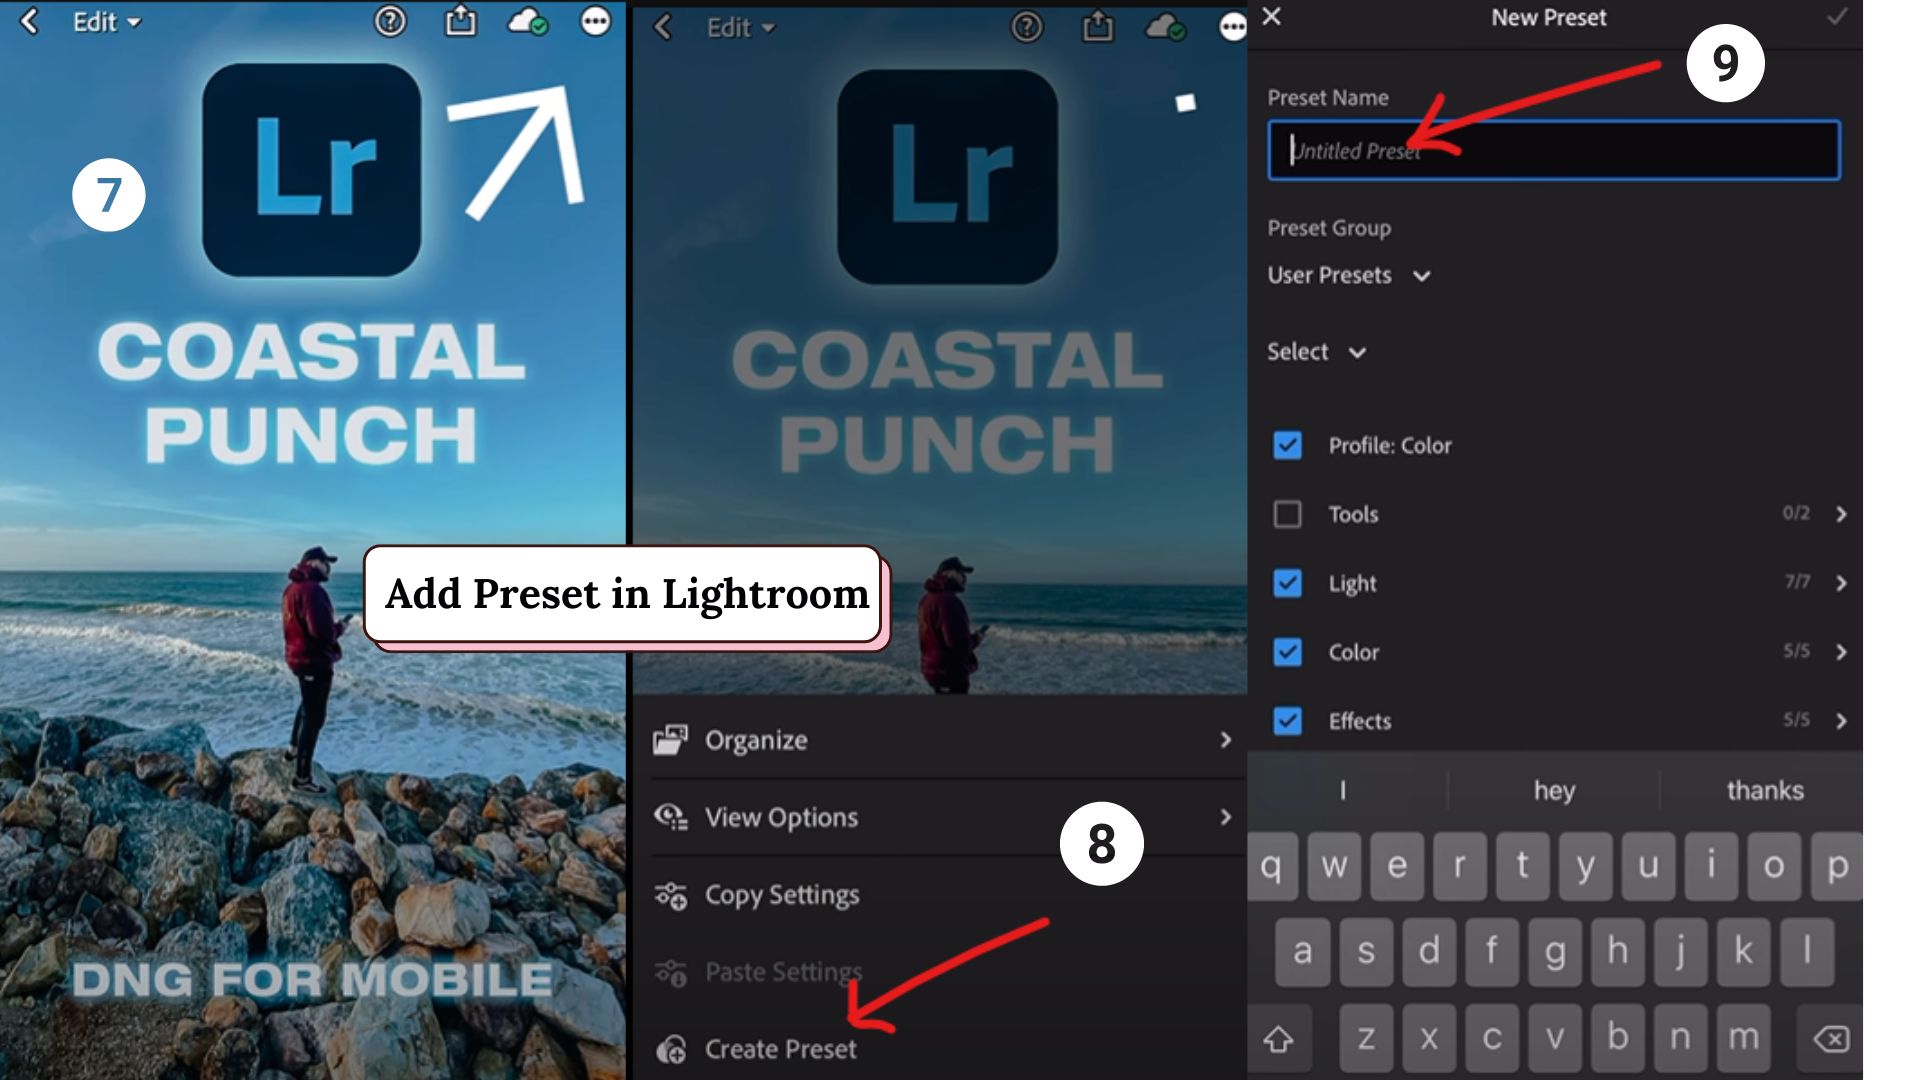
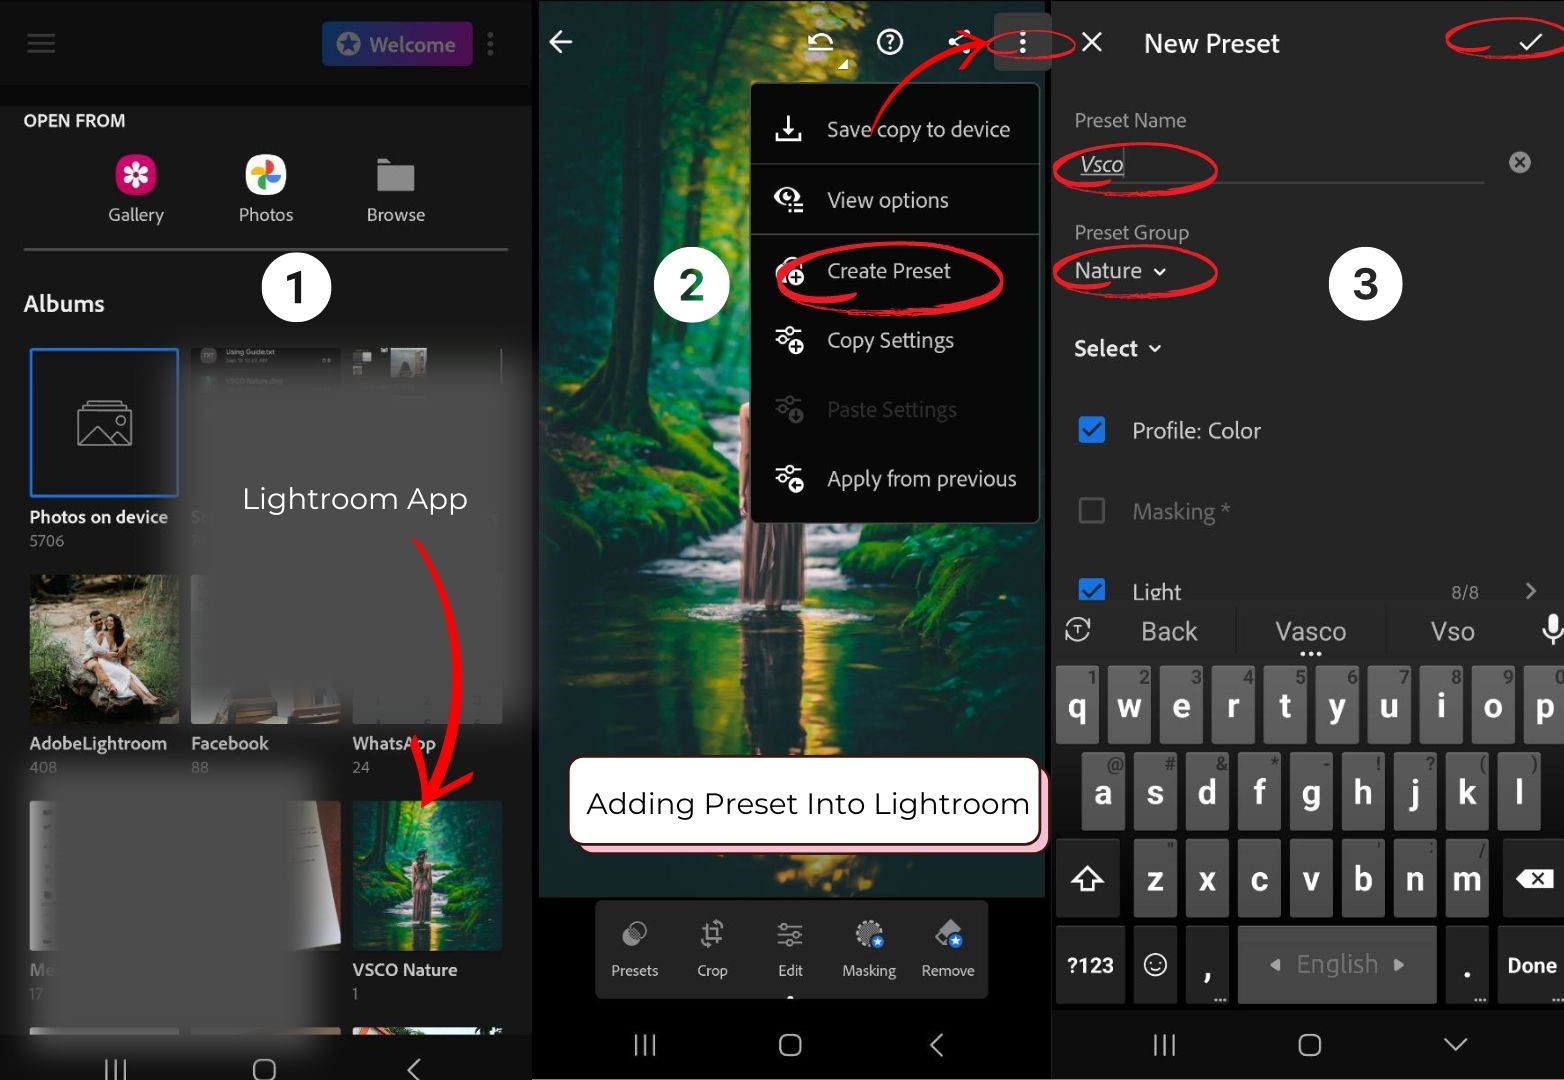
Step 4: Create Presets from DNG Files
Now, we’re almost there-hold tight!
- Open one of the DNG files in Lightroom. You’ll see a photo with some wild edits already applied. That’s your preset, right there!
Tap the three dots in the top right corner, then select “Create Preset.” - Give it a catchy name, like “Dreamy Sunsets” or “Moody Monday Blues” (or just stick with the original name, whatever floats your boat!). You can also add it to a group, like “User Presets,” for easy access later.
- Repeat for each DNG file, and ta-da! You’ve got yourself some shiny new presets in Lightroom Mobile.
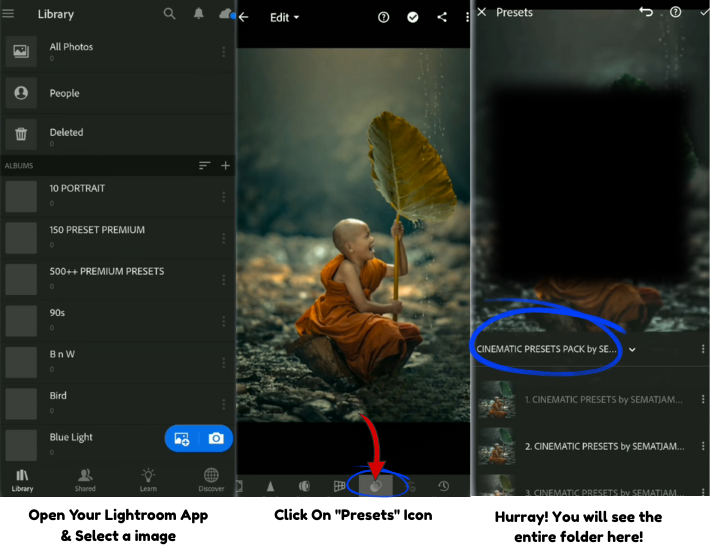
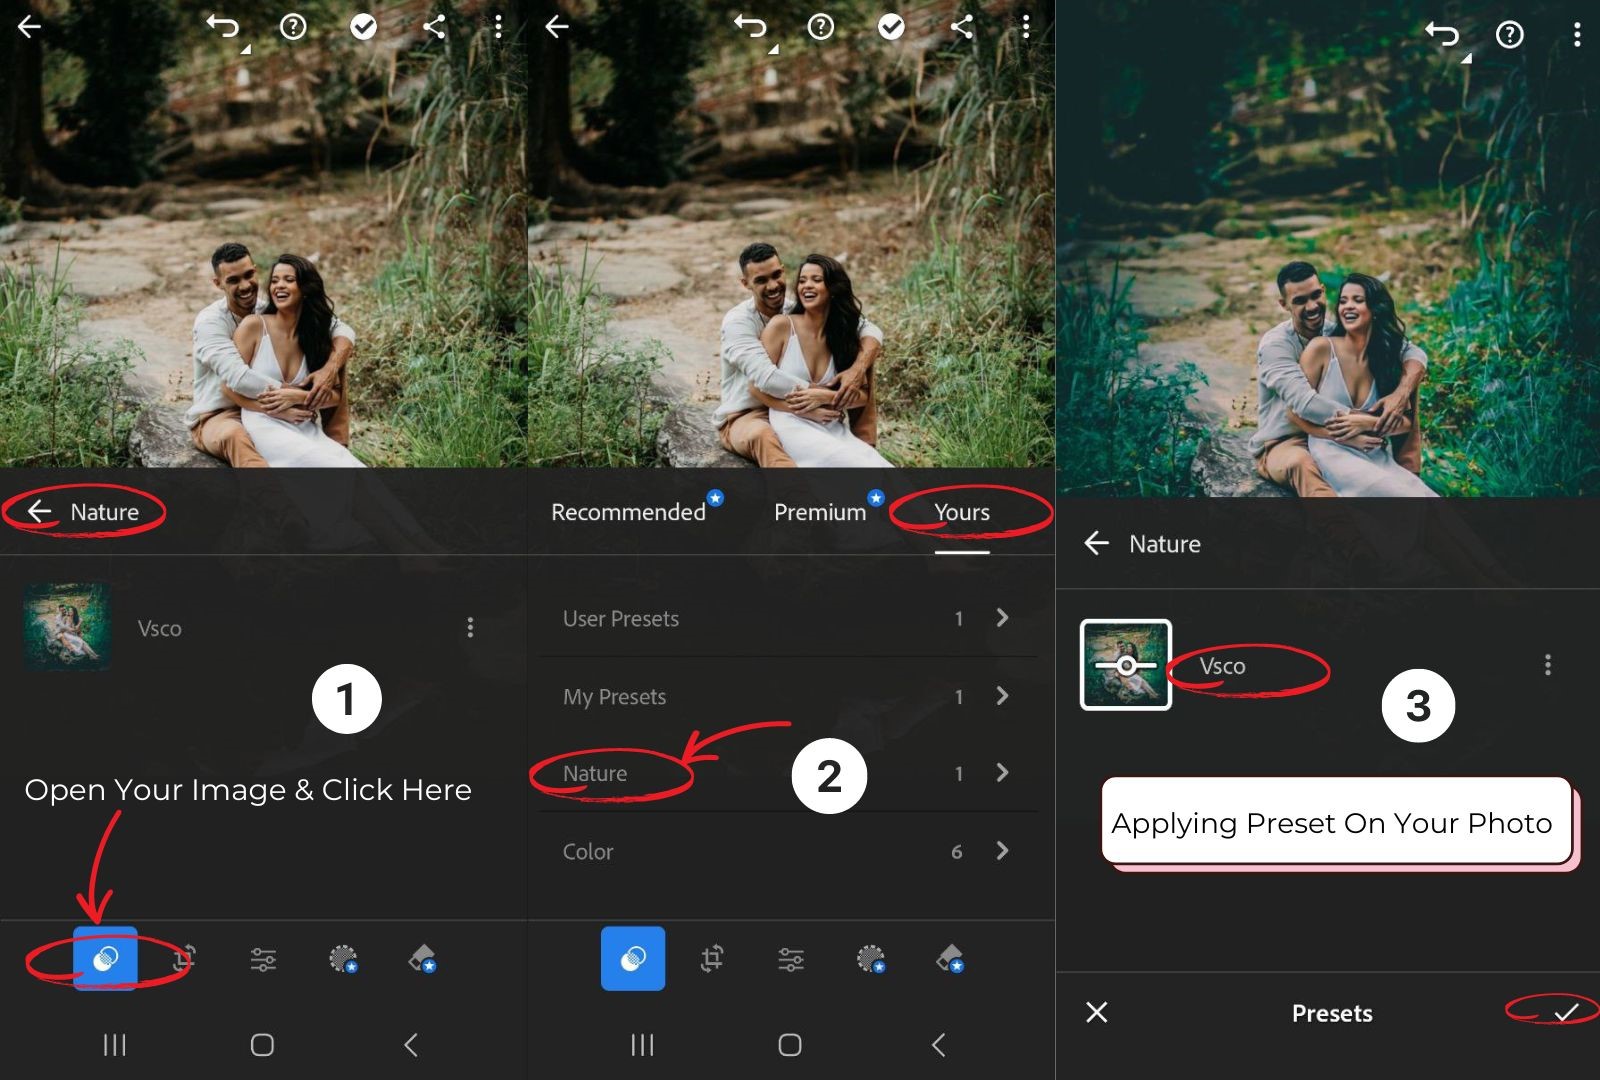
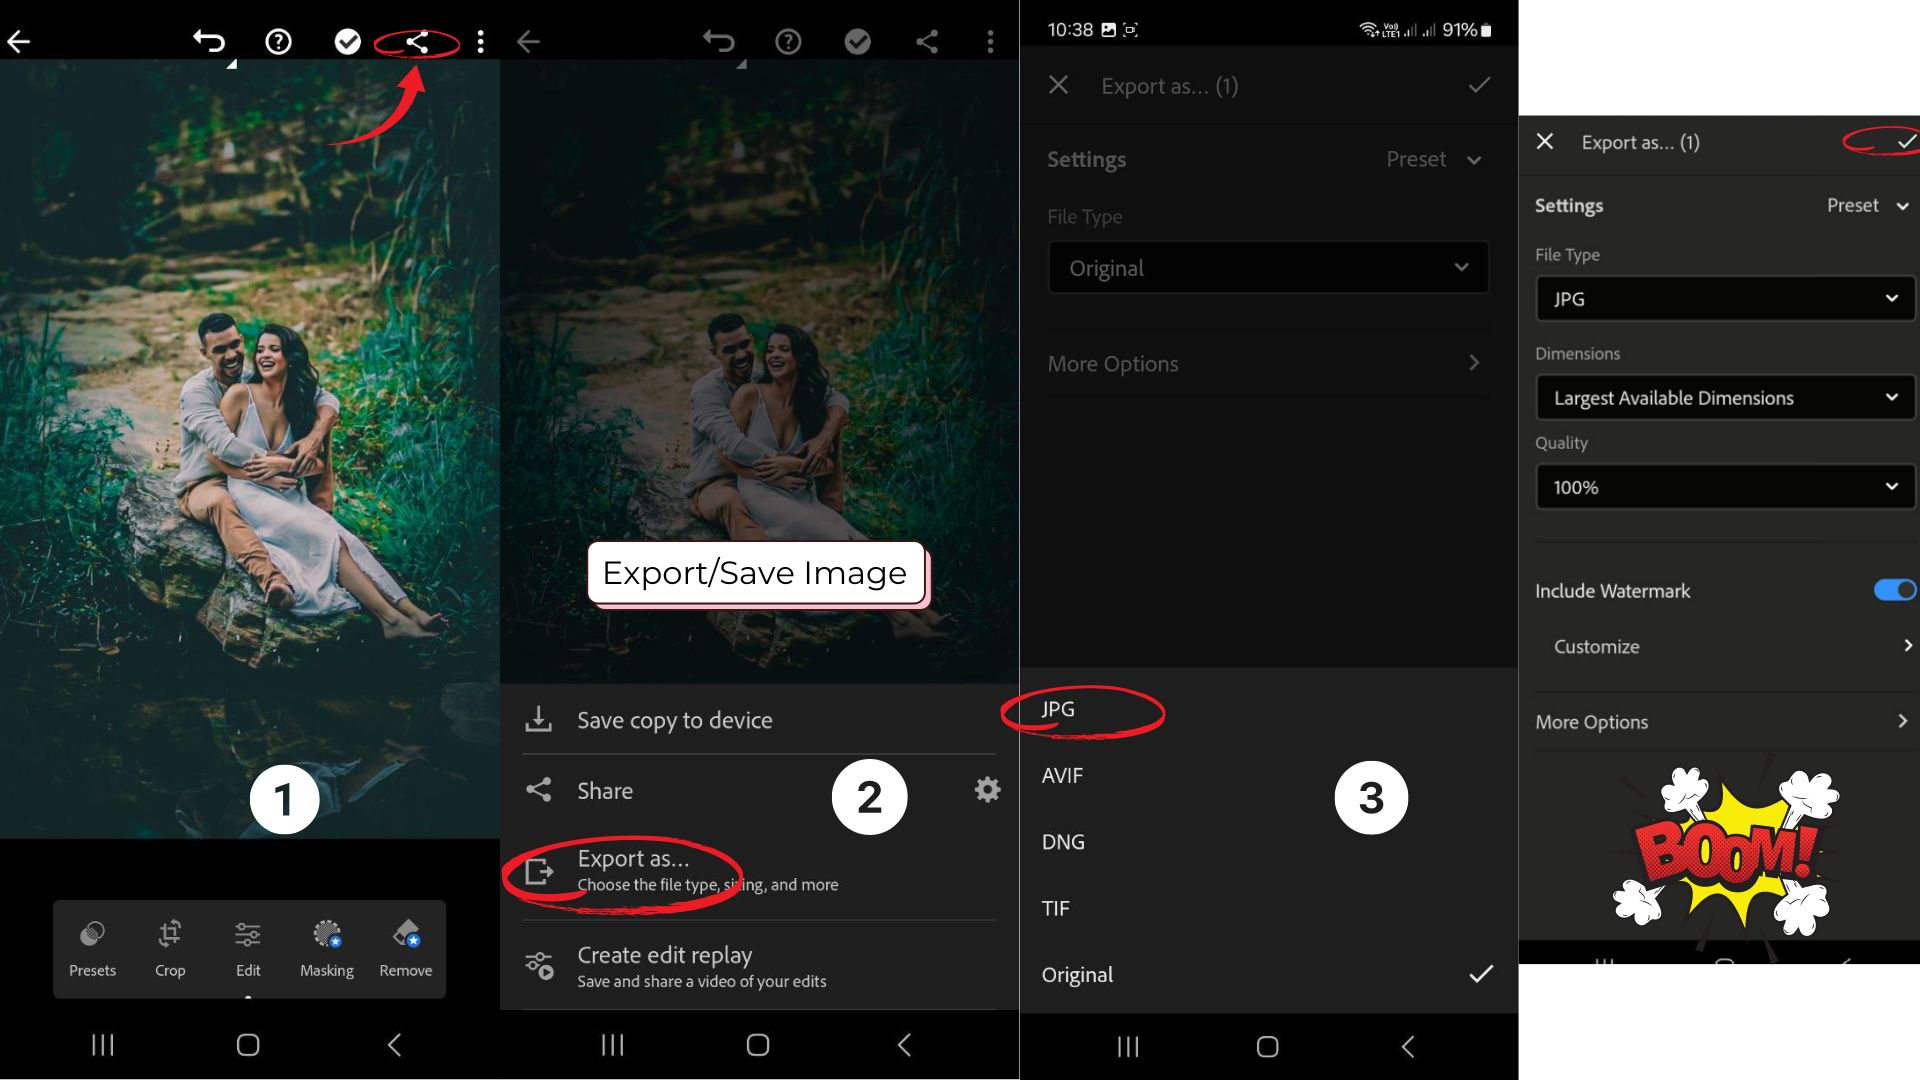
Step 5: Applying Presets to Your Photo & Export/Save
It’s time to see the magic!
- Open an image that you want to apply the preset to.
- Click the “presets” icon.
- Select the preset that you created previously.
- Apply & Boom!
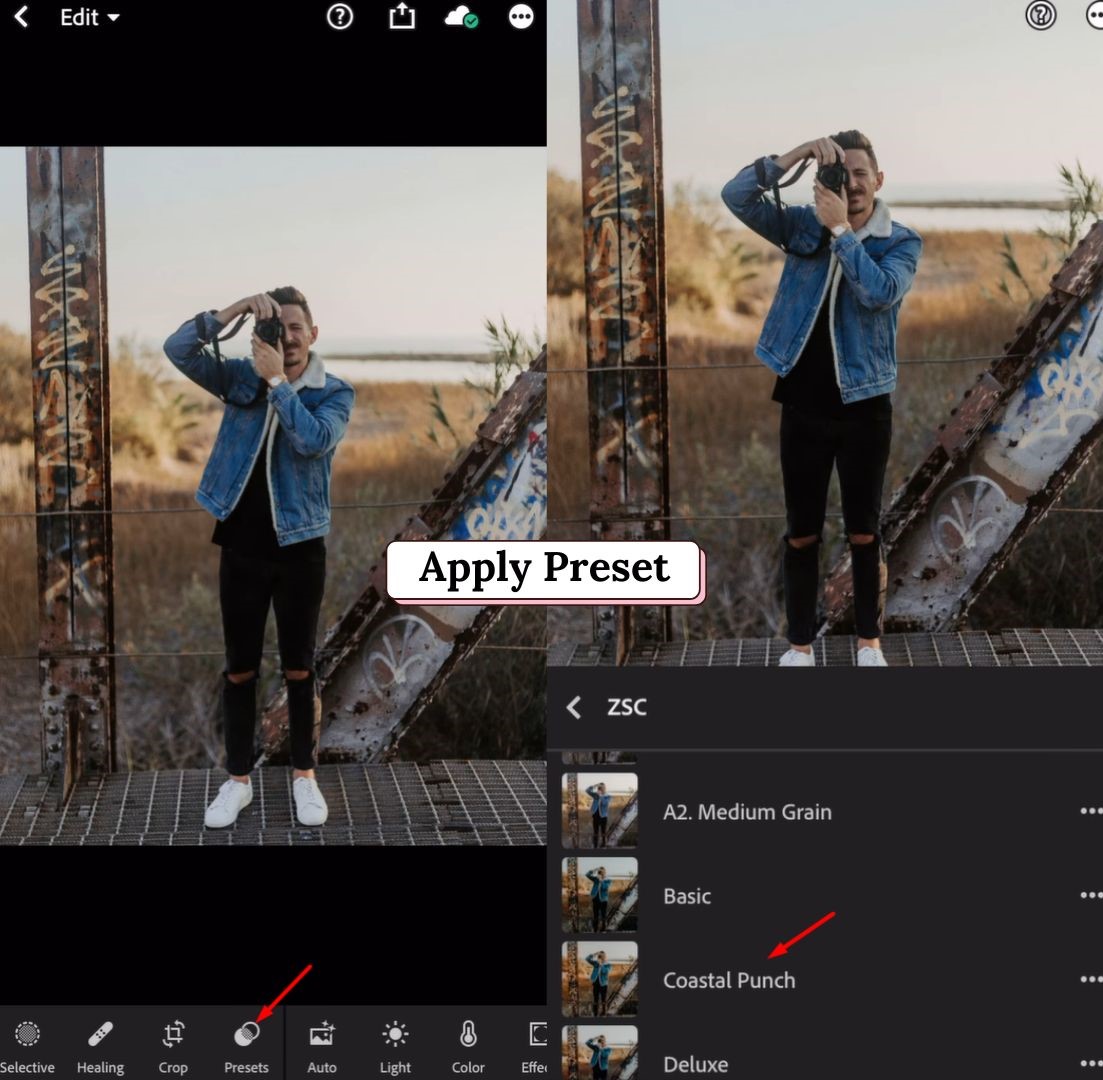
To Export or Save click the ”3-dot icon” on right corner and select JPG. Give a name and save! Yahoo!!
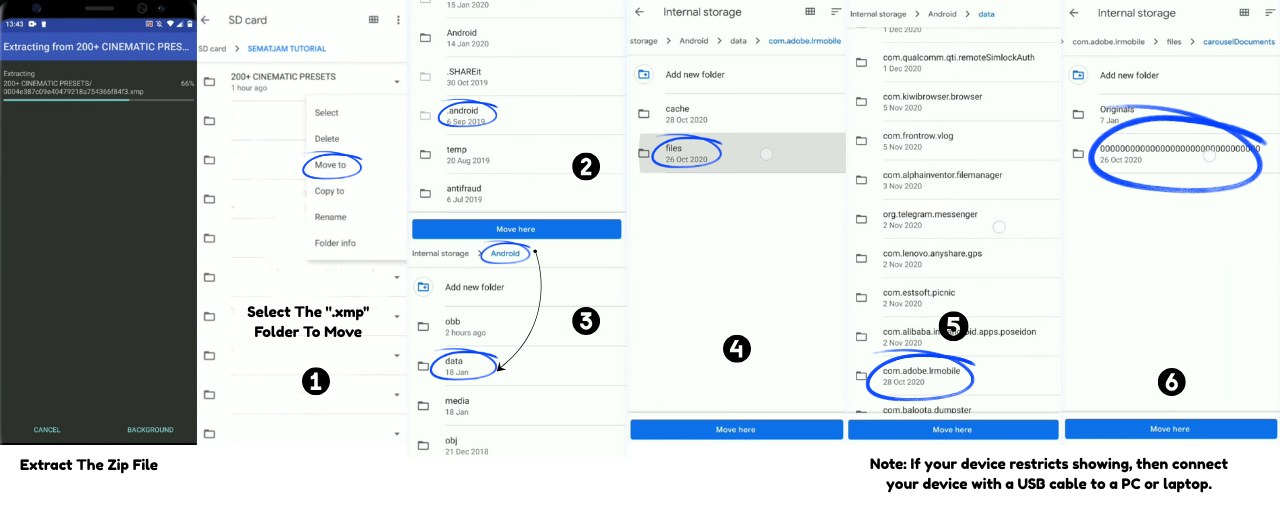
2. Installing Lightroom Presets on Android
Alright, Android gang, your turn! Installing presets on Android is pretty similar to the iPhone process, but there are a few tweaks. Let’s jump right in!
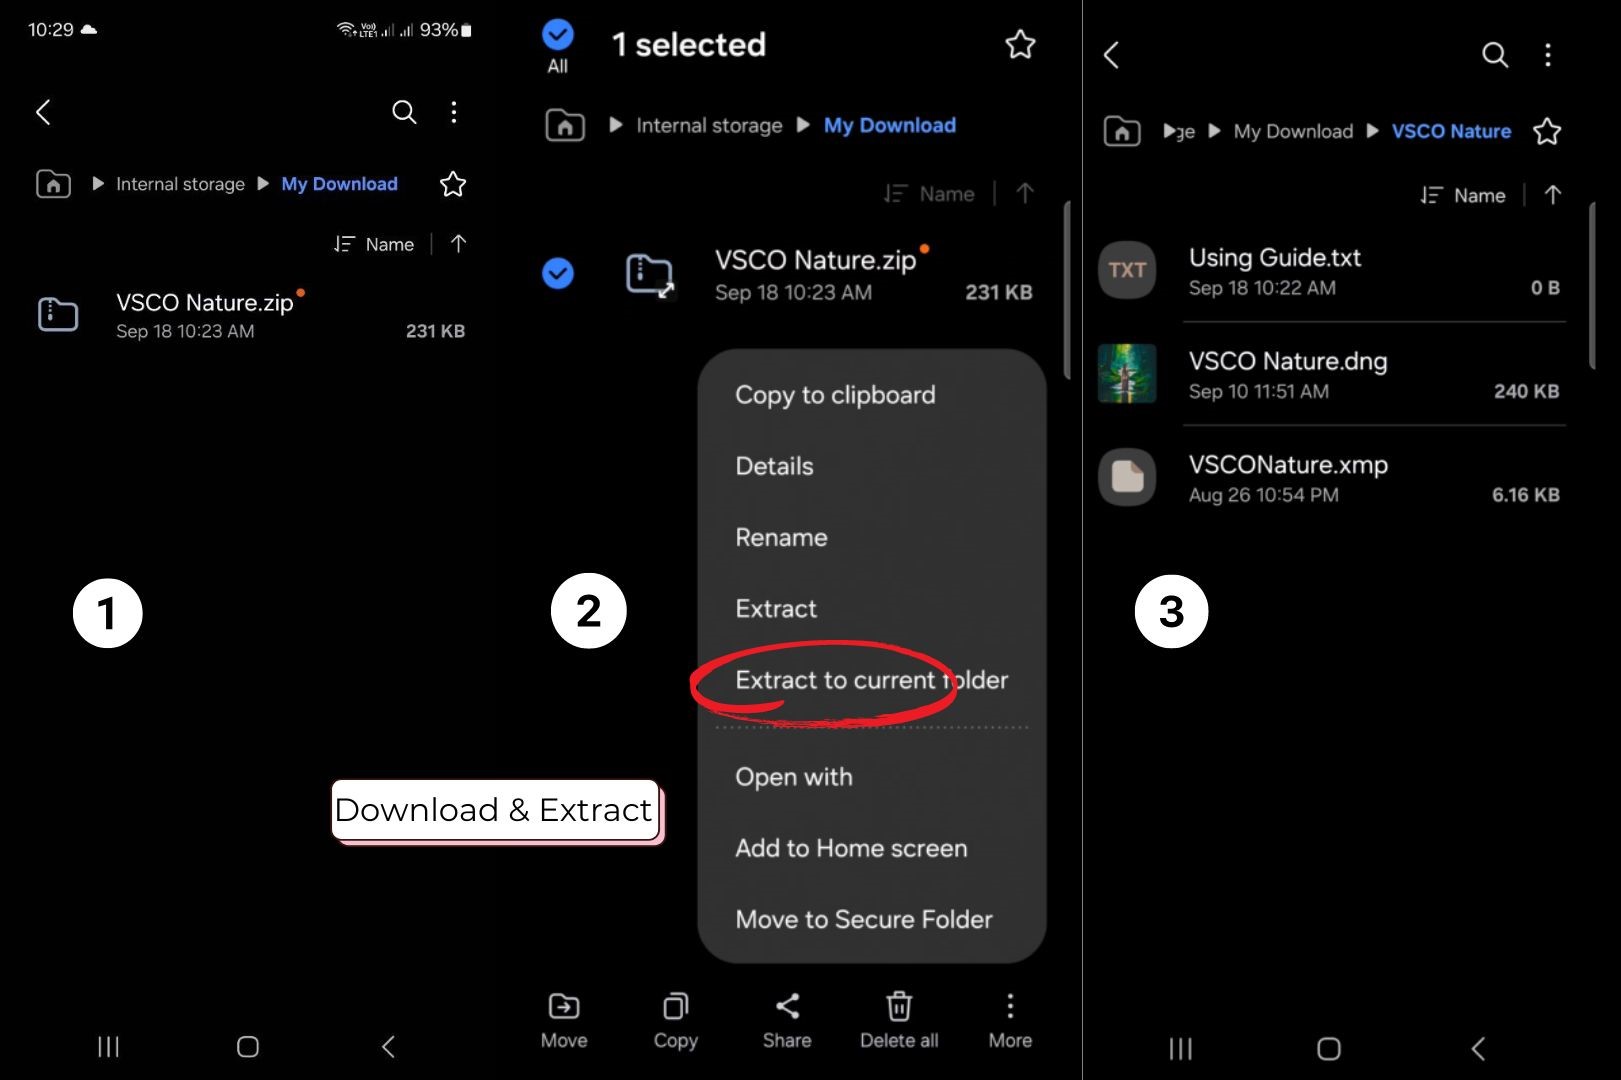
Step 1: Download and Extract Your Presets
- Download the ZIP file with your presets. It should land in your “Downloads” folder.
- Head over to your favorite file manager app (Files by Google, ES File Explorer, etc.) and find that ZIP file.
- Tap on it and select “Extract” or “Unzip.” Boom! The presets are now in a nice, accessible folder.
Step 2: Open Lightroom Mobile and Create a New Album
Open Lightroom Android App and create a new album. Let’s keep it simple and call it “Presets” (yep, sticking with the classics). 🌟
Step 3: Import the Presets (DNG Files)
Now, for the fun part!
- Go to the folder with your extracted presets. You’ll see those beautiful DNG files again-tap and hold to select them.
- Tap “Share” and choose “Lightroom” as your destination. Now, your DNG files are chilling in the “Presets” album.
Step 4: Save Presets in Lightroom Mobile
- Open a DNG file. Tap on the three-dot menu in the top right corner, then select “Create Preset.”
- Give your preset a name that makes you smile and save it in your chosen preset group.
Repeat for each DNG file. And just like that, you’re ready to start editing like a pro!
Step 5: Applying Presets to Your Photo & Export/Save
It’s time to see the magic!
- Open an image that you want to apply the preset to.
- Click the “presets” icon.
- Select the preset that you created previously.
- Apply!
To Export or Save click the ”3-dot icon” on right corner and select JPG. Give a name and save! Boom!!
3. Installing Lightroom Presets on Mac (Lightroom Classic and Lightroom CC)
Alright, Mac lovers, you’ve been waiting patiently, and now it’s your time to shine. Whether you’re using Lightroom Classic or the newer Lightroom CC, I’ve got step-by-step guides for both.
For Lightroom Classic Users:
Lightroom Classic is the OG, and it’s perfect if you’re looking for more advanced editing tools. Let’s make those presets happen!
Step 1: Download and Unzip Presets
Download the ZIP file containing your presets.
Find it in your “Downloads” folder, double-click, and it will unzip automatically. You’ll see a folder with “.XMP” files-that’s what we’re looking for!
Step 2: Open Lightroom Classic and Import Presets
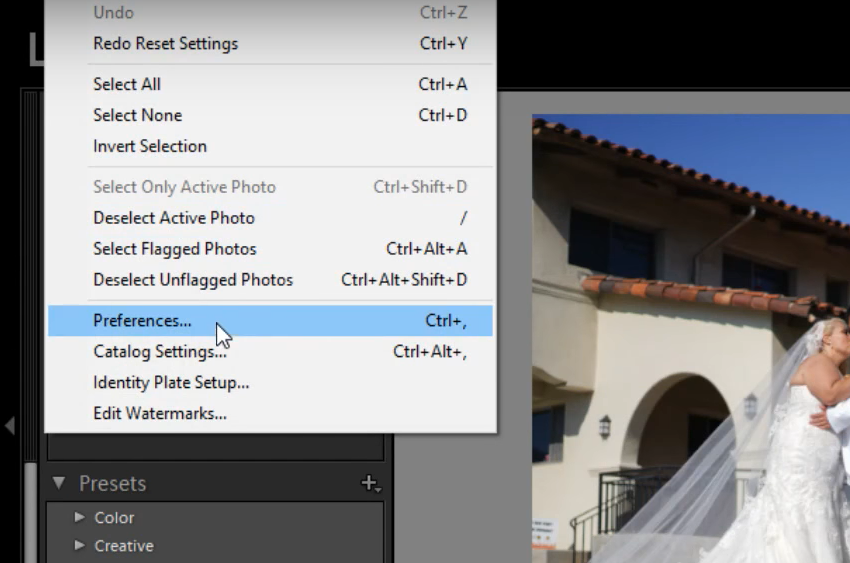
- Fire up Lightroom Classic (ah, the comforting click of the app opening). Go to the “Develop” module.
- Look over to the left panel and find the “Presets” section. Right-click (or Control + Click) and select “Import.”
Step 3: Import and Organize
- Go to the folder where you unzipped the “.XMP” files. Select them and click “Import.”
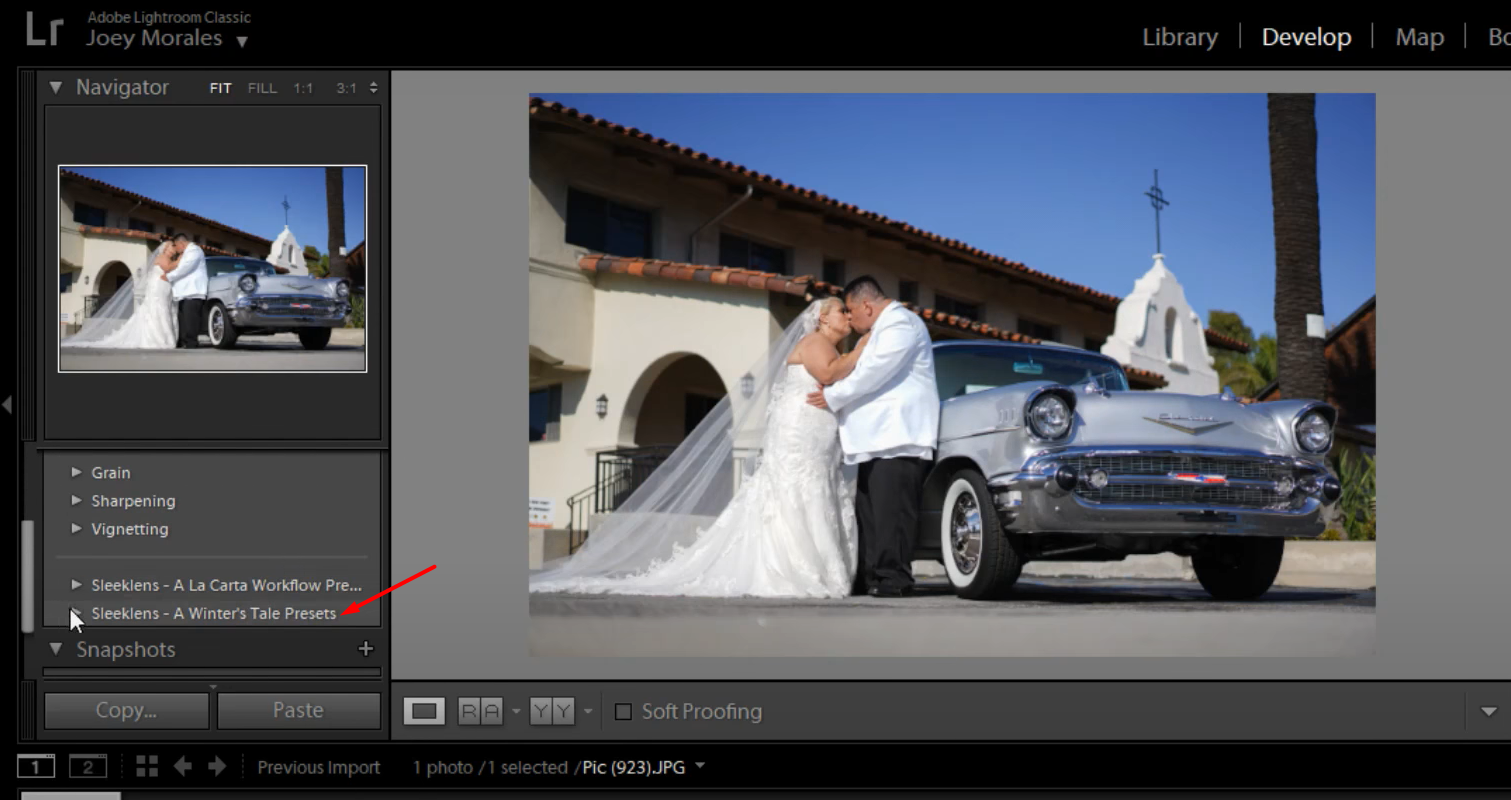
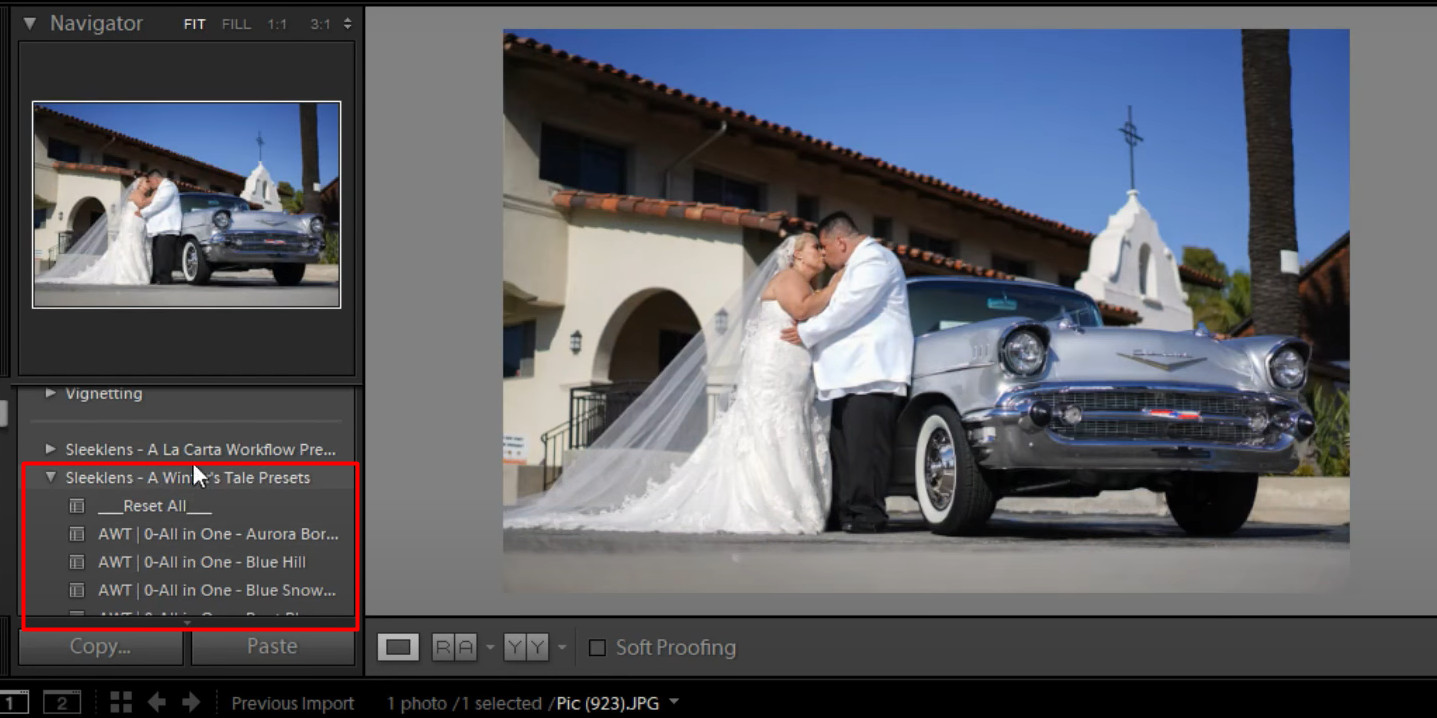
- Boom! Your presets are now in the “Presets” panel, ready to be used on any photo. Go ahead, try them out on a landscape shot or a portrait.
Trust me; it’ll be like a breath of fresh air!
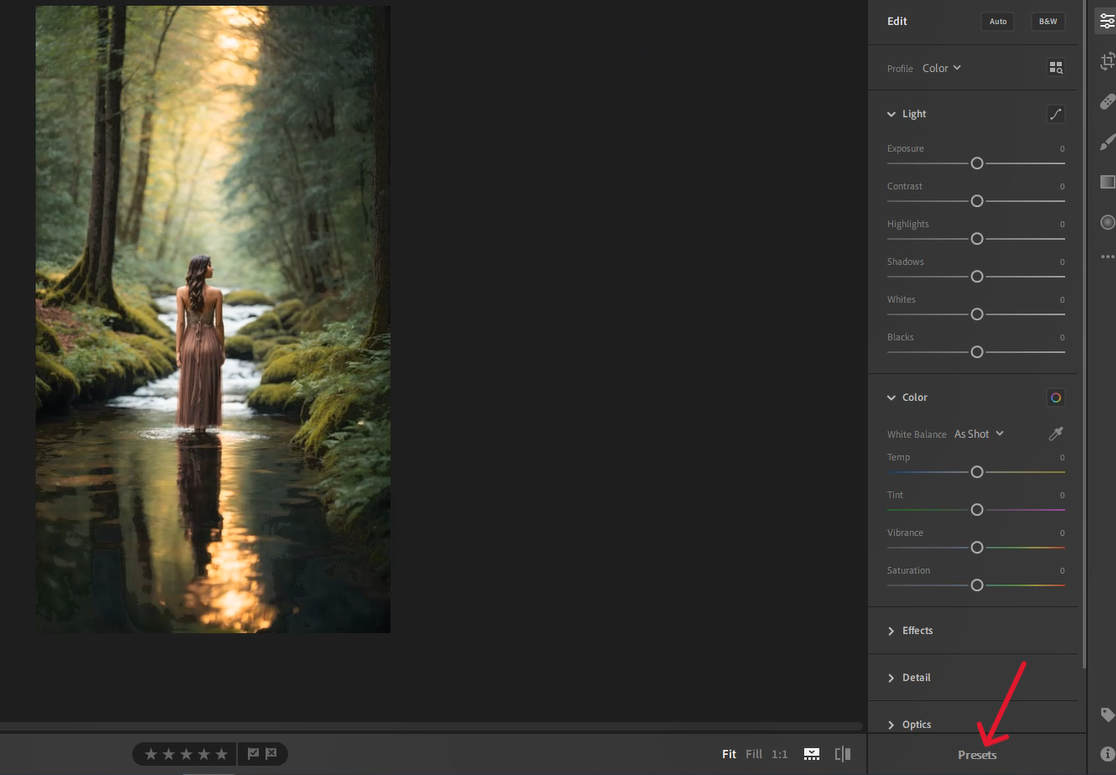
For Lightroom CC Users:
Lightroom CC is sleek, modern, and perfect for cloud editing. Let’s get those presets in there!
Step 1: Download and Unzip Presets
Download the ZIP file and unzip it by double-clicking. Easy peasy. 🍋
Step 2: Open Lightroom CC and Import Presets
Open Lightroom CC and navigate to the “Presets” button (you’ll see it at the bottom right when you’re in the “Edit” module).
Click on the three dots next to “Presets” and choose “Import Presets.”
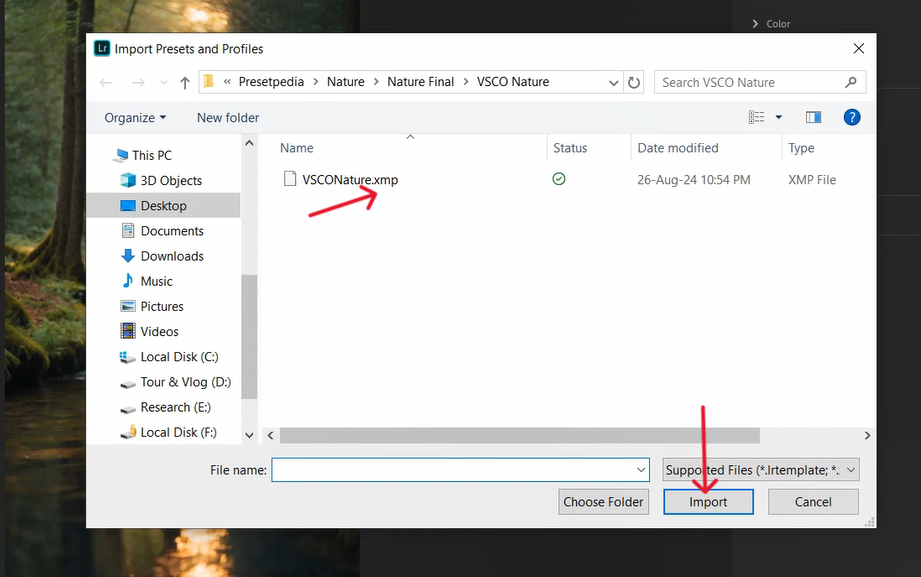
Step 3: Select and Import
Find your unzipped folder of presets (those lovely “.XMP” files) and select them. Click “Import,” and like magic, your presets are ready to use!


4. Installing Lightroom Presets on Windows (Lightroom Classic and Lightroom CC)
Windows friends, I haven’t forgotten about you! Let’s walk through installing presets on Lightroom Classic and CC on Windows.
For Lightroom Classic Users:
We’re keeping it classic-let’s do this!
Step 1: Download and Unzip Presets
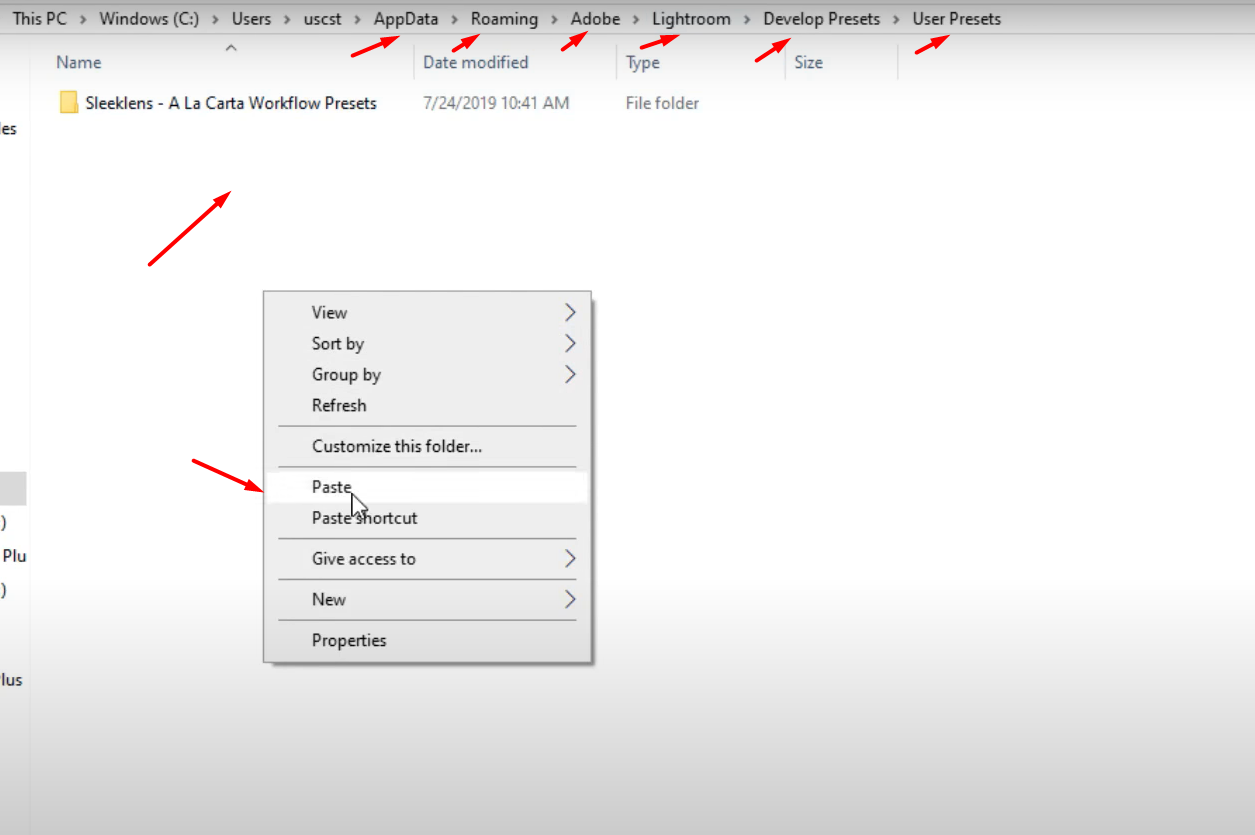
Download the ZIP file and unzip it. Find it in your “Downloads” folder, right-click, and select “Extract All.” Now you’ve got your folder of “.XMP” files ready to go!
Step 2: Open Lightroom Classic and Import Presets
Open up Lightroom Classic and head over to the “Develop” module.
In the left panel, right-click on “Presets” and select “Import.”
Step 3: Select Your Presets and Import
Go to where your “.XMP” files are and select them. Click “Import,” and ta-da! Your presets are now in Lightroom, waiting to work their magic on your photos.
For Lightroom CC Users:
Lightroom CC is great for editing on the go. Let’s get those presets set up!
Step 1: Download and Unzip Presets
Download and unzip the presets just like before. Easy, right?
Step 2: Open Lightroom CC and Import Presets
Open Lightroom CC, and click on the “Edit” button. Then, click on “Presets” at the bottom.
Hit the three dots next to “Presets” and select “Import Presets.”
Step 3: Import and Start Editing!
Go to your unzipped folder of presets, select the “.XMP” files, and click “Import.” They’re now part of your Lightroom CC arsenal, ready to make your photos shine!
Wrapping It Up
Whew, we made it! You’re officially a Lightroom preset-installing pro. Whether you’re on your phone, tablet, or desktop, you can now quickly bring your photos to life with just a few clicks (or taps!). Go ahead and start playing around with those presets-don’t be shy, your Instagram feed is about to look fire.
Got any questions or need a little more help? Drop me a comment or shoot me a message-I’ve got your back! Now, go out there and make your photos shine like the true masterpieces they are. Happy editing!
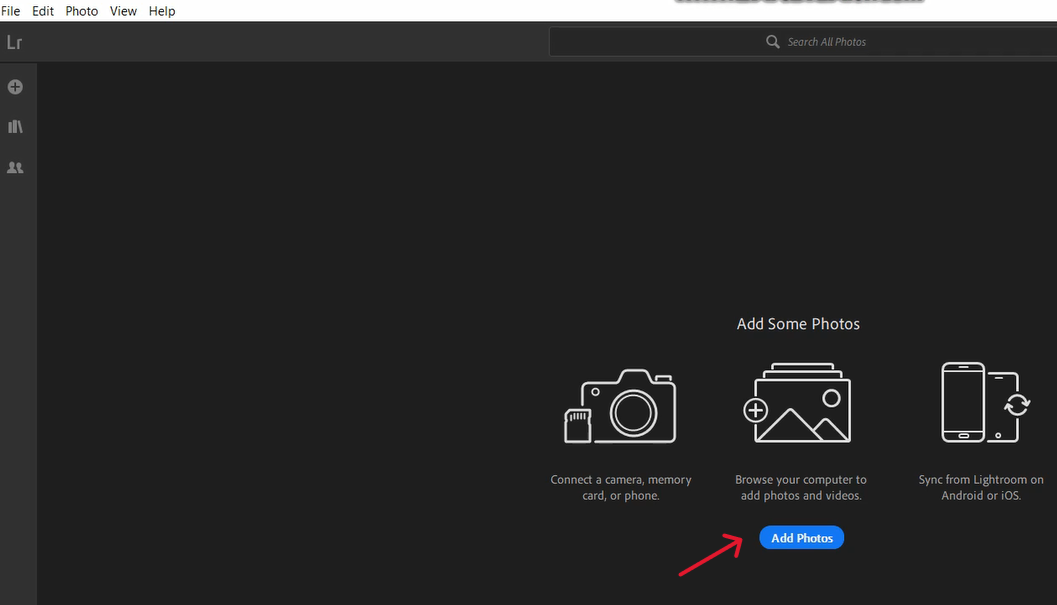
Free Lightroom Tutorial Download: Zip Download
- Lightroom A TO Z Tutorial.
- Lightroom CC Missing FAQ by Victoria Bampton.
- Lightroom Complete Guide For Photographers.
- Lightroom-Mobile Tutorial.
Check more: